Private Cloud: Creating IPsec VPN connection
This article explains how to create an IPsec VPN connection in IONOS Cloud Panel to ensure a stable and secure connection to your Private Cloud and the vSphere management network.
OpenVPN is used by default for the connection to the vSphere management network of Private Cloud, which only allows one end device connection at a time. Alternatively, you can create an IPsec VPN connection in the Cloud Panel to establish a connection to vSphere. The IPsec VPN service integrated in Cloud Panel uses an automatically provided VyOS backend gateway. This makes it possible to establish one or more IPsec connections to different endpoints. To create an IPsec VPN connection, complete the following:
Preparation
- Log in to your IONOS account.
Click on Menu > Servers & Cloud in the title bar.
Optional: If you have multiple server contracts, select the desired contract.
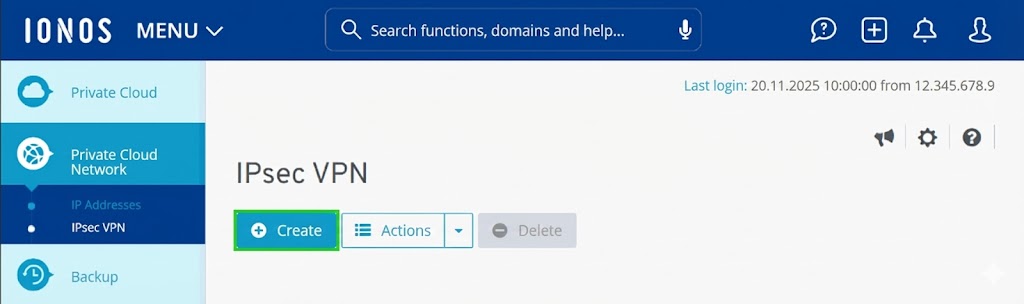
- Click on Private Cloud Network > IPsec VPN in the navigation bar on the left. The IPsec VPN area is displayed.
- Click on Create. The Create IPsec VPN area is displayed.
Enter configuration data
In this section, you define the basic parameters of the connection.
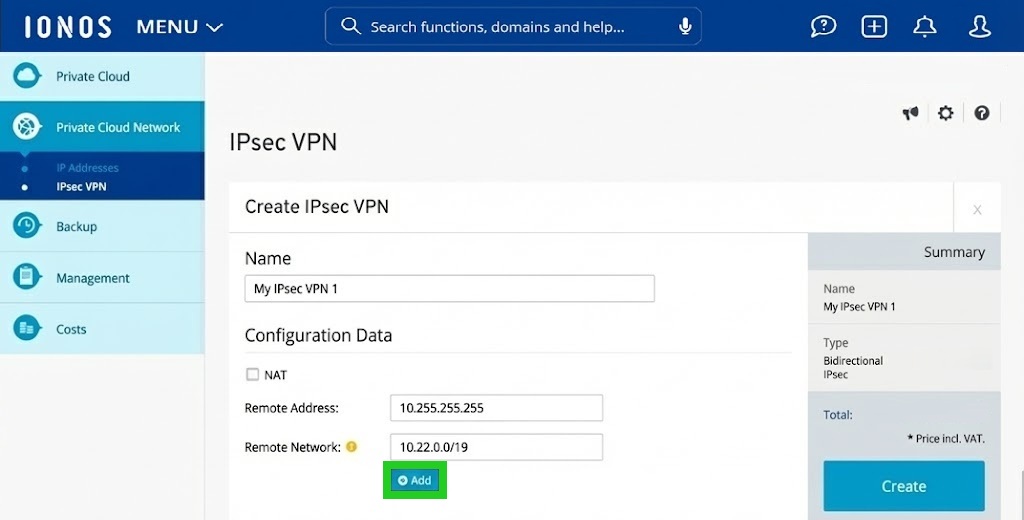
- Enter a unique name for the IPsec VPN connection in the Name field.
- Some networks use NAT (Network Address Translation). This means that the devices in your network use a private IP address, but communicate with the outside world (the Internet) via a single public IP address.
Activate NAT if the device that establishes the VPN tunnel (e.g. your router or firewall) uses a private IP address, which is then translated to establish the tunnel. In this case, it is often necessary to specify a remote identifier so that the IONOS system can forward the VPN traffic correctly.
Deactivate NAT if the device setting up the VPN tunnel has a public IP address. This is the default configuration for most home and office networks, so you do not usually need to tick this checkbox. - If you activate the NAT option, the Remote identifier field is displayed. Enter the private IP address used by the device in this field.
- Enter the public IP address of your network device (router/firewall) in the Remote address: field. This is the end point from which you connect to Private Cloud.
- In the Remote network: field, enter the private IP address range of your local network in CIDR notation. This is the address range that your router uses for the devices in your network. Example: 10.22.0.0/19
- Optional: To add further remote networks, click on Add.
Set up authentication
- Authentication must be configured so that only authorised devices can establish the VPN tunnel. A pre-shared key (PSK) is used for authentication. Create a strong, unique key.
- Enter the pre-shared key in the Pre-installed key (PSK) and Repeat pre-shared key fields.

Note
The key you enter must match exactly the key you use in the VPN configuration on your local device (router or firewall).
Configure encryption and lifetime
The encryption settings define which cryptographic algorithms and parameters are used for key exchange (phase 1) and for data traffic (phase 2). These settings must match the settings of your local VPN device.
To configure the encryption and the lifetime, complete the following:
- Select a suitable group from the Diffie-Hellman Group: drop-down menu (e.g. 15).
Note
The Diffie-Hellman group (DH group) determines the strength of the key exchange procedure in phase 1 (IKE phase 1). Higher numbers generally offer more security, but also require more computing power. Group 15 uses a 3072-bit key, which is a good standard.
- Select the desired encryption standard from the Encryption type: drop-down menu. AES256 is the currently recommended standard and offers a high level of security.
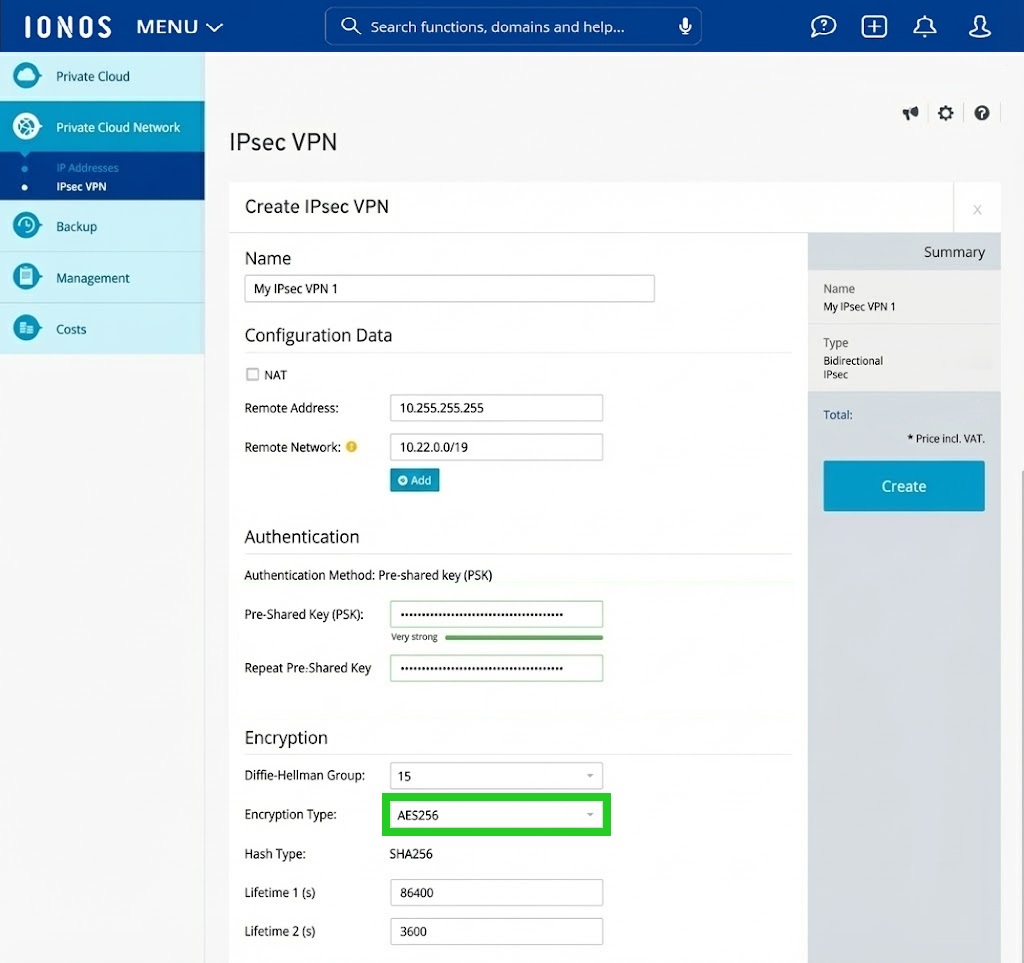
- In the Hash type: drop-down menu, select the algorithm for the integrity check (e.g. SHA256). The hash type ensures that the data has not been manipulated during transmission. SHA256 is a safe choice for this.
- In the Lifetime 1 (s): field, enter the desired duration for phase 1 (IKE phase 1) in seconds (e.g. 86400). This is the validity period of the first security key (IKE-SA). 86400 seconds corresponds to 24 hours.
- Enter the desired duration for phase 2 (IKE phase 2) in seconds (e.g. 3600) in the Lifetime 2 (s): field. This is the validity period of the second, actual data traffic key (IPsec-SA).
Create IPsec VPN
- Finally, check the summary on the right-hand side of the window.
- To set up the IPsec VPN connection, click on Create.
Once the connection has been created, you must enter the exact parameters (remote address, PSK, DH group, encryption type, hash type and lifetimes) in the VPN configuration of your local firewall or router in order to establish the tunnel and change the status from "Down" to "Up".