Setting up Microsoft Exchange® in classic Outlook (Microsoft 365)
This article explains how to set up Microsoft Exchange in classic Outlook for Microsoft 365. If you use Microsoft Exchange, the Microsoft Exchange account is automatically recognised and set up in Outlook for Microsoft 365. At the end of this article you will also find solutions for any problems that may occur.
Note
Microsoft Exchange is currently not supported by the new Outlook for Windows.
Identify Outlook version
If you are not sure whether classic Outlook or the new Outlook for Windows is installed on your computer, you can use the following article to find out which version of Outlook you are using: Which version of Outlook do I have? - Microsoft support
Requirements
You have an Microsoft Exchange account.
You have created an email address in your Microsoft Exchange account. You can find more information on this in the following article: Setting up Microsoft Exchange.
You have downloaded Office 365 and installed it on your computer. You can find more information on this in this article: Installing Microsoft 365 apps on PC or Mac
An Autodiscover entry has been created in the DNS settings of your domain.
Note
Microsoft Exchange no longer requires an Outlook Configurator. If you use Microsoft Exchange with mailboxes from IONOS, these are automatically recognised and set up via Autodiscover. Choose which step-by-step guide you want to follow:
This is the first time I have used Outlook for Microsoft 365.
or
I have already set up a profile in Outlook for Microsoft 365 and would now like to use Microsoft Exchange as well.
Initial setup of Outlook for Microsoft 365
Open Outlook for Microsoft 365.
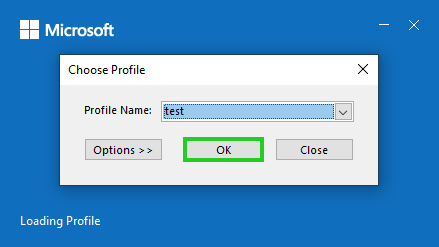
Click OK on the Choose Profile window to confirm the automatically set up profile. This window is displayed when you open Outlook for Microsoft 365 for the first time after successful installation.
If no profile is displayed in the Profile Name field, enter the desired profile name and click OK.
A standard Windows security prompt with the following heading is displayed: Do you want to allow this app to make changes to your device?
Click on Yes. A window with the Outlook icon and the title Outlook is displayed.
Notes
If you have already created a profile for a Microsoft Exchange account in Outlook for Microsoft 365, and want to use an additional Microsoft Exchange account, you must create a new profile for this additional account.
To create a new profile, open the Control Panel. Click on Small Icons in the top right of the Display menu. Then select Mail (Microsoft Outlook).
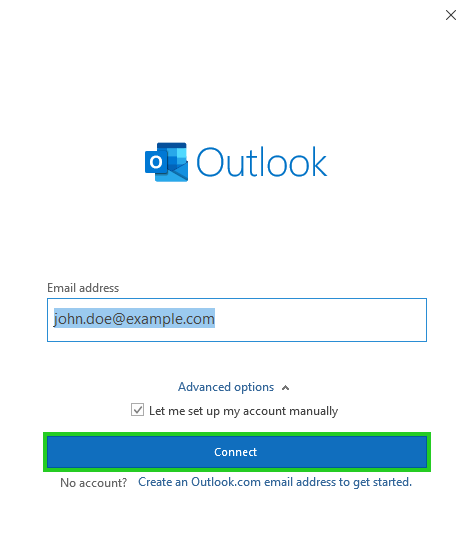
Enter the email address of your new Microsoft Exchange account.
Click on Advanced options.
Tick the checkbox for Let me set up my account manually .
Click on Connect. A window for selecting the account server type opens.
Select the Exchange account type.
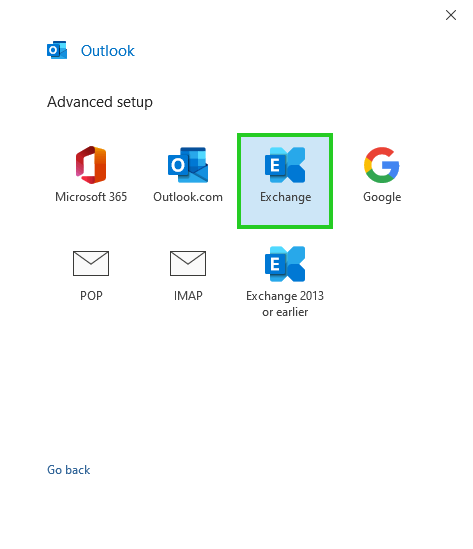
Your computer will now establish a connection to the Exchange servers. This may take a few minutes.
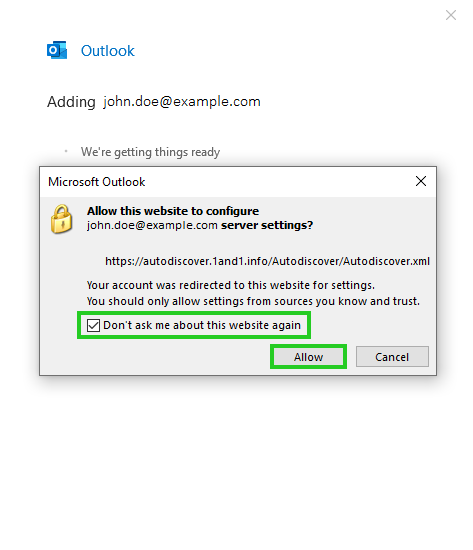
You will be asked to authorise Autodiscover to set up Outlook on your behalf.
Tick the checkbox for Don't ask me about this website again, and click Allow.
Enter your password next.
Optional: Tick the checkbox for Save credentials to save the password permanently.
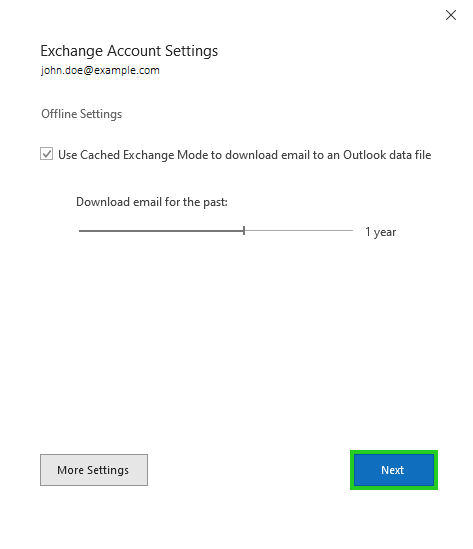
Click on OK. The Exchange account settings window opens.
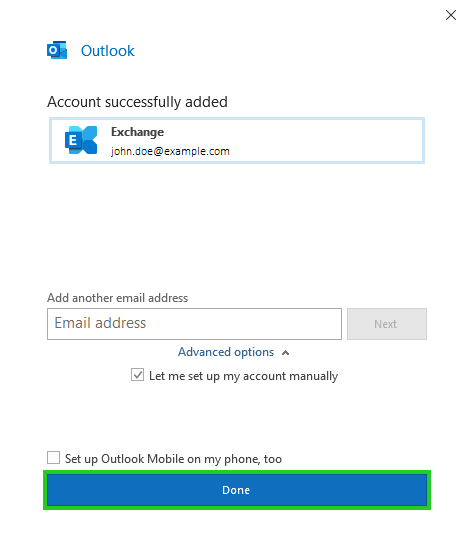
Click on Next. The Account successfully added window is displayed.
Click on Done. Microsoft Outlook will now open.
Done! Your Microsoft Exchange account is now set up and ready for use.
Setting up an additional account in Outlook for Microsoft 365
The following explains how to set up a Microsoft Exchange account in Outlook for Microsoft 365, in addition to an existing POP3 or IMAP account.
Notes
If you have already created a profile for a Microsoft Exchange account in Outlook for Microsoft 365, and want to use an additional Microsoft Exchange account, you must create a new profile for this additional account.
To create a new profile, open the Control Panel. Click on Small Icons in the top right of the Display menu. Then select Mail (Microsoft Outlook).
To set up a Microsoft Exchange account in Outlook for Microsoft 365, in addition to an existing POP3 or IMAP account:
Open Outlook for Microsoft 365.
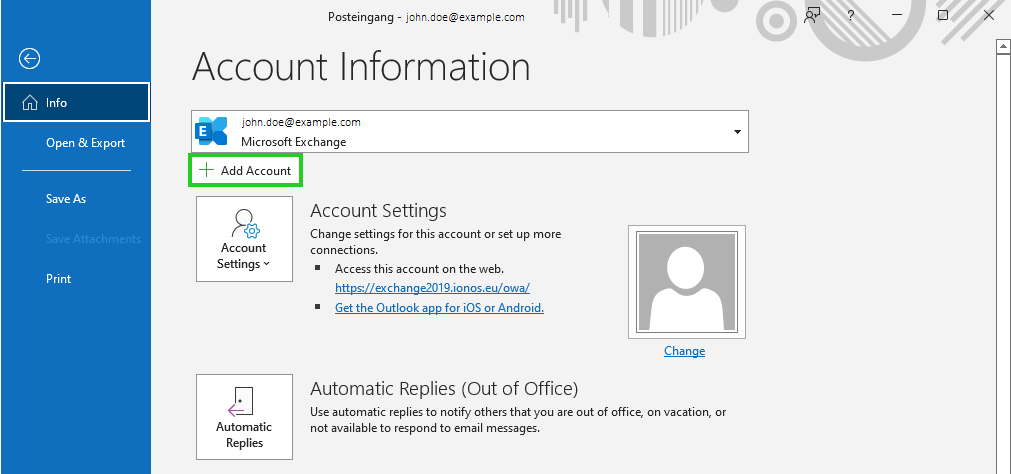
Click on File > Info > + Add account.
Enter the email address of your new Microsoft Exchange account.
Click on Advanced options.
Tick the checkbox for Let me set up my account manually .
Click on Connect. A window for selecting the account server type opens.
Select the Exchange account type.
Your computer will now establish a connection to the Microsoft Exchange servers. This may take a few minutes.
You will be asked to authorise Autodiscover to set up Outlook on your behalf.
Tick the checkbox for Don't ask me about this website again, and click Allow.
Enter your password and click OK.
Optional: Tick the checkbox for Save credentials to save the password permanently.
Click on OK. The Exchange Account Settings window is displayed.
Click on Next. The Account successfully added window is displayed.
Click on Done.
Done! Your Microsoft Exchange account is now set up and ready to use.
The automatic setup of the Microsoft Exchange account fails
The following are solutions for problems that may occur.
Outlook tries to sign in to the domain that is registered in Microsoft 365
If Outlook always tries to log in to the domain that is registered in Microsoft 365, you must deactivate Autodiscover for Microsoft 365 in the Outlook registry. This is necessary, for example, if you use a hosted Exchange mailbox at IONOS, or your own local Exchange server. This will prevent Outlook from always trying to log in to the domain that is registered in Microsoft 365. You can find instructions on how to do this in the following article: Deactivating Autodiscover for Microsoft 365 in Outlook.
The automatic setup of the Microsoft Exchange account fails
If the setup of Microsoft Exchange in Outlook for Microsoft 365 fails and Outlook does not attempt to log in to the domain registered with Microsoft 365, check whether an Autodiscover entry has been created in the DNS settings of your domain. If necessary, create an Autodiscover entry if no Autodiscover entry exists for your domain.
You can find more information in the following article: Checking the Autodiscover settings of your domain.
Despite a correct Autodiscover entry, the Microsoft Exchange account cannot be set up automatically
If you reorder the domain or change the DNS settings, it may take some time for the DNS settings to be updated.
The Office 365 login window is always displayed during setup
If you are using a version of Outlook that is provided as part of Office 365, and the Office 365 login window is displayed when you set up the Microsoft Exchange account, follow the instructions in the following article: Unexpected Autodiscover behavior when you have registry settings under the \Autodiscover key