Speeding up websites with PHP OPcache
Valid for Web Hosting.
PHP OPcache accelerates the execution of PHP scripts through caching. Here you can find out how to activate and configure OPcache in your web hosting environment.
Requirements
- You have edit and upload access to the directory of your webspace where your website is located.
- Your website must be PHP-based. If you have created your website with a content management system (CMS), there is a good chance that your website is based on PHP. Well-known examples of PHP-based CMSs are WordPress, Joomla!, and Drupal.
- Basic knowledge of web hosting, especially managing webspace and editing configuration files.
How OPcache speeds up your website
With PHP-based websites, PHP code is executed by the web server when a page is opened. Normally, the PHP code is parsed and compiled into bytecode by the web server each time it is called. OPcache stores this bytecode in memory so that it does not have to be parsed and compiled again when the page is opened later. This significantly improves the performance of your website.
OPcache for IONOS WordPress installations
If you use a Hosting for WordPress package from IONOS, or haveWordPress as a Click & Build installation, OPcache is already activated automatically. In this case, no further configuration is necessary.
Activate OPcache
Note
If you ordered your contract after September 17, 2025, you do not need to do anything, as OPcache is already automatically activated on your web space.
- Connect to your webspace via SFTP.
- Create a new directory with the name .opcache in the root directory of your webspace. Note the dot in front of the name.
Open a text editor on your computer and copy the following lines into the document:
zend_extension=opcache.so;
opcache.enable=1;
opcache.memory_consumption=64;
opcache.interned_strings_buffer=8;
opcache.max_accelerated_files=5000;
opcache.revalidate_freq=180;
opcache.fast_shutdown=0;
opcache.enable_cli=0;
opcache.revalidate_path=0;
opcache.validate_timestamps=2;
opcache.max_file_size=0;
opcache.file_cache=/path/to/your/webspace/.opcache;
opcache.file_cache_only=1;Replace the placeholder /path/to/your/webspacein opcache.file_cache with the absolute path of your webspace. For example:
opcache.file_cache=/customers/homepages/12/d123456789/htdocs/.opcache;
Save the document under the name php.ini.
To activate OPcache, upload the finished php.ini file to your webspace in the directory of your website. If you want to activate OPcache for several websites, upload the php.ini file to each website directory.
Notes
- If there is already a php.ini file in your website directory, download it, add the settings for OPcache, and upload the file again.
- If you need help creating the php.ini file, please read the article Customising the PHP settings using the php.ini file.
Check activation
To ensure that OPcache is active, you can check your PHP configuration as follows:
Using a text editor, create a PHP file (e.g. info.php) with the following content:
<?php phpinfo(); ?>
Upload the file to your webspace in the directory of your website, and then access your website in your browser by adding /filename to the address. Example: https://example.com/info.php
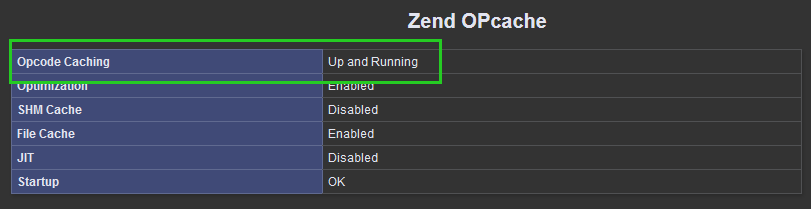
You will now receive an overview of your PHP configuration. Use the browser's search function to find the Opcode Caching entry. If it says Up and Running, Opcache is active.
If the Opcode Caching is displayed as not active, make sure that the PHP file created for the purpose of the check is located in the same directory as the php.ini file in which you have entered the instructions for the OPcache.