Adding a public IPv4 address to a Windows Server
Valid for VPS, Cloud Servers, migrated Cloud Servers, VPS+, Dedicated Servers, and Bare Metal Servers running Microsoft Windows Server 2019, Microsoft Windows Server 2022, and Microsoft Windows Server 2025.
This article explains how to adjust your server's network configuration to use an additional public IPv4 address. To add an additional IP address, complete the following:
Note
The following article explains how to establish a remote desktop connection (RDP) to your server with your computer:
Requirements
During installation, you selected the option Windows Server 2019 Standard (Desktop Experience), Windows Server 2019 Datacenter (Desktop Experience), Windows Server 2022 Standard (Desktop Experience), Windows Server 2022 Datacenter (Desktop Experience), or Windows Server 2025.
You have assigned an additional, public IPv4 address to your server in the Cloud Panel.
You are logged in to your server.
Identify DNS Server, Default Gateway and Subnet Mask
To identify the DNS servers used, proceed as follows:
Enter the command cmd in the search bar located in the taskbar.
Double-click on Command Prompt.
Enter the command ipconfig /all. Example:
C:\Users\Administrator>ipconfig /all
Note down the displayed DNS servers, the default gateway and the subnet mask.
Add public IPv4 address
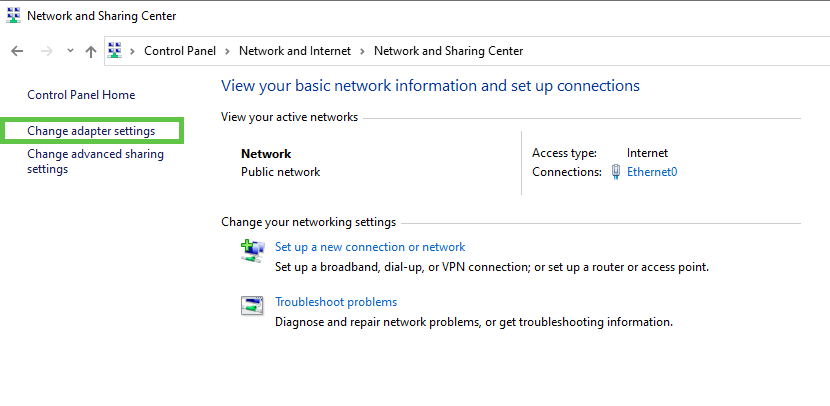
Open the Control Panel.
Click on Network and Internet > Network and Sharing Centre > Change adapter settings.
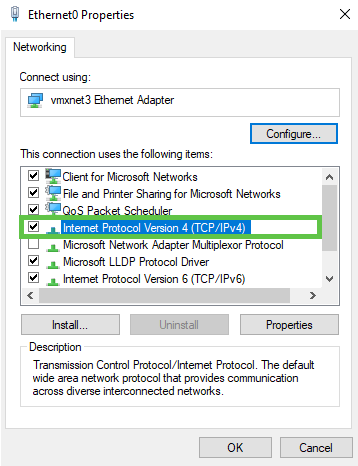
Right-click on the network adapter.
Click on Properties.
Double-click on Internet Protocol Version 4 (TCP / IPv4).
Note
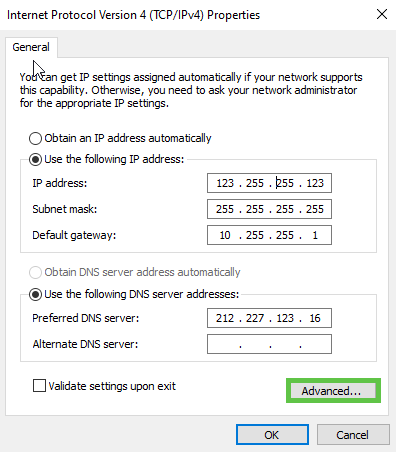
To retain the current main IP address, you must first enter it as a static address.
Activate the option: Use the following IP address.

In the IP address field: enter the current main IP address.
In the Subnet mask field: enter the subnet mask you have noted down.
In the Default gateway field: enter the default gateway you have noted down.
In the Preferred DNS server field: enter the DNS server you have noted down.
Click on Advanced.
Click on Add in the IP addresses area.
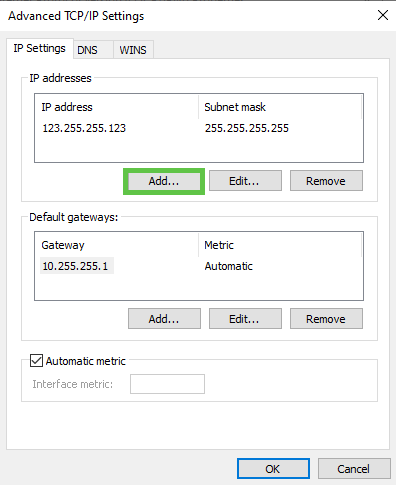
Enter the additional IP address in the IP address field.
Enter 255.255.255.255 in the Subnet mask: field.
Click on Add.
Confirm the remaining open dialogues with OK.
Note
You may receive a warning that the gateway is in a different subnet. You can ignore this. In this case, simply confirm with YES that the configuration should be saved.
The change is applied. This may result in a brief interruption of the remote desktop connection.
Note
If the server cannot be reached via the main IP address or the additional public IP address after the changeover, you can log in to the server using the KVM console.