Configuring Ubuntu 24.04 + n8n for use with SSL (SSL certificate from Let's Encrypt)
Valid for VPS and migrated Cloud Servers.
In this article, you will first learn how to install the Ubuntu 24.04 + n8n image on your server. n8n is provided in a Docker container as part of the installation. The n8n image provided by IONOS does not contain an SSL certificate for the IP address supplied, meaning that access is initially only possible via the unencrypted HTTP protocol. In order to access n8n via an encrypted connection, manual configuration is required. How to prepare and configure n8n is explained later in the article.
Summary of the necessary steps
The necessary steps are listed in brief below:
- Install the image on the server
- Prepare configuration
- Establish SSH connection to the server
- Configure n8n for SSL connection
- Access the n8n interface
Caution
If you reinstall an image on an existing server, all existing data on the server will be irretrievably deleted and replaced by the data of the newly installed image. This process can no longer be undone. Make sure that you create a backup of the server before installing the image. Otherwise there is a risk of data loss.
Install image on the server
To install the Ubuntu 24.04 + n8n image, complete the following:
- Log in to your IONOS account.
Click on Menu > Servers & Cloud in the title bar.
Optional: If you have multiple server contracts, select the desired contract.
- Click on the desired server in the Infrastructure > Servers area.
- Click on Actions.
- Click on Reinstall Image. The Reinstall Image area is displayed.
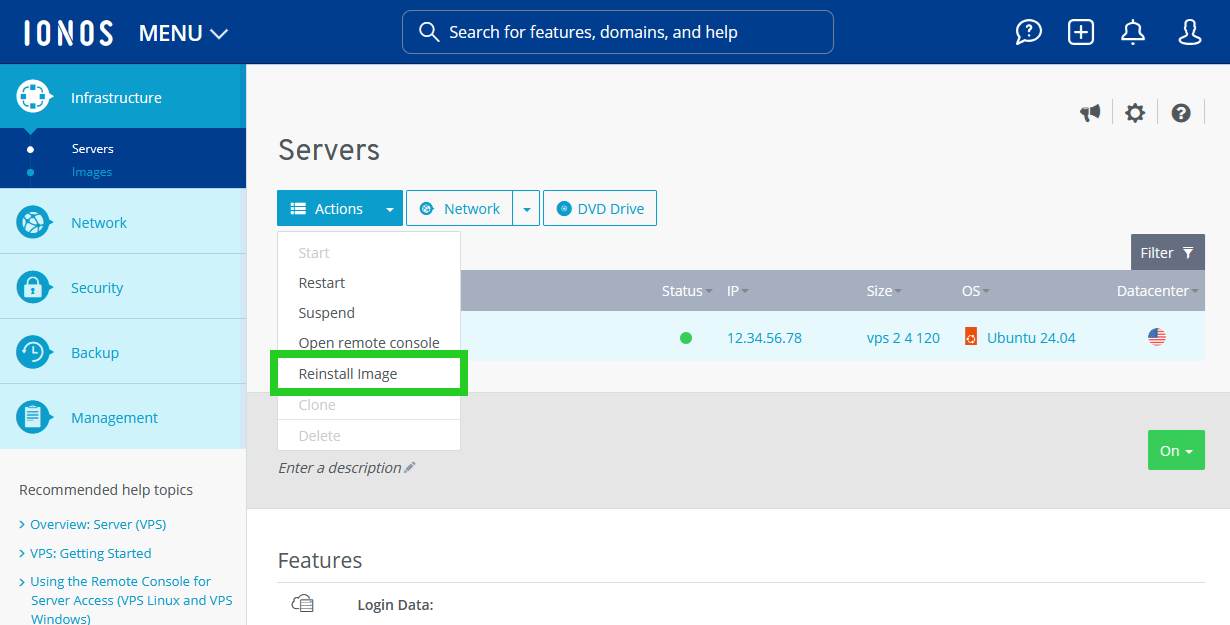
- Click on the arrow pointing downwards in the Ubuntu tile.
- Select the Ubuntu 24.04 + n8n image.
- Click on Reinstall Image. The image is installed. This process may take a few minutes.
- Make a note of the IP address of the server. This will be required later on to connect your domain.
Prepare configuration
In order to establish an encrypted connection to n8n, a domain is required that can be accessed. In addition, an SSL certificate is required, which is issued for the domain.
Order a domain
If you have not yet ordered a domain for your server, you can order one at any time. You can find instructions in the following article: Ordering a domain as an IONOS customer
Create a subdomain
Create a subdomain in the following format: n8n.example.com
Replace the placeholder example.com with your chosen domain. How to create a subdomain in your IONOS account is explained in the following article: Creating a subdomain
Connecting the domain to the static IP address of the server
You can find instructions on how to connect your domain to the static IP address of your server in the following article: Changing the IPv4/IPv6 address of a domain (A/AAAA record)
Configuring the firewall
Make sure that the following ports are enabled in the firewall policy:
Port 80
Port 443
Port 5678
You can find instructions in the following article: Editing the firewall policy (VPS and migrated Cloud Servers)
Establish SSH connection to the server
In the next step, establish an SSH connection to your server. Log in as root for this. You can find corresponding instructions in the following articles:
Establishing an SSH connection to your Linux server on a Microsoft Windows computer
Establishing an SSH connection to your Linux server on a Linux computer
Configure n8n for SSL connection
Please Note
These steps will deactivate the installed, unsecured instance and install a new n8n instance secured with an SSL certificate from Let's Encrypt. If you carry out these steps after you have already been working with the unsecured instance for some time, we recommend that you first export any workflows and other content you have created so that you can import them into the new instance. You can find out how this works here in the n8n documentation: Exporting and importing workflows | n8n Docs
To create a new directory named n8n-compose on your server, enter the following command:
root@ubuntu:~# mkdir n8n-compose
To continue working in the newly created directory, change to the new directory:
root@ubuntu:~# cd n8n-compose
In this directory, use the vi editor to create a file with the file extension .env. This file is used to define environment variables that are used in the Docker Compose file.
root@ubuntu:~/n8n-compose# vi .env
Notes
The vi editor has an insert mode and a command mode. You can call up insert mode with the [i] key. In this mode, the characters entered are immediately inserted into the text. to exit insert mode and call up command mode, press [ESC]. If you use command mode, your keyboard input is interpreted as a command.
Add the information below to the .env file and replace the placeholders example.com and the placeholder for the time zone. These variables are referenced in the compose.yaml file in a later step and are used to specify domain settings, the desired time zone standard and the email address for SSL certificates.
# DOMAIN_NAME and SUBDOMAIN together determine where n8n will be reachable from
# The top level domain to serve from
DOMAIN_NAME=example.com
# The subdomain to serve from
SUBDOMAIN=n8n
# The above example serves n8n at: https://n8n.example.com
# Optional timezone to set which gets used by Cron and other scheduling nodes
# New York is the default value if not set
GENERIC_TIMEZONE=America/New_York
# The email address to use for the TLS/SSL certificate creation
SSL_EMAIL=user@example.com- Replace the placeholder user@example.com in the SSL_EMAIL line.
- Press the [ESC] key.
To exit vi and save the file, enter the following command and then press the Enter key:
root@ubuntu:~# :wq
Create a directory with the name local-files. This is used as a bind mount to enable access to files from the container. To do this, enter the following command:
root@ubuntu:~/n8n-compose# mkdir local-files
To create the required Docker Compose file, enter the following command:
root@ubuntu:~/n8n-compose# vi compose.yaml
Now add the information below:
services:
traefik:
image: "traefik"
restart: always
command:
- "--api.insecure=true"
- "--providers.docker=true"
- "--providers.docker.exposedbydefault=false"
- "--entrypoints.web.address=:80"
- "--entrypoints.web.http.redirections.entryPoint.to=websecure"
- "--entrypoints.web.http.redirections.entrypoint.scheme=https"
- "--entrypoints.websecure.address=:443"
- "--certificatesresolvers.mytlschallenge.acme.tlschallenge=true"
- "--certificatesresolvers.mytlschallenge.acme.email=${SSL_EMAIL}"
- "--certificatesresolvers.mytlschallenge.acme.storage=/letsencrypt/acme.json"
ports:
- "80:80"
- "443:443"
volumes:
- traefik_data:/letsencrypt
- /var/run/docker.sock:/var/run/docker.sock:ro
n8n:
image: docker.n8n.io/n8nio/n8n
restart: always
ports:
- "127.0.0.1:5678:5678"
labels:
- traefik.enable=true
- traefik.http.routers.n8n.rule=Host(`${SUBDOMAIN}.${DOMAIN_NAME}`)
- traefik.http.routers.n8n.tls=true
- traefik.http.routers.n8n.entrypoints=web,websecure
- traefik.http.routers.n8n.tls.certresolver=mytlschallenge
- traefik.http.middlewares.n8n.headers.SSLRedirect=true
- traefik.http.middlewares.n8n.headers.STSSeconds=315360000
- traefik.http.middlewares.n8n.headers.browserXSSFilter=true
- traefik.http.middlewares.n8n.headers.contentTypeNosniff=true
- traefik.http.middlewares.n8n.headers.forceSTSHeader=true
- traefik.http.middlewares.n8n.headers.SSLHost=${DOMAIN_NAME}
- traefik.http.middlewares.n8n.headers.STSIncludeSubdomains=true
- traefik.http.middlewares.n8n.headers.STSPreload=true
- traefik.http.routers.n8n.middlewares=n8n@docker
environment:
- N8N_ENFORCE_SETTINGS_FILE_PERMISSIONS=true
- N8N_HOST=${SUBDOMAIN}.${DOMAIN_NAME}
- N8N_PORT=5678
- N8N_PROTOCOL=https
- N8N_RUNNERS_ENABLED=true
- NODE_ENV=production
- WEBHOOK_URL=https://${SUBDOMAIN}.${DOMAIN_NAME}/
- GENERIC_TIMEZONE=${GENERIC_TIMEZONE}
- TZ=${GENERIC_TIMEZONE}
volumes:
- n8n_data:/home/node/.n8n
- ./local-files:/files
volumes:
n8n_data:
traefik_data:
Note
The entry - "--certificatesresolvers.mytlschallenge.acme.storage=/letsencrypt/acme.json" must be in one line.
- Press the [ESC] key.
To exit vi and save the file, enter the following command and then press the Enter key:
:wq
To find out which process is using port 5678, enter the following command:
root@ubuntu:~/n8n-compose# sudo lsof -i :5678
To terminate a process, customise the following command and enter it:
root@ubuntu:~/n8n-compose# sudo kill PID_HIER_EINSETZEN
Enter the following command to stop the old containers:
root@ubuntu:~/n8n-compose# docker compose down
To start the containers defined in compose.yaml as daemons in the background, enter the command below. This command starts and configures the Traefik and n8n instances.
root@ubuntu:~/n8n-compose# docker compose up -d
To check whether the containers are running, enter the following command:
root@ubuntu:~/n8n-compose# docker ps
Make sure that the following 2 containers are running and their status is "UP". To do this, enter the following commands.
root@ubuntu:~/n8n-compose# n8n-compose-traefik-1
root@ubuntu:~/n8n-compose# n8n-compose-n8n-1
Accessing the n8n interface
Once the Docker services (containers) have been successfully started, access to n8n is managed by the Traefik proxy. Traefik ensures SSL encryption and forwards requests to your n8n instance. Access is now exclusively via the domain that you have previously configured in the .env file.
Note
Direct access via http://SERVER-IP:5678 is no longer possible. The configuration in compose.yaml (under ports: - "127.0.0.1:5678:5678") ensures that n8n is only accessible "internally" (for Traefik), but not publicly via the server IP.
- Open your browser.
- Enter the complete, secure URL, which is made up of the variables SUBDOMAIN and DOMAIN_NAME of your .env file. Example: https://n8n.example.com
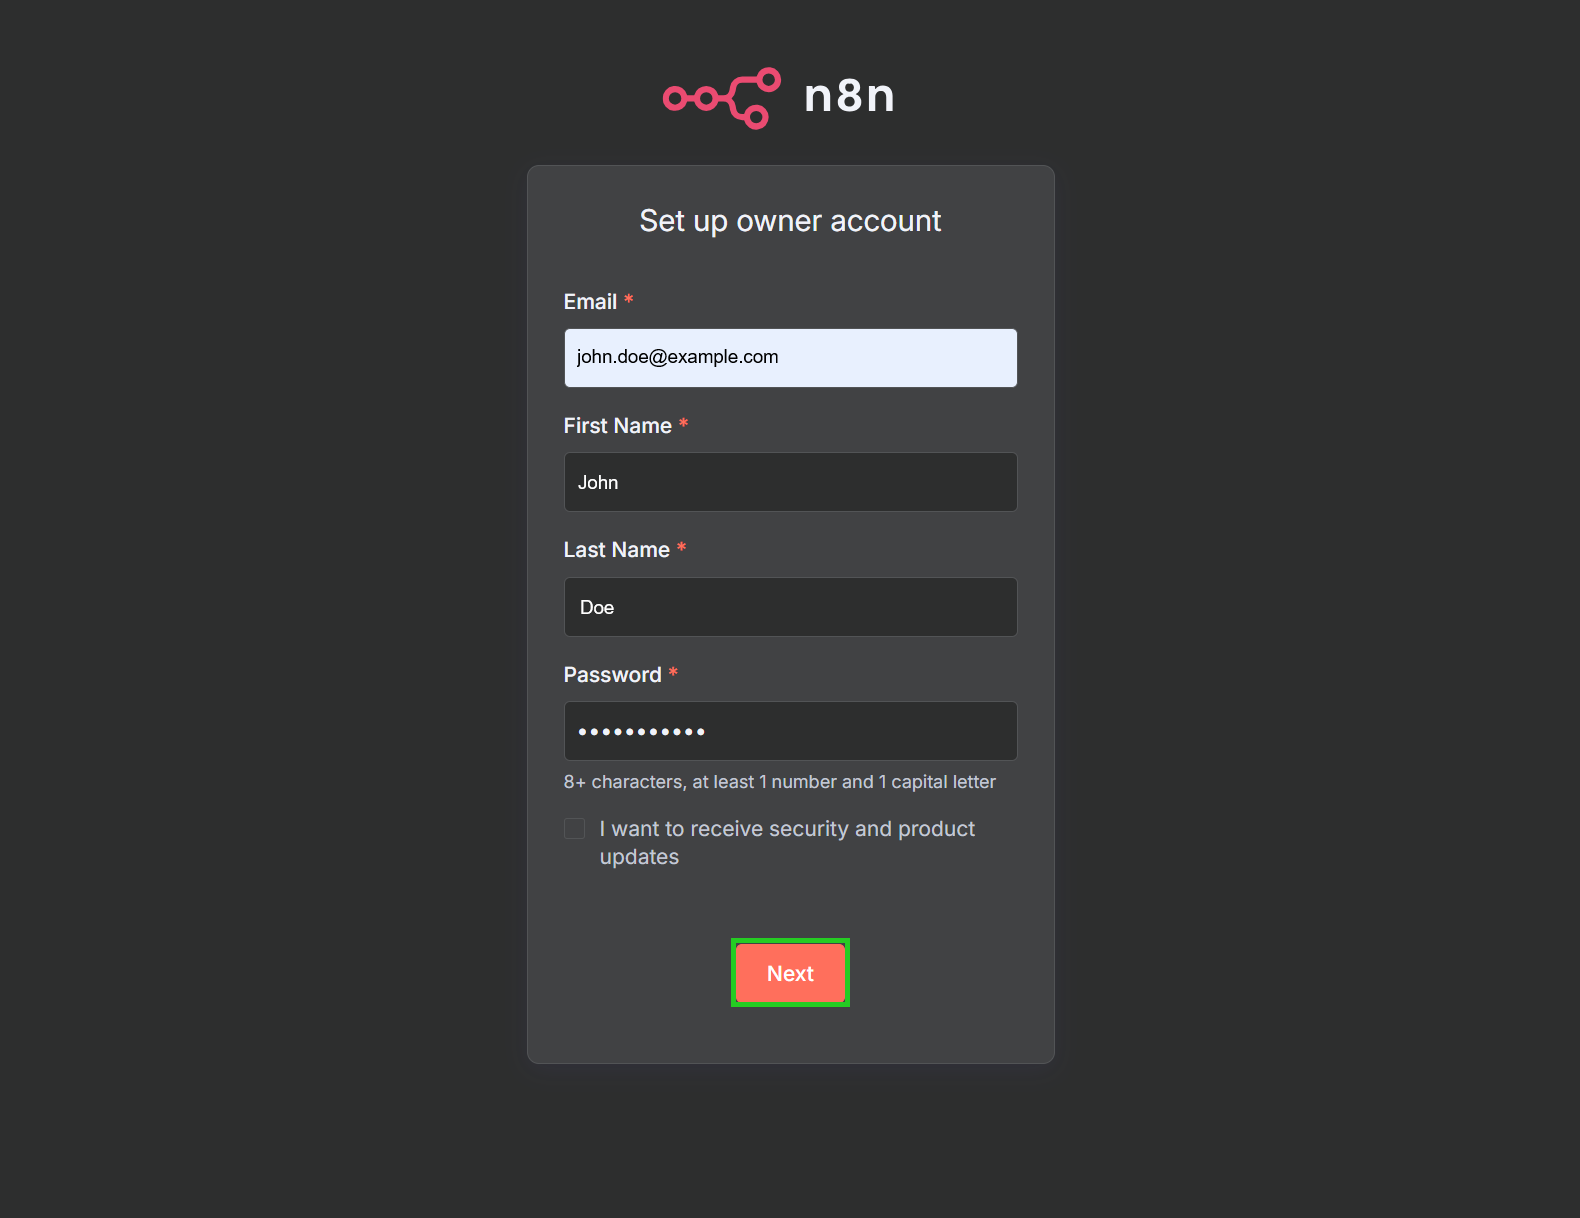
- The Set up owner account window is displayed the first time open it. Enter the desired email address in the Email field.
- Enter your first and last name in the First Name and Last Name fields.
- Enter a password in the Password field.
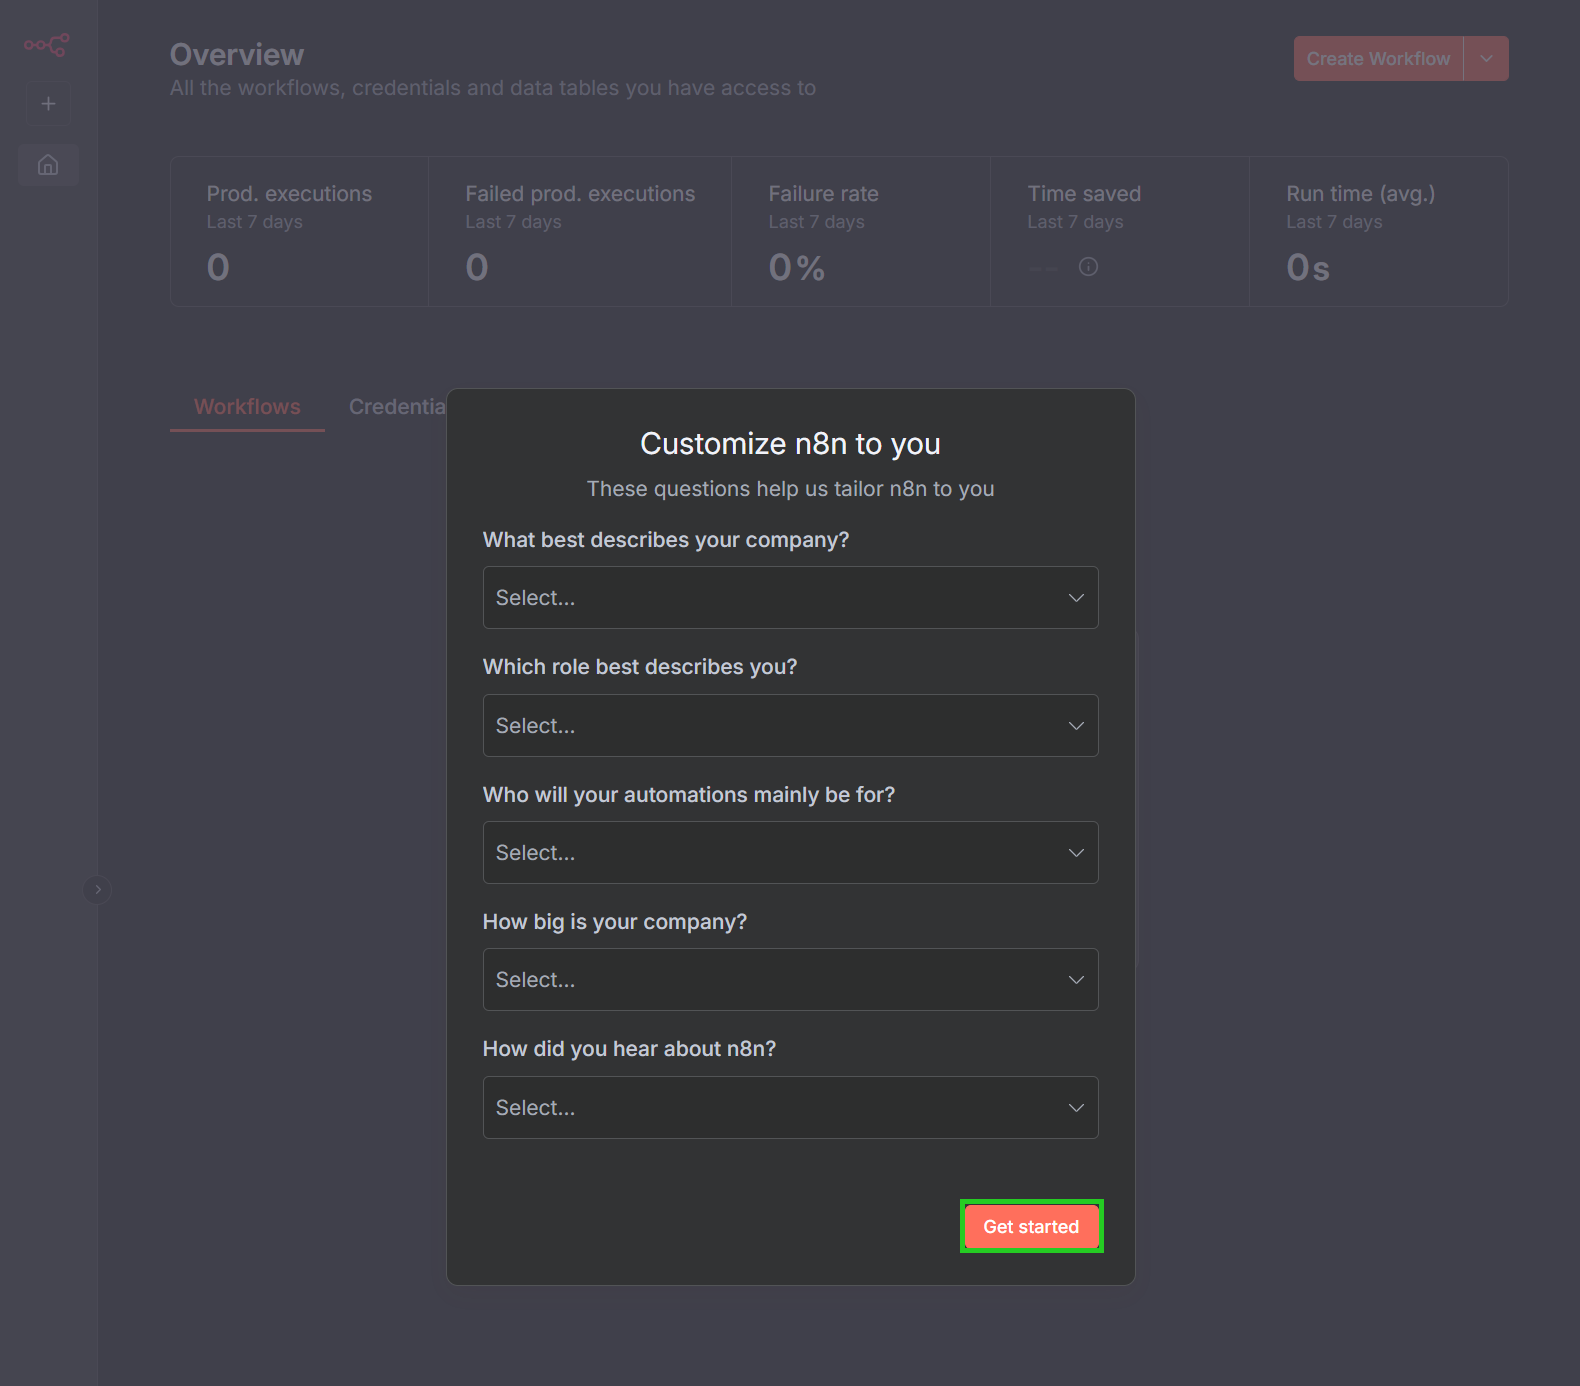
- Click on Next. The Customize n8n to you window opens.
- Answer the questions in the Customize n8n to you window and click on Get started. You can now use n8n.