VPS+: First steps
This article applies if you have purchased a VPS+ package. This package is suitable for both simple and highly complex projects.
In this article, you will learn how to set up a VPS+ and what steps you need to take after setting it up. The most important functions of the Cloud Panel are also explained.
Managing the VPS+
You can manage your VPS+ in the Cloud Panel. To open the Cloud Panel, complete the following:
- Log in to your IONOS account.
Click on Menu > Servers & Cloud in the title bar.
Optional: If you have multiple server contracts, select the desired contract.
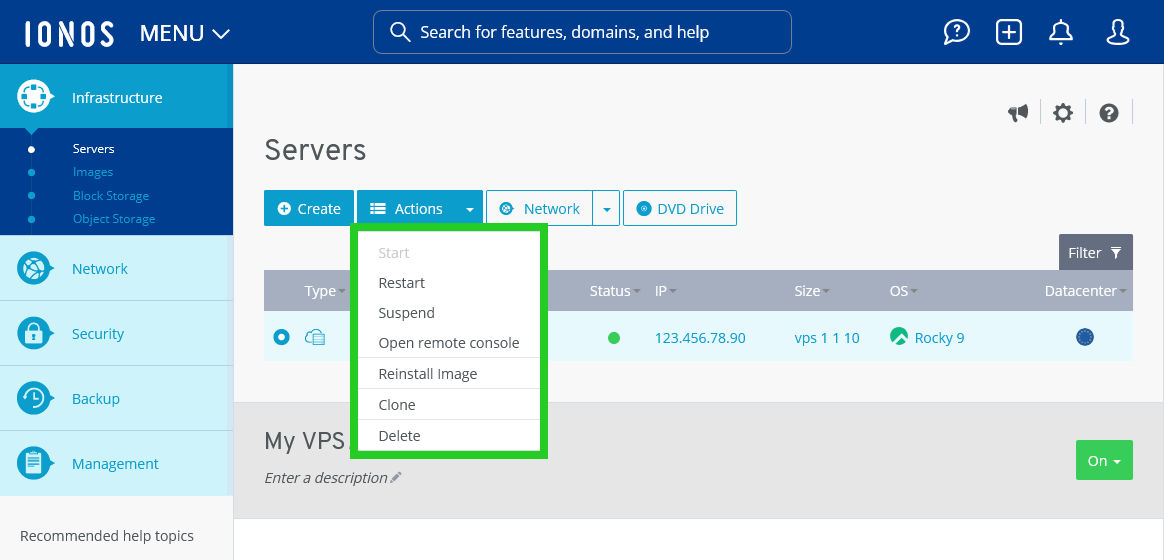
Note: You can restart the server, suspend it, open the remote console, and reinstall or duplicate an image in the Cloud Panel at any time. To do this, click on Actions in the Infrastructure > Servers area, and then on the desired action.
To assign a new, additional IP to the server:
- Click on Network > Assign IP in the Infrastructure > Servers area.
- Select the IP address type to be assigned to the server.
- Click on Yes.
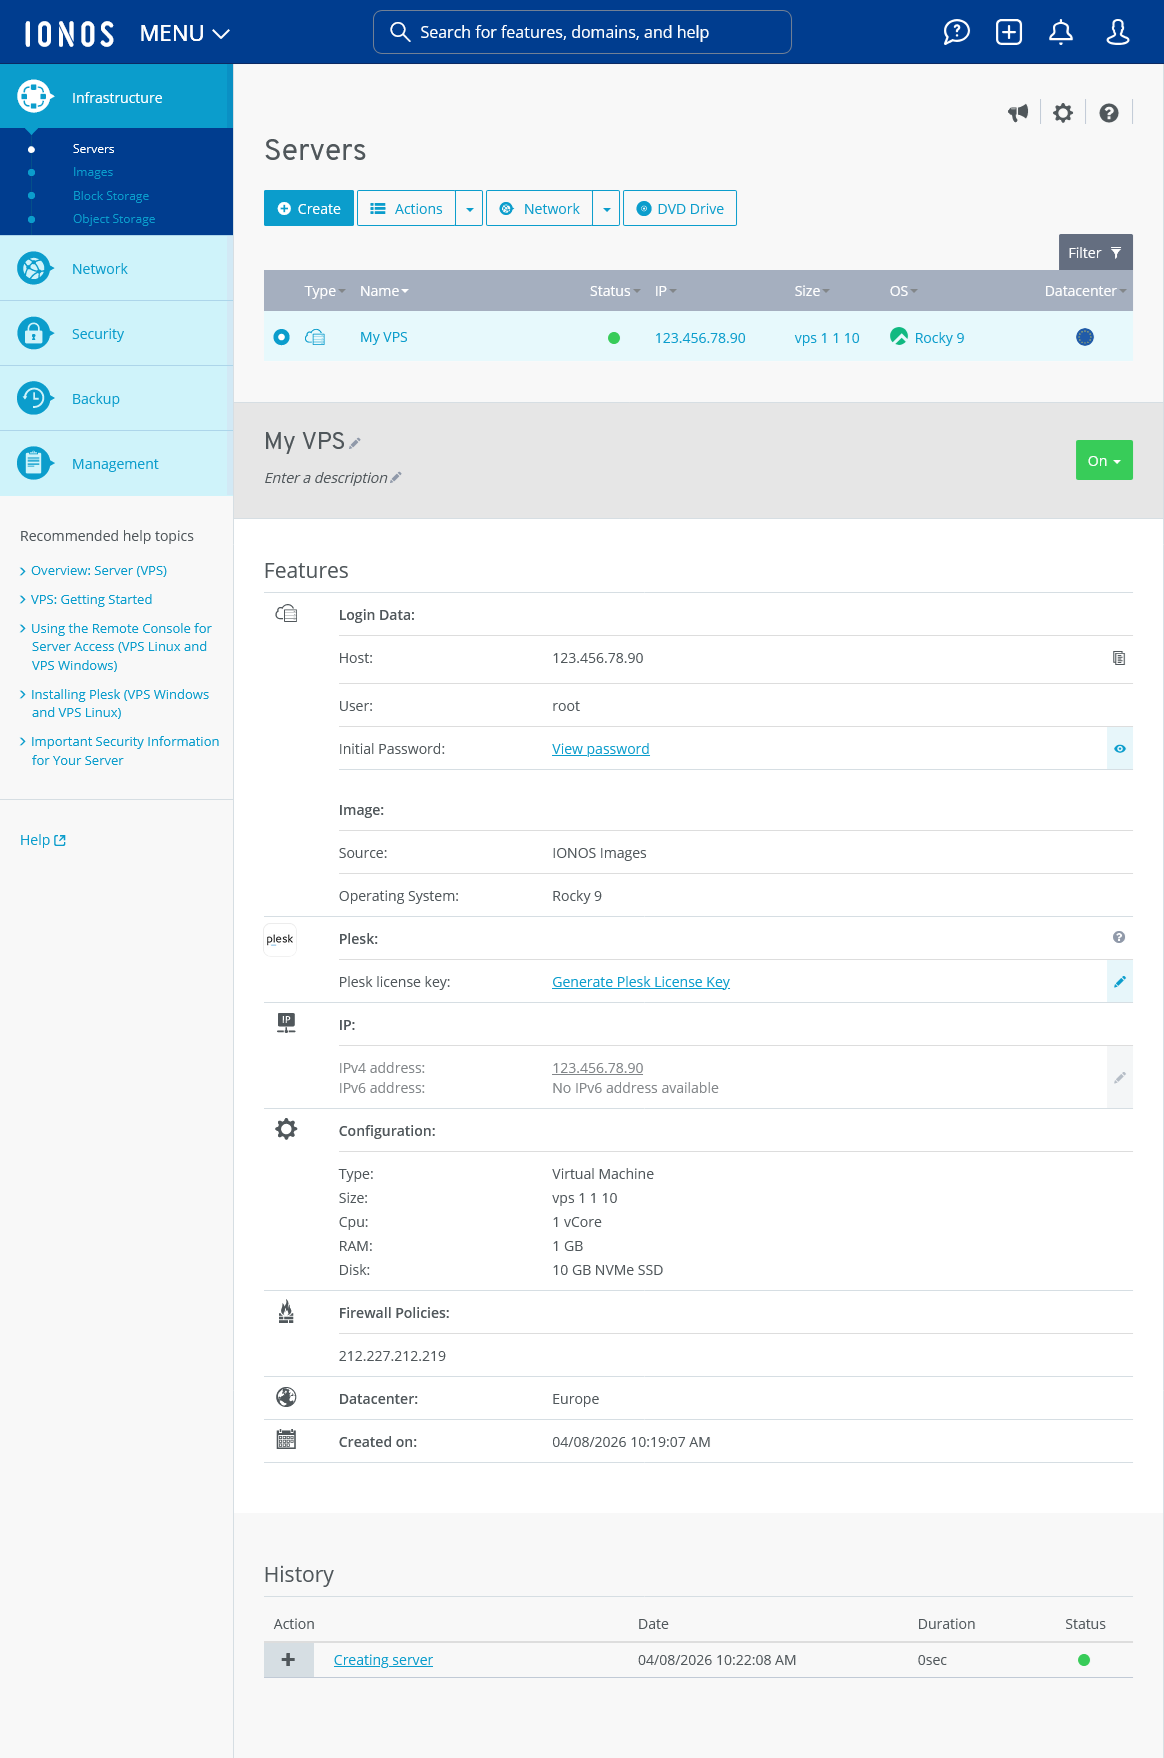
To view the detailed information of the server:
- Click on the desired server in the Cloud Panel. All important information about the server is then displayed.
Further information on managing the server in the Infrastructure > Servers area can be found in the VPS+ and migrated Cloud Servers Administration section of the IONOS Help Centre:
Create additional VPS+
If required, you can create additional VPS+ at any time. You can find instructions in the following article: Creating a server (VPS+)
Standard server configuration
By default, your VPS+ is provided with the following settings:
Public IP
With a public IP, your server is accessible from outside. This is necessary so that your customers can access your website. A public IPv4 address is assigned to the server by default. If required, you can assign several IPv4 addresses or several IPv6 addresses to a server. The IPv6 addresses are configured automatically in these operating systems. After assigning the IPv6 addresses or after reinstalling the operating system, restart the server so that the assigned IPv6 addresses are displayed.
If you assign two IPv4 addresses and at least one IPv6 address to a VPS+, you must configure these IP addresses manually in your operating system.
Firewall
For security reasons, the server is protected by an external hardware firewall that can be configured in the Cloud Panel. This firewall blocks incoming data traffic for all ports, with the exception of those configured in the rules.
By default, a firewall policy is configured according to the requirements resulting from the installed image:
Linux Server: Incoming traffic is unblocked for ports TCP 22, 80, 443, 8443, and 8447.
Windows Server: The incoming data traffic is released for the ports TCP 80, 443, 3389, 8443, and 8447.
You can create additional rules at any time to enable additional ports and/or protocols.
Note
For security reasons, SMTP port 25 (outgoing) is closed by default. This measure prevents emails from being sent from your server. If you would like to open the port, please contact IONOS Customer Support by phone. The contact details can be found on the following page: IONOS Customer Support
We recommend that you keep all unnecessary ports closed by default to increase the security of your server.
Further information on firewall policies can be found in the following article: Editing your firewall policy (VPS, migrated Cloud Servers, and VPS+)
For more information about the ports that Plesk uses, see the following article: Ports used by Plesk
Cloud Panel: Monitoring
In the Monitoring Center, all the servers you have configured are listed in a table in the Security > Monitoring Center area. To display graphical analyses of the monitoring, select the desired server. Then select the desired time period in the Time period section and click Apply.
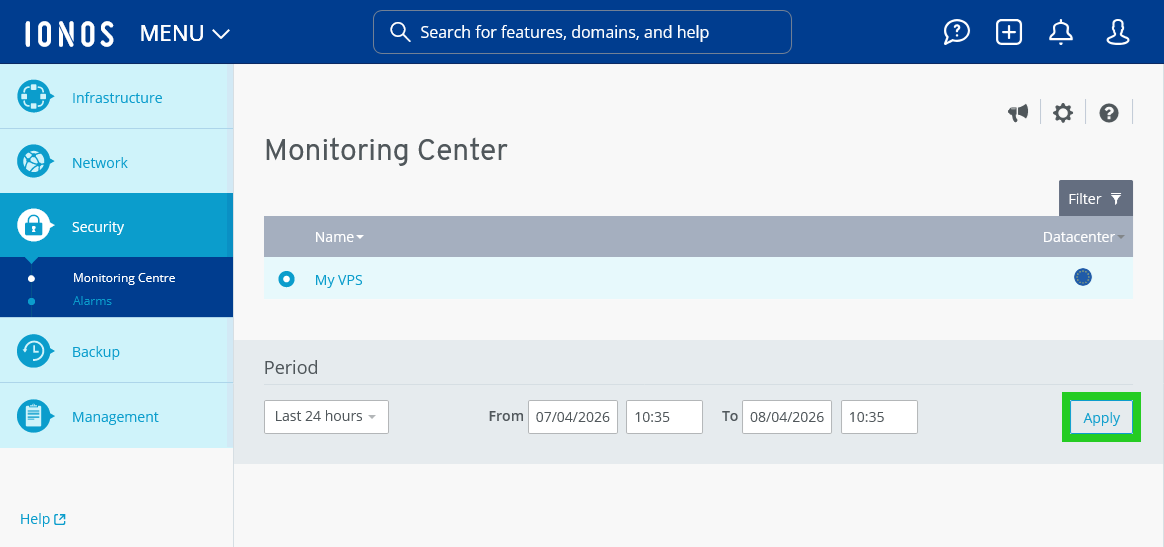
The following graphical analyses are then displayed:
- Average CPU utilisation
- Network: Bytes received/second
- Network: Bytes sent/second
- Network: Packets received/second
- Network: Packets sent/second
- Memory: Bytes read/second
- Memory: Bytes written/second
- Memory: IOPs read
- Memory: IOPs written
Add block storage
Block storages offer additional storage space that you can use in conjunction with a VPS+. Each block storage consists of an SSD, the size of which you can specify individually. As block storages are treated as individual disks, they are suitable for storing files, databases or log files, for example. Block storages can only be assigned to a single VPS+. If required, you can assign the block storage to another VPS+ if it is located in the same data centre.
Further information on block storages can be found here:
Establish a connection to the server
You can find the access data for your VPS+ within the Cloud Panel in the detailed information for your server. To establish a connection to your server, make a note of the following data:
- IP/Hostname
- Username
- Initial password
Note
Only passwords that are automatically generated during the creation or reinstallation of a server are displayed in the server details.
The following articles explain how you can establish a connection to your VPS+:
Connecting a client computer with the Microsoft Windows operating system to a VPS+ with the Microsoft Windows operating system:
Connecting to Windows Server via Remote Desktop
Establishing a connection from a client computer with the Microsoft Windows operating system to a VPS+ with the Linux operating system:
Establishing an SSH connection to your Linux server on a Windows computer
Establishing a connection from a client computer with the Linux operating system to a VPS+ with the Linux operating system:
Establishing an SSH connection to your Linux server on a Linux computer
If your server is running but can no longer be reached via SSH or remote desktop connection, you can log in to the server using the remote console. The remote console allows you to remotely maintain the system as if you were sitting in front of it. You can follow the system messages just like on a "real" screen and interact with the server at any time. For example, the server can be booted with different boot options in the event of start-up difficulties. The remote console is particularly suitable for advanced troubleshooting. You can find instructions on how to establish a connection to your VPS+ using the remote console in the following article:
Using the remote console for server access (##VPS LINUX### and Windows VPS)
Install Plesk
Plesk is not included by default in the images offered for your VPS+. To use Plesk, you must install this software manually. You can generate the required license key at Cloud Panel. You can find instructions on how to set up Plesk with the standard configuration in the following articles: Installing Plesk (VPS+ Windows, Windows VPS, and migrated CLOUD SERVER)
Configure domain
You can access your server directly via the public IP or the automatically generated hostname. However, to make your website easily accessible to your customers, you need a domain. Connect this domain to the static IP address of the server so that the domain points to your server. This is possible by configuring an A record (Address Resource Record) or an AAAA record. How to do this is explained in the following articles:
Ordering a domain as an IONOS customer
Safety recommendations
Create backups
Protecting your server is crucial for the security of your data. This is particularly important in the event of a server failure. We therefore strongly recommend that you create regular backups. For example, you can use Cloud Backup to create backups of your servers. This backup solution is particularly suitable for planned, medium and long-term backups. These backups are managed by you in a backup console. You can find more information about Cloud Backup in the following article: Welcome to Cloud Backup
Keeping your operating system up to date
When you order a server from IONOS, it is always delivered with the latest available update for the operating system or the respective distribution. Nevertheless, you should always keep the server up to date.
Operating system updates mainly provide two types of functionality: new features or the fixing of bugs or security vulnerabilities. If there is a security vulnerability in the operating system installed on a server and it is not fixed, cyber criminals can exploit this vulnerability to gain access to the server. Patch management is therefore an important part of maintaining your systems. As the timely application of security updates is one of the most important and effective things you can do to protect your server, your patch management should be as efficient as possible.
For more information on server security, see the following articles:
Important security information for your Linux Server (part 1 of 2)
Important security information for your Linux server (part 2 of 2)
Important security information for your Windows server (part 1 of 2)
Important security information for your Windows server (part 2 of 2)
Changing SSH port