

Work schedule – free Excel template to download

In companies with shift work, a work schedule is one of the most important tools for efficient staff management. And it fulfils two purposes: it provides employees with an overview of work hours, and it helps the employer organise routine tasks like documenting weekly hours and wage calculations.
But professional work schedule software is expensive. And single-handedly creating a weekly or monthly plan in Excel can take a lot of time and effort. Instead, why not use our free work schedule template in Excel, which is ready for use in just a few steps.
What does a professional work schedule look like?
Work schedules must meet certain content, design, and legal requirements to guarantee that every employee is at the right place at the right time.
Content
First of all, a work schedule must include all vital information relevant to your employees: At first sight, it must make clear which calendar week it’s relating to and which colleagues are logged for which shifts. That’s why it makes sense to concentrate on the key points. This will reduce the risk of the schedule being misunderstood, which can lead to understaffing.
As an employer and schedule planner, it’s practical if you’re able to see straight away how often employees have been assigned shifts, their weekly accounted hours, and their hourly wages. Excel work schedules are especially suited for this purpose, as they offer the possibility to make calculations out of quantitative data like weekly hours and wages.
Design
Less information often means a better overview. But blank lines and columns as well as different fonts and colours can also assist the structure. With the help of these and other design-related tools, your shift schedule should ideally be self-explanatory to users. You can also choose to add a legend, where you describe the meaning of certain colour-coding, for example.
Legal conformity
Work schedules must meet certain legal requirements: Changes to overtime policies, minimum wage, rest period requirements, and scheduling rules can significantly impact the bottom line. Staying compliant to the working conditions as set by the European Working Time Directive is of utmost importance. This directive requires EU member states to guarantee certain rights for workers such as maximum weekly working hours and how long rest breaks should be.
- Up to 50 GB Exchange email account
- Outlook Web App and collaboration tools
- Expert support & setup service
Work schedule template – edit in Excel
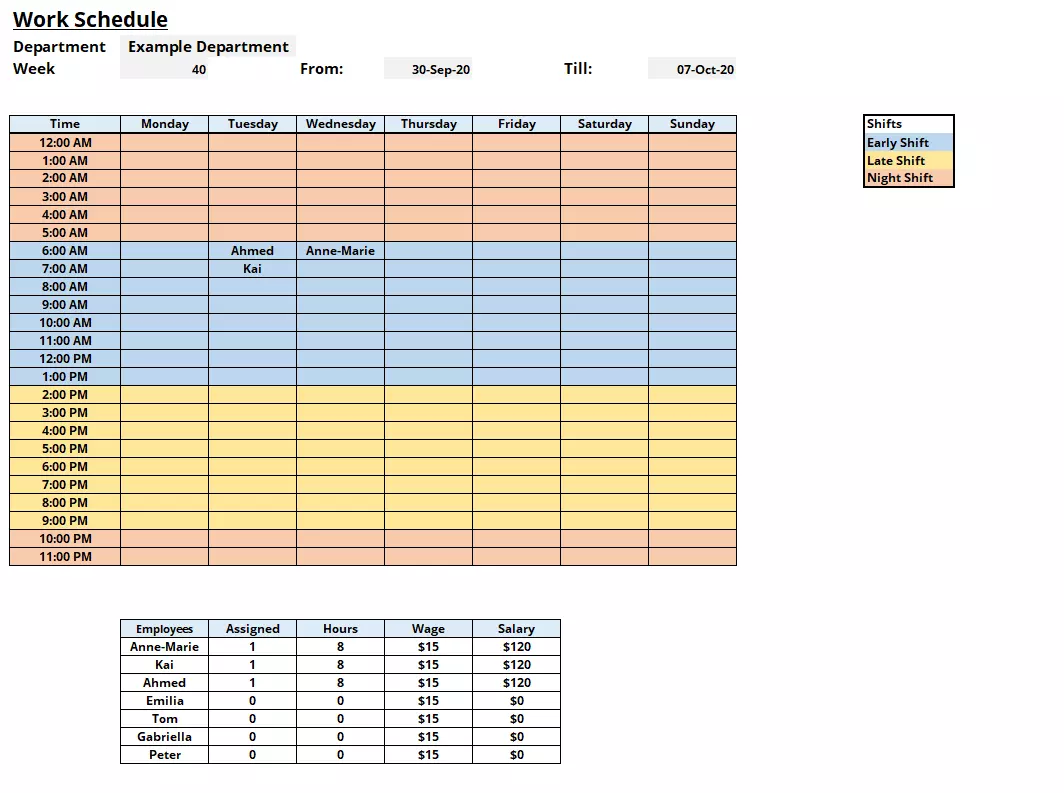
The following Excel template can be used as either a work schedule for an individual employee or as a weekly schedule for the entire workforce. You can find all instructions in the Startup Guide on how to create a monthly work schedule.

You can download the free work schedule template by following this link:
Next, we’ll describe how you can use the template and adapt it to your needs.
Adapt the work schedule template to your needs
The downloadable Excel template fulfils all requirements of a professional work schedule: It’s limited to the most important information and is designed in a clear and appealing way.
However, if the work schedule isn’t to your liking aesthetically, then you can easily adapt it – for example by changing the column width. Use the “fill colour” button in the “start” menu to clearly define layers and tables from one another. Different fonts and font sizes can also complement this. The right side of the template offers plenty of white space: for example, for additional notes or to loosen up the work schedule with additional columns.
Of course, it’s up to you to adjust the layout of the work schedule template. We recommend, however, that you keep the column segmentation as it is. Only then can the calculation module correctly calculate the shifts, weekly hours, and wages. If you do have to make changes, then you should make yourself familiar with the COUNTIF function or the “if then” function in Excel. Or you can follow the following steps.
Edit the employee list
As you can see, some sample names have already been entered in the work schedule template. Click on the name in the weekly plan and you’ll notice that next to each cell is a small arrow. Click on it, open the drop-down menu, and select the employees assigned to the shift. In this way, you don’t have to manually type in the employee names for the shift each time.
Every drop-down menu is linked to the employee list in the lower end of the template. When you change the names in the list, the names in the drop-down menu will adapt accordingly. In this way you can also change the names of the sample employees with those in your company. Should you need more employees than the number included (7), then you must amend the drop-down menu. To do this, follow these steps:
- Write out the names of your employees under the “employee list” column. Note that the sequence will be mirrored in the drop-down menu.
- Now click on any empty cell in the work schedule.
- Click on the “validation” button in the menu ribbon under “data” and a context menu will open.
- Under “settings,” select “list” in the “allow” drop-down.
- Remove the tick at “ignore blank” but keep the tick for “in-cell dropdown.”
- Now, click on the button next to the dialogue box “source.”
- With your mouse, mark your employee list. This will now be used as a source for your drop-down menu and will be shown the respective dialog field with the formula, which could look something like this: =$C$35:$C$42. Alternatively, you can enter the source manually.
- Next, in the “input message” tab, remove the tick next to “show input message when cell is selected.” Do the same with the tick at “show error alert after invalid data is entered” in the “error alert” tab.
- Click on “OK.”
You have now created a new drop-down menu that links to your employee list, making the shift allocation process significantly easier. Now you have to adapt the calculation module in the bottom of the Excel template. We’ll tell you how this works in the following steps.
Of course you don’t have to include a drop-down list. You can also make do without it and instead manually enter the names of your employees in the provided layers. The functionality of the calculation module will remain intact.
Edit the calculation module
The colour-highlighted calculation module on the margin of the Excel template simplifies the shift schedule for you by automatically calculating the number of entries, the weekly hours, and the gross income of your employees. For example, if you want to assign your employee Anne-Marie to a shift, then this will be automatically assigned and her weekly hours will be automatically calculated (in the example 4 entries each at 8 working hours equal a total of 32 weekly hours). Depending on the gross hourly wage that you enter for Anne-Marie, Excel will calculate the gross income for Anne-Marie in the final column.
If you’ve entered additional names into your employee list, then you must complement the related calculation formula. You can use this example as a guide:
- Excel calculates the number of “entries” with the COUNTIF function. For the employee Anne-Marie, this will be as follows: =COUNTIF(C7:I30;C35). This tells the table calculation program: If in the cell fields C7 to l30 the entry from C35 (Anne-Marie) then it should be counted. If on row 42 under Peter, you add a further employee, the formula should be =COUNTIF(C7:I30;C42) etc.
- In the work schedule example, 8-hour shifts apply. To calculate the total weekly hours of Anne-Marie’s shift, then the number of entries must just be multiplied by 8. The accompanying formula is: =D35*8. For an additional employee, the formula would be =D42*8.
- Excel calculates gross income in the same way. To do this, enter the formula =E42*F42 in the example.
Your work schedule template is now adapted and can be used again and again for future staff management plans.
Copy the work schedule template into a new Excel table
The practical thing about your work schedule Excel template is that it can be used over and over, instead of having to build a new table from scratch each time. For every week, you can simply save a new .xlsx file. It’s even more practical, though, if you create new sheets in the same Excel table and directly paste the work schedule template into it. In this way, you’ll have a clear overview and can incorporate several weekly plans into one monthly plan.
Pasting your work schedule template into a new sheet doesn’t take much effort, but surprisingly does not work with the approach suggested by Microsoft. The problem: While content and formatting are completely the same, the same does not apply to column width. Instead, the result will be distorted, since Excel uses default values.
Here is a solution that actually works:
- In the bottom left corner of the Excel window, click on the “+” button to add a new sheet.
- Right-click on the new sheet and select “rename” to rename it by the given calendar week.
- You can also change the “tab colour” of your sheets to visually separate them from one another.
- Click on the sheet with your work schedule template and mark the relevant field in the table. Pull your mouse across the area that includes the cells A1 to l41. Careful: Marking the entire sheet with the key combination [CTRL] + [A] or by clicking on the intersection between the column and row names will not lead to the desired result.
- Use the key combination [CTRL] + [C] to copy the marked field.
- Go to your new sheet, click on the cell A1 and use the key combination [CTRL] + [V] to paste in the work schedule template. The table contents and the cell colours, lines, and font formatting will also be carried over, but not the column widths, which keep their default settings.
- The solution: While the pasted table is still marked, click on the SmartTag “(Ctrl)” in the bottom-right corner of the marked field.
- In the opening context menu, click on “default width” under “enter.” The original formatting of your work schedule template will be fully restored.
- Alternatively, you can mark the cell A1 in your new sheet and, under the start tab, click on the arrow in the menu bar under the “enter” button. Here, select the “enter content” option. In the opening window, mark “all” under the “enter” point. In a second, separate window, repeat this step, this time marking the point “column width” and then click on “OK.”
Subsequently, you should enter the current calendar week in cell C3 (including related details) so that your employees can see straight away which planning period the work schedule applies to.
Assigning employees shifts in your work schedule
Using the free work schedule template is super simple: Mark early, middle, late, and night shifts by using the “fill colour” tool to mark these as different blocks, and type in the names of the employees on duty once (!) per shift. The calculation module will automatically count the items and will calculate the corresponding weekly hours and the gross income.
If you have created a drop-down menu, then you can just copy and paste it into the correct locations and select the suitable employee for each assigned shift.
Utilise the work schedule
Once you’re happy with the work scheduling for this week, you can:
- Print the Excel work schedule and hang it up, for example, in the break room
- Save the Excel work schedule as a PDF file and send it in an email to your employees
Remember that the work schedule works as a binding agreement as soon as it’s hung up on the notice board or sent out to the team. The schedule must be posted between 7 and 14 days ahead of the scheduled shift. Extra pay is given to employees if an employer changes the schedule after the it’s posted.
Please note the legal disclaimer relating to this article.
Reviewer

Anne-Laure Wolber
Anne-Laure has been part of the IONOS Digital Guide since its inception in 2016. As an expert in the startup category, she focuses primarily on the strategic integration of SEO, GEO and conversion rate optimisation. Over the years, she has also gained extensive experience in related performance disciplines such as lead generation and native advertising. As a polyglot, she leverages her multilingual background to develop content strategies with precision and impact for international audiences.