Copy WordPress website and safely test locally
In this tutorial, we'll show you how to create a local copy of your WordPress Web site. If you would like to move your WordPress website from another provider, you will find detailed instructions here.
We recommend that you make a copy of your WordPress installation and install it on your computer. You can use this local WordPress installation, for example, to test new plug-ins before installing them on your "real" website.
If there are problems, it is always better to identify them on a test system. There you will have enough time for error analysis.
The steps described here refer to a Windows system. On Mac or Linux computers, however, the process is basically the same.
Preparations
Required programs
There are various programs that you can use to set up a local WordPress installation. In this article we have focused on the following easy-to-use tools:
- Install a local web server and a MySQL database. In this example XAMPP was installed under the following folder: C:xampp
This program is also available for Linux and Mac.
- To download your WordPress files, you need an FTP program such as FileZilla Client.
- The local WordPress installation must be adapted later. For this purpose we have downloaded the plugin Better Search & Replace.
Procedure
The setup of a local WordPress installation consists of the following steps:
- Download WordPress files: Download all files from your WordPress installation via an FTP program and copy them to your computer.
- Identify and export database: You can Control Panelidentify and export the database of your WordPress installation by means of the
- Import and customise database: You import the exported database and adjust it using XAMPP.
- Customise file: For WordPress to work locally, you must customise a file
- Customise links: Use a plugin to adapt the links to your local WordPress installation
Download WordPress files
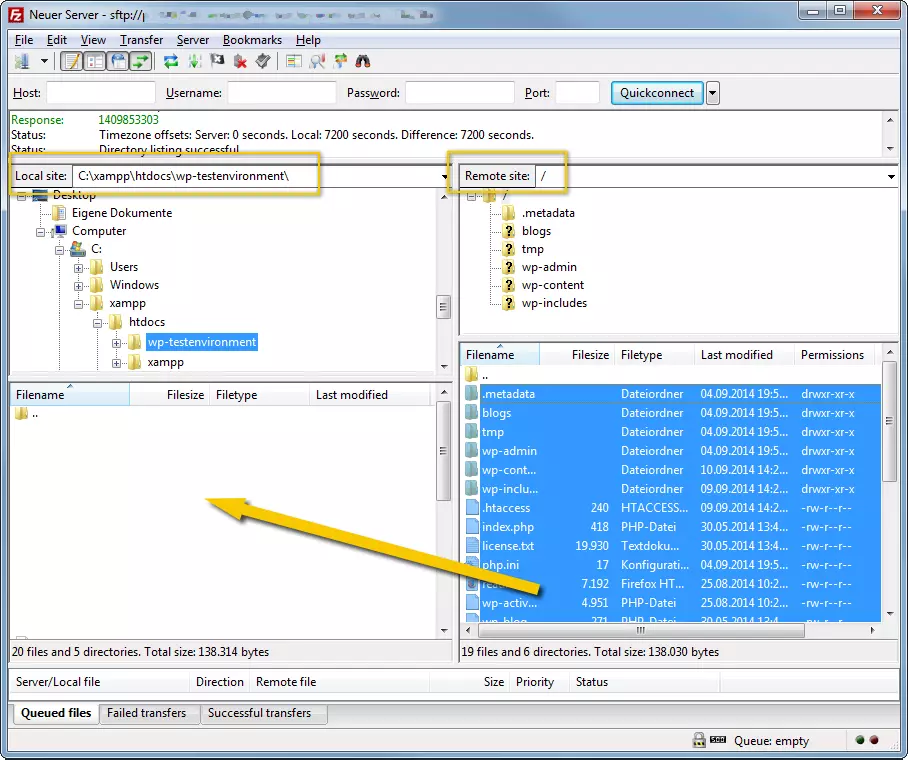
- Create a new folder under C:xampphtdocs. In this example: wp-test environment
- Remember this folder name. You will need it to log into the local WordPress installation later, for example.
- Using an FTP program, copy all the files from your WordPress installation into the folder you created previously.
Identify database
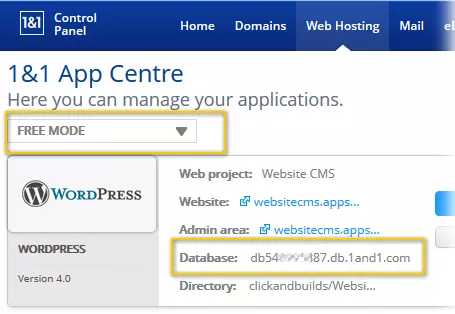
If you don't know which database your WordPress installation is using, then check the IONOS App Centre directory first:
- Log in to your IONOS customer account.
- Click on the IONOS App Centre Show all applications in Free Mode
- Make a note of the database name of your WordPress installation. Important is the part up to the first point.
Export database
- Log in to your IONOS customer account.
- Click Menu > Hosting in the title bar.
- In the Databases tile, click Manage.
- Click Open behind the desired database.
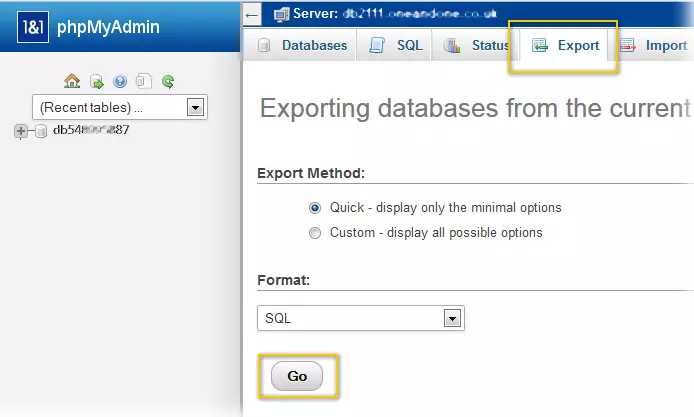
- On the menu bar, click Export.
- To start the export, click OK.
- Save the export file to your computer.
Make a note of the file name and location of the exported file. You must import these in the next step.
Install WordPress locally
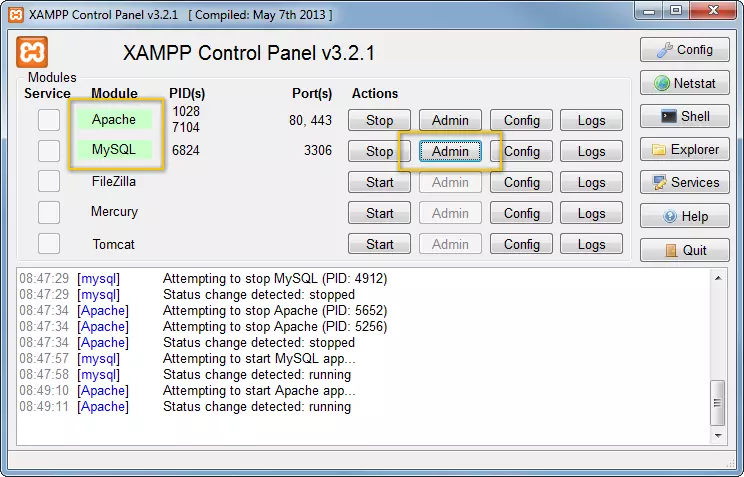
All steps in this section require that your local web server (Apache) and the local database (MySQL) are started. If you have stopped these modules in the XAMPP Control Panel, you cannot use the local installation.
Import database
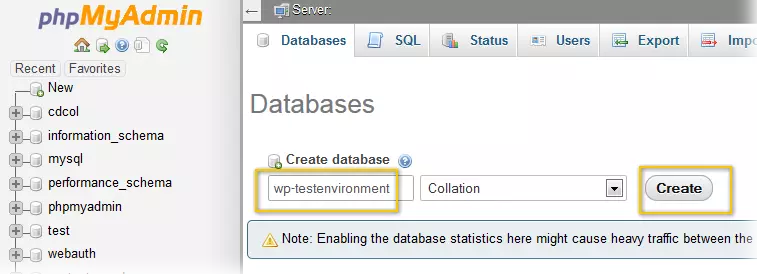
The new database is displayed in the left pane. Import the previously exported database into this empty database.
- Click on the new database
- Click Import > Browse
- Select your previously exported database. Click OK
The database is imported.
Customising the Local Database
In the database the entries "siteurl" and "home" have to be changed manually. Both still contain the URL at which your "correct" WordPress installation can be reached. You must replace this URL with the local URL.
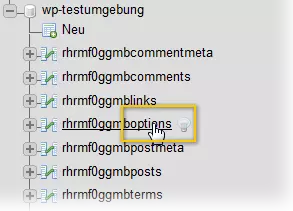
- Click left on the table ending with "options
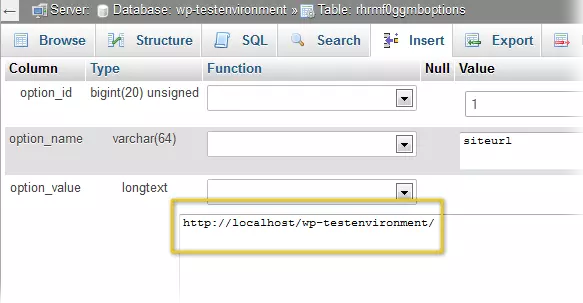
- Click on Edit on siteurl
- Enter the URL where your local WordPress installation is located. In this example: http://localhost/wp-testumgebung/ Note: "wp-test environment" is the name of the folder you created in the section "Download WordPress files". If you have chosen a different folder name, you must enter it here
- Click OK.
The changed entries must be in the option_value column.
Customize files
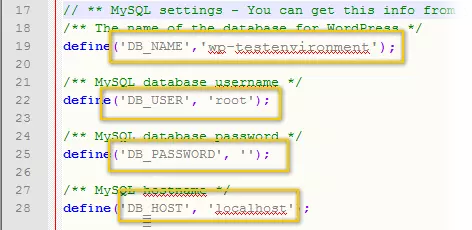
You must now customise the file wp-config.php. This contains the details of the database of your "correct" WordPress installation. You must replace these with those of your local installation.
- Open the folder containing your local WordPress installation. In this example: C:xampphtdoc's
wp-test environment
"wp-test environment" is the name of the folder you created in the "Download WordPress files" section. If you have selected a different folder name, you must enter it.
- Save the file
Customise links
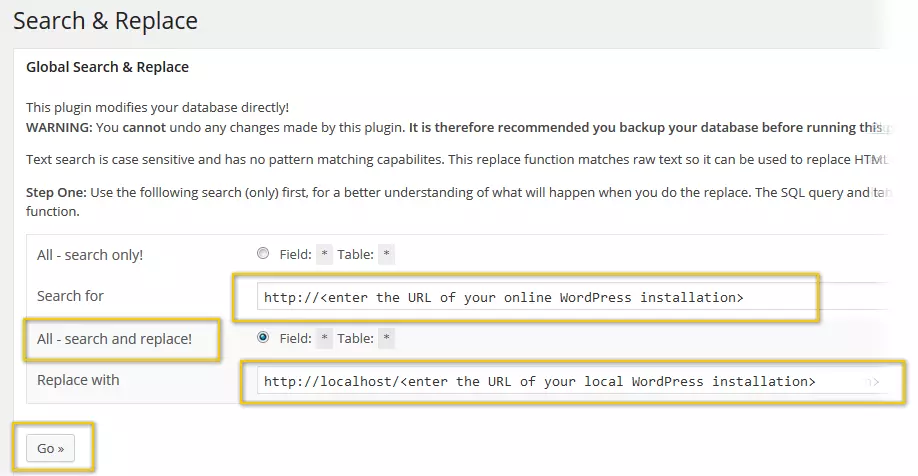
The links of the local WordPress installation still refer to your online installation. With the help of the plugin "Better Search & Replace" for a comfortable search & replace this can be changed quickly.
- Go to the admin area of your local WordPress installation by entering the corresponding URL in your browser. In this example: http://localhost/wp-testumgebung/wp-admin.
"wp-test environment" is the name of the folder you created in the "Download WordPress files" section. If you have selected a different folder name, you must enter it.
- Install the Better Search & Replace plugin.
- Click Settings for the plugin you just installed.
- Enter the URL of your "online installation" in the Search for field.
- Activate the option All - Search and Replace!
- In the Replace with field, enter the URL of your local WordPress installation. In this example: http://localhost/wp-testumgebung/
- Click Start.
The changes are made.
- Click Settings > Permalinks
- Choose AcceptPost Name Changes
The local WordPress installation is now set up.
Using local WordPress installation
The following steps are necessary to use the local WordPress installation:
- Start the XAMPP Control Panel program.
- Start Apache and MySQL
- Enter the address of your local installation in the browser. In this example: http://localhost/wp-testumgebung/ or http://localhost/wp-testumgebung/wp-admin
Use your local WordPress installation as usual
- Stress-free, no matter your skill level with easy AI tools
- Full customisation with themes and plugins
- Hassle-free updates and less admin


