The 10 most common WordPress problems and their solutions

WordPress is generally a reliable CMS programme, so there’s a good reason that most bloggers manage their web presence with WordPress. But even though the system’s developer is continually working to improve it, the application may pop up with error messages from time to time. So that you can continue to work on your website as quickly as possible, this guide will offer solutions for the 10 most common WordPress issues.
- Stress-free, no matter your skill level with easy AI tools
- Full customisation with themes and plugins
- Hassle-free updates and less admin
1. White Screen of Death: WordPress only shows a white screen
This error indication is familiar to many WordPress users: If the display is just a white page instead of your website, this is often called the White Screen of Death. This error freaks many users out when they’re confronted with it for the first time. After all, it seems like the entire page has disappeared. But the cause of this, like other WordPress errors, can easily be found and corrected.
There are multiple possible causes for the White Screen of Death: non-functioning plugins, problems with PHP, and various coding or database errors. So it’s recommended to determine the exact cause. If WordPress isn’t working correctly, sometimes a blank screen will appear instead of your site. It seems as if it doesn’t work anymore. Often, you just have to fix a small blunder and everything will be displayed normally once again.
 To display this video, third-party cookies are required. You can access and change your cookie settings here.
If you’re an advanced user and can deal with an FTP client (if not, no worries), then you should employ WP_DEBUG to find out why WordPress is showing white instead of your website. When active, the WP_DEBUS module shows error messages that explain exactly why your site isn’t working properly. You can use these messages as a troubleshooting guide.
But not every user knows how to make use of WP_DEBUG. That’s no problem, though, since there are many other possibilities for finding out what is causing your White Screen of Death. Plugins are among the most common perpetrators.


Error source 1: Plugins
If there’s something good to say about the White Screen of Death, it’s this: The nickname for this WordPress error makes it sound more dramatic than it is. Often, simply deactivating the plugin is enough to make everything display correctly again. The White Screen of Death is often a result of one of the following actions:
- You activated an incorrectly functioning plugin in WordPress.
- You changed the setting for an active plugin.
- You changed the backend code of an active plugin.
If you’ve recently made one of these three changes, then simply access the plugin page in WordPress and deactivate each plugin that you recently modified. In many cases, you will have already solved the problem. After deactivating the plugins, your website should ideally be restored. If you modified the backend code of a plugin before the display error and would like to reuse this plugin, then you must do the following:
Delete the plugin from your WordPress personal directory and upload an original, unmodified version of the same plugin from the WordPress plugin directory.


But there are also cases where the plugin can’t be deactivated in this way, because the WordPress dashboard isn’t visible either. In this case, it’s not possible to make changes to the WordPress menu.
If you’re presented with this issue, then you need to use an FTP client (File Transfer Protocol) to access your WordPress files and delete or deactivate the modified plugin. If you have never used an FTP client to make changes to your WordPress installation, don’t worry: Its handling is easy to learn and many FTP clients are available free of charge.
As soon as you have installed your FTP client, log in to your domain using the log-in credentials you received from your web host. Then delete the problematic plugin by following the instructions below, and the White Screen of Death should once again be gone.
- Open the index where your WordPress files are saved.
- Open the ‘wp-content’ folder.
- In the ‘wp-content’ folder, find the ‘plugins’ folder.
- Open the ‘plugins’ folder and search for the plugin that you worked on before you received your display error.
- Delete the plugin. You might potentially have to mark the plugin and right-click on it with the mouse to find the appropriate option that deletes it from your WordPress installation. If you don’t want to delete the plugin, then you should rename the folder for that plugin, which will also deactivate it.
- Return to your browser and refresh your website. The White Screen of Death should have disappeared and you can log back in to WordPress.
Always remember to use only those plugins that the respective developer actively supports. The plugins need to also be compatible with the newest version of WordPress. Using out-of-date plugins can quickly lead to problems.
Error source 2: Code error
If the error isn’t due to a plugin, then it could be the result of modifying the ‘functions.php’ file or another PHP file using the WordPress theme editor.
Eventually, you’ll see the following error message on your white screen:
Parse error: Syntax error, unexpected $ end in /home/name/public_html/wordpress/wp-content/themes/your_theme/functions.php on line 231
That means that there’s an error in your code. The selected WordPress theme (the layout and design of the page) can’t be displayed correctly. In this case, you need to restore the original version of the file.
The problem is then, of course, that quick access to the file may not be possible because of a white screen being displayed instead of the WordPress theme editor. The best way to resolve this problem is as follows: Reload the defective file in its WordPress folder with your FTP client and exchange it.
After logging on to your server, follow these steps:
- Open the index where your WordPress file is stored.
- Open the wp-content folder.
- In the wp-content folder, find the theme file.
- Open the theme folder and search for your current WordPress theme.
- Open the folder of your current WordPress theme and make sure that the functions.php file is in the folder.
- Now upload a functional version of functions.php. This can be a copy of the file that you saved on your hard drive before you modified the file. You can also take the original version from your theme.
- If you don’t want to overwrite the file, you need to do the following: Rename the folder of your current theme. This will deactivate it and use the standard WordPress theme again. Now it’s possible to manually remove the incorrect code from the functions.php file in the inactive theme.
- If you’ve decided to exchange the non-functioning functions.php file with a working version and your FTP client asks if you want to overwrite functions.php, click yes.
- Return to your browser and refresh your website. The White Screen of Death is now ideally gone and a regular log-in is once again possible.
You can also use a different theme, instead of changing the parent functions.php file. This makes changes to your theme without changing the code.
It’s always worth it to save a separate backup copy of your modified themes before you make any changes. That way you make sure that the above operation remains feasible, should you ever receive the White Screen of Death.
Unknown error source
Sometimes the White Screen of Death appears for unexplained reasons: You’ve neither modified plugins nor overwritten your theme’s code. You try to access your URL and instead of your website you see the White Screen of Death. But how can you correct this WordPress error, when there’s no obvious cause for it? In situations like this, a WP_DEBUG really helps: The WP_DEBUG error messages identify problematic files. Then you can easily remove, change, or overwrite these files, and your website remains fully functional. But even without WP_DEBUG, there are ways to clear your website of errors. Because of the complexity of many WordPress plugins, the probability is high that unknown errors are due to a plugin. Maybe one of your plugins is outdated, or a recently installed update isn’t compatible with your WordPress backend. If you have this suspicion, you should deactivate all your plugins and then reactivate one after the other, so that you can find out step-by-step which plugin is causing the problem. With the FTP client, log on to your website’s server. Then follow these steps to identify the bad plugin:
- Navigate to the index where your WordPress files are stored.
- Open the wp-content folder.
- In the wp-content folder, find the ‘plugins’ folder.
- Rename the plugins folder. This will automatically deactivate all plugins. You can name the folder whatever you want, you just need to be able to remember it later.
- Access the WordPress dashboard. If the White Screen of Death has disappeared and you can log in, you know that one of the plugins caused the error.
- Change the name of the renamed folder again back to ‘plugins’. Now, all your plugins should be listed on the corresponding page in WordPress – but they are now inactive. Start to reactivate them one at a time. If the display becomes white again after the activation of a particular plugin, then you know which plugin is at fault.
- Return to your FTP client and delete the problematic plugin.
If your website is still white after these steps, the problem could be associated with one of the installed themes. In this case, follow the same procedure with your theme folder: Rename it and reactivate all your themes one at a time, until you see the white display screen again. Apart from plugins, there are of course other causes for the display error which aren’t always obvious at first sight.
- Caching: Eventually, you may want to use a caching plugin to improve your WordPress load times. If you do, and you’re still seeing the white display screen even though you’ve completed the above steps, you may simply need to clear your page’s cache. If the programme’s cache can’t be deleted because you still can’t access WordPress, then delete the browser cache.
- Damaged file(s): Your WordPress files could possibly be damaged (for example, by malware). Contact your web host and ask for a problem diagnosis.
- Server down: Check your e-mail inbox. Many hosting providers notify their customers via e-mail when the servers are down. If you haven’t gotten any messages from your web host, then call their customer service line. It could be a server problem that your provider has not yet diagnosed.
The last possible option for curing the White Screen of Death is the complete restoration from a backup.
2. Internet issue: 500 Internal Server Error
The error message ‘500 Internal Server Error’ plagues all website operators – not just those using WordPress. Luckily, this cause is found pretty quickly in most cases. With WordPress, plugins and/or other problems with themes often also cause server problems. Other possible causes for internal server errors in WordPress are damaged .htaccess files or insufficient PHP storage space. Internal server errors can also affect the WordPress admin page while the rest of website works perfectly.
Error source 1: Damaged .htaccess files
The most common cause for the ‘500 Internal Server Error’ message is a damaged .htaccess file. For this reason, you should check this type of file first for such an error: Log in to your server via FTP access. Navigate to the root index of WordPress and search for the .htaccess file. Temporarily give this file another a name. Now reload your website. If it works: Congratulations! Now create a new .htaccess file by simply navigating to Settings à Permalinks in your WP admin panel and saving the settings again.
Error source 2: Insufficient PHP storage space
Sometimes PHP storage limits can also cause a 500 Internal Server Error. To determine whether or not this is the cause for the error, you should check the error_log of your website. Activate wp_debug and check the error protocol. Open your wp-config.php file and search for the following code line:


Define ('WP_DEBUG', false);
And change it as follows:
Define ('WP_DEBUG', true);
It’s once again recommended to deactivate plugins and themes one at a time, since an internal server error can also be caused by faulty plugins or themes. Alternatively, increasing the PHP storage limit can often correct the error.
 To display this video, third-party cookies are required. You can access and change your cookie settings here.
Error source 3: Damaged core files
It’s not a common occurrence, but occasionally a corrupted WordPress core file can also cause an internal server error to be reported. In such case, you should upload a new set of core files to eliminate the error source.
Log in to your website via FTP and create a new wp-admin and wp-includes folder. Changes in these folders should not influence your personal customisations for WordPress, unless you’ve saved modified files in these folders – but that’s usually not the case. The files in the wp-content folder contain your theme, your plugins, and other modifications. Do not renew this folder, otherwise you’ll delete all your website content.
If everything else fails, you have to download a new copy of WordPress from the official website and completely reinstall everything.
3. Error establishing a database connection
If you’re an experienced WordPress user, then this WordPress error is probably a quick fix. But for beginners, ‘Error establishing a database connection’ can be a confusing error message.
The error occurs, for example, when you manually install WordPress or when you try to upload your own website. Of course, a good WordPress host should configure everything for you and make sure that this error never occurs. But if you manage WordPress completely alone, then this error can quickly occur.
The wp-config.php file is the most important of the WordPress PHP files, because without it, no connection to the database can be established and your website won’t function anymore. In this file, your connection information is defined – database name, username, password, and host. With paid hosts, this file isn’t editable. The next scenario is highly unlikely to be relevant for you, provided you are using a managed hosting service.
 To display this video, third-party cookies are required. You can access and change your cookie settings here.
Error source 1: Incorrect connection settings
If there’s an error when establishing the data connection, this is usually due to incorrect database connection settings in wp-config.php. If you relocate a website from an old hosting service, then you have to make a change. Update the database name, the database username, and the database password in your wp-config.php file, so that your database works correctly.


Error source 2: Error with the relocation of your WordPress website
A more common error source is associated with the relocation of your WordPress files to a new hosting service. The website is still displayed when you go to the URL. But as soon as your old hosting service has finalised your contract, if you haven’t moved your database to the service of your new provider, then your site will no longer be displayed. You’ll receive the ‘Error establishing a database connection’ error message.
The best method to prevent this error is to immediately transfer the entire database to your new hosting company. Update your wp-config.php file to access the new database. This way, it’s possible to safely cancel your old hosting account without losing any data or being confronted with the dreaded ‘Error establishing a database connection’ message.
Before you start troubleshooting, make sure you have a backup copy of your database available by exporting your SQL file.
Error source 3: Faulty wp-config.php file
So, you forgot to update your wp-config.php file when you changed the database password.
You should frequently update your database password to secure your database, but you have to remember that you will also need to change the password in your hosting control panel as well as in your wp-config.php file. Download your wp-config.php file, open a text editor, and edit the following line:
Define ('DB_PASSWORD', 'Enter password here');
Enter your new password, save the wp-config.php file, and upload it via FTP. Reload your browser and check if your website is fully loaded.
Error source 4: You entered your database information wrong
Typos sometimes sneak in, and a tiny typo can crash an entire website. An incorrect underscore or a wrong number in your database name, username, or password is enough to block access to your website.
Most WordPress installations are performed via a hosting control panel with an assistant. But some users still prefer to do a manual installation. If you installed WordPress without automated support, you also have to manually create your database. Pay special attention here to make sure that you’ve correctly entered your database name, username, and password. To make absolutely sure, you should use the copy-paste method.
Even doing this, be careful to make sure that you’ve only copied the text that you need. Pay attention that you don’t copy any spaces, since WordPress interprets this information as character input. Spaces can therefore cause errors when the installer tries to connect to your database. You also need to make sure that you enter the information in the correct field during installation.
Error source 5: Problems with DB_HOST when transferring a WordPress website to a new host
Once you’ve updated your wp-config.php file to access your database from a new hosting provider, you may need to change the DB_HOST value as well.
This problem doesn’t happen often, but it can occur. Some hosting services use their own values when defining the DB_HOST parameter in wp-config, but this isn’t always the case. Other hosts define a URL to the MySQL database server, and this must be used as a value for DB_HOST. Sometimes it also works if the hosting IP address is entered instead of a MySQL URL.
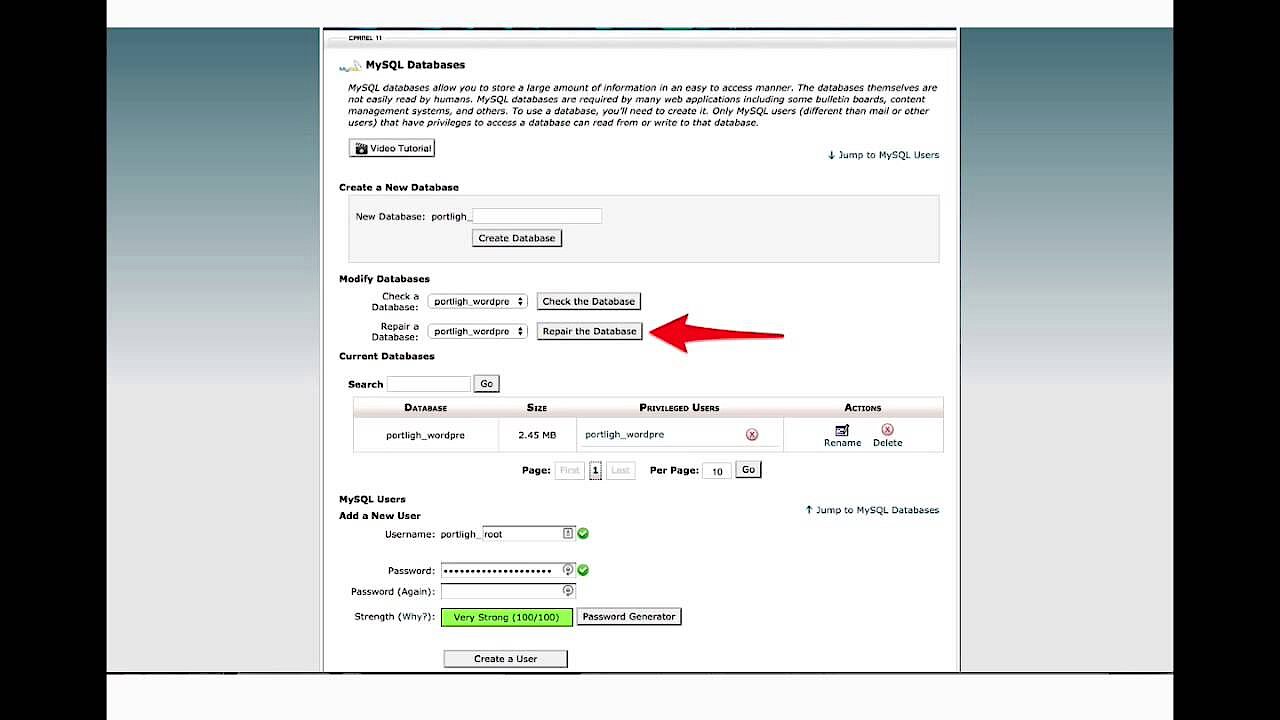
Error source 6: Your database is damaged
This error is not identical to the “Error establishing a database connection”, but it is related to it. Sometimes, the frontend of your website works perfectly, but still displays an error message. One or more database tables are not available, and the database might need to be repaired.
Open your wp-config.php file and go to the section that defines your database name, username, password, and host. Under host, define the following:
Define ('WP_ALLOW_REPAIR', true);
Now save your wp-config.php file and upload it via FTP. Access the following URL:
http://www.your-website.net/wp-admin/maint/repair.php
On this page, you’ll see two options. Option one is the ‘Repair Database’ button, and the second option is a ‘Repair and optimise the database’ button. At this point, you should make sure that you’ve created a full backup of your database.
Click on the ‘Repair Database’ option and as soon as the repair process is finished, open a new tab in your browser. Now check whether or not your website is displayed problem-free.
Error source 7: The MySQL database server is shut down
This scenario can occur if the server of your hosting provider reaches its limits. If your website loaded with too much traffic, the database server may be overloaded. Some providers may have a large number of sites on the same server. Then, if one of the websites has too much traffic, this can cause problems for the rest of the sites.
You should call your hosting provider to make sure, and ask them to check the status of the database servers. Maybe there is a technical problem or your hosting provider hadn’t yet sent you an e-mail about planned service maintenance. Even though this is very unlikely, a simple call can provide assurance.
Talk with your hosting provider and explain that you have already tried many troubleshooting options, without success. If they tell you that your website produces a lot of traffic on the server and a hosting upgrade is recommended, then you have successfully tracked the source of the error.
As you can see, the ‘Error establishing a database connection’ is not so grave. In most cases, you just need to check exactly whether or not your database settings are entered correctly in the wp-config.php file.
4. Connection timed out
This error message generally occurs when the website’s server is overloaded and the browsers requests can’t be completed. Another possible scenario is a poorly configured server. The ‘connection time out’ error is shown when your website sends more requests to the server than it can deal with.
Error source 1: Faulty plugins
First of all, you should deactivate your plugins. If this solves the problem, then reactivate them one by one. With this method, you can see which plugin is causing the problem. Alternatively, you can switch from your current theme to the standard WordPress theme.
Error source 2: Insufficient PHP storage space
Another possible error source is the PHP storage space. Increase the limits for this in the wp-config.php file. Open the file and enter the following line of code:
define(‘WP_MEMORY_LIMIT‘,‘64M‘);
This line will increase the storage space to 64 MB. You should note, though, that shared web hosting can only increase your memory to a certain limit. If you want to increase it further, you need to contact your web host and have them increase the storage limit. Keep in mind that many shared hosting providers keep the PHP storage limit very low.
If you have access to your php.ini file, you can also increase the maximum execution time. Scroll within the file to the line with the option max_execution_time. Set the limit value to zero to completely remove the PHP execution time limit, or set any other value that you desire.
Error source 3: The 404-error
Another common cause for error messages is the so-called 404 error. This is when a website tries to load a file that doesn’t exist. It can slow down your website and cause a timeout.
Error source 4: Faulty cookies
This WordPress error may occur if you’re not yet familiar with the use of an .htaccess file. In extremely rare cases, this WordPress problem occurs when your browser saves a faulty cookie. Even though this situation rarely occurs, it’s always a good idea to delete the browser cache and reload the page to prevent this error.
The universal solution: Core Control
There are many troubleshooting solutions for the various WordPress errors. Many of these error sources can be prevented with the plugin Core Control: Core Control is a collection of plugin modules with which you can control system files of the WordPress core. If you want to use this plugin, load the ‘Core Control’ settings page and activate the HTTP module. Then go to the new tab and try out Core Control.
5. WordPress isn’t saving changes
You’ve just modified the theme or created a new entry, reloaded your website – but no changes are visible. In most cases, there’s an easy solution for this problem: your web browser needs to completely reload the page from the server. A web browser saves copies of websites in its cache or in the storage of their computer. Then, on subsequent visits to the site, the web browser just accesses the saved copy in the cache so that the website loads faster.
If your web browser is loading a saved copy of the page from the cache, then your most recent changes won’t be displayed since it’s dealing with an old copy. To completely reload your site in Firefox, for example, you have to use the key combination Ctrl+Shift and press the R key. In Chrome, press Ctrl+F5. Depending on your browser settings, these shortcuts can vary.
It can happen that a web hosting service uses caching plugins in the backend without its customers knowing. It’s usually possible to disable this cache plugin in the configuration settings of your web host. To be sure, you should ask the support staff of your web host whether the service uses caching plugins or not. If this is the case, you can request that these plugins are deactivated.
Changes not being displayed is a common occurrence when using a WordPress hosting plan. Many hosting plans use server-side caching. If you’re using the provider’s WordPress service, it may be useful to manually delete the cache. In many cases, your changes will be shown immediately after clearing the cache.
If you use a caching HTTP reverse proxy on your webserver, changes to your files won’t be immediately shown. Edits first become visible after a certain time, when the cached version of the page has expired and is reloaded. To resolve this issue, set your caching system accordingly.
WordPress doesn’t have cache storage available by default. But some WordPress plugins add cache functionality to your WordPress site, regardless of your browser settings. This helps your website to load faster, since WordPress obtains your files from the cache. All good cache plugins clear the cache as soon as an edit, page, or comment is published. But if you make other changes, such as to your theme, the cache may not be deleted and will still display the old version. In this case, check the tutorial of the respective plugin to find out how to clear the cache.
When you make changes in a file, the new file is initially only saved on your computer. If you don’t see any changes, make sure you have uploaded the file and placed it in the correct folder. If you’ve overwritten an identical file, then it could be the case that the storage process hasn’t been completed. To make sure, you should delete the oldest version of the file from the host server.
You can also use a proxy website and reload your site from there. Because this is a proxy page, no cache is used, so instead the latest version of the site is loaded.
6. Ongoing maintenance mode after an upgrade
It frequently occurs that you have a plugin, a theme, or maybe a WordPress core file that you need to update. You save your website, run the update, and then there’s an interruption. There is a conflict between the upgrade and the existing plugins, or the upgrade and your custom code. The result is the report of an internal failure.
If you deactivate the faulty plugin or the user-defined code, it’s possible that you may still be stuck in the WordPress maintenance mode. On the home page of your site, you’ll see the following message:
Maintmode.wpe
The site is now publically in maintenance mode. But what exactly is that? Maintenance mode is a core function that suspends access to WordPress during updates or installation. When you run updates, some backend processes have to stop for a short time. WordPress then creates a temporary file to install the updates. As soon as the process is finished, the file is deleted and the website functions normally again.
It becomes problematic if there’s a conflict with this file. Such a conflict can interrupt the scheduled deletion of the temporary file. The maintenance file then continues to run after the update is finished and the above message is displayed.
But this type of conflict is easy to correct if you’re familiar with an FTP programme. Simple remove the maintenance file directly from the index:
Log in via your FTP programme and change to your root directory (the same folder as the wp-config.php file). If you can’t find the file, then it’s probably hidden. Select the ‘Show Hidden Files’ option in your client. As soon as you’ve found the file, delete it and update the client. Then delete the cache in your browser and reload your website.
But how can you prevent conflicts with the maintenance file? With these simple steps, you can rule out many problems in advance:
- Many conflicts arise when update notifications are ignored. Use the updates as soon as they’re available. Check whether or not important updates are recommended on your WordPress admin page.
- Make sure that all your plugins and themes are compatible with the newest version of WordPress. If not, ask the plugin or theme developers if and when the publication of a new version is planned.
- Don’t run any updates without first creating a backup.
7. Syntax error
It was discussed in a previous section how just a small typo in the wrong place can cause your entire WordPress page to stop working. But the ‘Syntax Error’ message is not an unsolvable problem.
A syntax error is usually caused by a small but decisive error in your code syntax. A missing comma or brackets may interrupt the entire script. Have you recently added a snippet from the internet or updated a plugin? If so, then you should check that first.
To correct syntax errors, you need to edit the code section causing the error. Either delete it entirely or repair the syntax. As a beginner, it can quickly become frustrating if a single error is making the entire website inaccessible. If you’ve inserted the code using the editor section in your WordPress, then no direct access to your WordPress code is available. The only option at this point for correcting the syntax error is a direct exchange of the problematic code via FTP.
Log in with your FTP programme and switch to the index with your theme file that needs to be edited. The error code indicates which file and which line is the most accurate.
Now either completely remove the recently added code or correct the syntax. As soon as the code has been deleted or edited, save the file and upload it to your server. Access your WordPress website without the cache, and it will work normally once again.
8. Automatic update failure
WordPress offers lots of cool features – and without a doubt, the automatic update function is very practical for many users. But there are sometimes complications when updating WordPress automatically.
If you have the current version of WordPress installed, then you don’t need to worry about smaller and security-related updates. Most of these updates take place in the background. This means that the smaller WordPress updates automatically get installed without you having to do anything. For bigger updates, such as a completely new version of WordPress, simply click on the ‘Update Now’ button.
Before you update WordPress, you should always create a backup of your WordPress database as well as all files and folders. If you get the error message ‘Update failed’, you can solve this problem as follows:
 To display this video, third-party cookies are required. You can access and change your cookie settings here.
Delete the maintenance file
First, delete the maintenance file via FTP from your WordPress index. If a WordPress update fails, then you need to delete the file to return to the WordPress admin page.
Check the data permissions
Sometimes, WordPress can’t run an upgrade because of an authorisation problem. If you receive the ‘Couldn’t install update’ error message, then you should check if your wp-content file is available with a proper 755 file permission. It’s also possible to use a 777 permission. But remember to change the permission back as soon as you’ve solved the problem. You should also temporarily disable all plugins for this solution.
Then try to update WordPress again. If you still are seeing the same error, delete the ‘upgrade’ folder in wp-content, recreate it, and use a 777 permission for the same folder. If it works now, remember to change the permission back to 755 to minimise the security risk.
In some cases, you’re also faced with authorisation issues due to your web host. Then you have to send a support ticket to your host and try to solve the problem this way.
Add FTP access data to the WordPress config file
If your site was recently moved, or if you changed your FTP password, then WordPress might ask for your FTP access data in the dashboard. WordPress regularly requests this data, but that can also be changed using the according settings.
Instead of entering the access data in the dashboard every time, you can simply enter it into the wp-config.php file. Before you do this, though, make sure that you’re using the correct FTP access data. Check the data by visiting your web hosting control panel.
Now open your wp-config.php file from the root index of your WordPress installation and supplement it with some extra lines. Enter the following code in your wp-config.php file above the “‘/* That’s all, stop editing! Happy blogging. */‘” line:


define(‘FS_METHOD’, ‘ftpext’);
define(‘FTP_HOST’, ‘ftp.website.com’);
define(‘FTP_USER’, ‘username);
define(‘FTP_PASS’, ‘password);
Enter your corresponding data in the FTP host, username, and password details lines.
9. Problems uploading pictures to WordPress
Problems uploading pictures are often caused by incorrect file permissions. Your upload index should have correct file permissions, otherwise WordPress can’t save files into it. In some cases, you may have difficulties viewing your files from the upload index. To set correct file permissions for your upload index, you need an FTP client. Maybe ask yourself why there have been difficulties with the permissions all of a sudden – who has changed the file permissions?
There are multiple possible causes which lead to complications with the permissions. It’s possible that your web hosting provider performed an upgrade and your file permissions were changed. It’s also possible that a hacker made these changes by uploading a backdoor hack. With a poorly configured share hosting, it’s also possible that another user installed a theme or a plugin from an untrustworthy source, and this file falsely altered the script and file permissions for all users.
If everything on your website is functioning normally again, you still need to normalise your file permissions. If you still run into difficulties, contact your hosting provider and ask them for support.
Connect to your website via FTP client and open the /wp-content/ folder. This contained the /uploads/ subfolder. Right-click on the upload index and select file permissions. Then open the dialog box for the permissions. First, you have to set file permissions for the upload index itself and then set all subdirectories to 744. To do this, enter 744 as the numerical value in the field and then check the box next to “recursively in subdirectories”. Finally, click on ‘Click for directories only’. Confirm and apply the changes by clicking OK. Your FTP programme will now start file management for the indexes. If setting the index permissions to 744 doesn’t help, then try using the value 755 instead.
In the next step, set the file permissions for all files in the upload index. To do this, right-click on the upload index and select the ‘File access rights’ category. Change the dialog box ‘File access changes’ to the numerical value 644. Check the box next to ‘recursively in subdirectories’. Finally, click the options button ‘Only for files’. Then click OK to apply these changes.
Your FTP programme now sets the file permissions for all files. As soon as these changes are saved, it should again be possible to upload photos to your WordPress admin page.
10. Sidebar appears under main content
When this WordPress problem occurs, your sidebar is no longer to the left or right of the main content, but instead under your text. This doesn’t only look unattractive, but can also impair the usability of your website. Even if your layout often becomes unusable because of this error, that doesn’t mean that you can’t still use your theme. The sidebar error can usually be resolved quickly.
A common cause for this error is having either too many open or too many closed div tags in your HTML code. Div tags in the code of your WordPress page look like this:
<div> </ div>
This notation opens or closes HTML elements on your website. If too many or too few div tags are present in your code, then it won’t be implemented correctly. This affects your layout most of all. Especially if the problem is only visible on one post or page, then div tags are probably to blame for the mess. The simplest way you can test your code for div tag issues is through an online HTML validator.
Otherwise, it’s also possible that an error in your CSS style file has crept in. This cause should be considered primarily when you have recently made changes to this file. If you’ve assigned sizes to the main content and sidebar that don’t fit side by side, the CSS can’t build your layout properly. Incorrectly entered page margins or too much padding could also result in a faulty representation of your website.
Another possibility is that the float properties of your page size are deactivated, so that they can no longer be aligned to the left or right by the CSS. Also check the float definition to rule out that source of error.
Reviewer

Julia Hertler
With over 18 years of experience in content marketing, Julia Hertler has deep expertise in digital communications. For the past 10 years, she has specialised in the areas of domains and hosting at the IONOS Digital Guide, making complex technical topics easy to understand.