How to recover unsaved Word documents
If you frequently work with Word, you may accidentally delete a file or forget to save one. Don’t fret! Microsoft Word provides built-in recovery tools. You can recover unsaved Word documents in Microsoft 365, Word 2021, Word 2019 and Word 2016 in just a few steps.
What are different ways to recover Word documents?
Depending on the scenario, different methods are suitable for successfully recovering a Word file regardless of whether you’re dealing with a lost, damaged or deleted document. However, it’s generally advisable to leave AutoRecover and Backup enabled. This way you’re always on the safe side and spare yourself a lot of trouble and unnecessary extra work.**
| Scenario | Solution |
|---|---|
| Document closed without saving Power failure, PC or Word crashes |
Use AutoRecover. |
| Unintentional changes to a file | Automatically create backup copies. |
| File deleted from recycle bin | Use recovery tool. |
With HiDrive cloud storage from IONOS, you can securely store, edit and share your Office documents. Whether private or professional, with the HiDrive app and other interfaces you can work flexibly from any device. Your data is optimally protected in state-of-the-art data centres from IONOS.
Recover a Word file with AutoRecover
AutoRecover is a function that is activated by default in newer versions of Word (from 2010). When activated, the program automatically saves all current data in a Word document every 10 minutes. If your PC crashes or you haven’t saved your Word file, you can recover your document by using the built-in function.
How to recover additional changes to saved files with AutoRecover
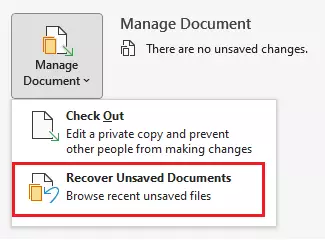
Created and saved a file, but forgot to save further changes or lost your progress due to power failure? You can recover your progress with the AutoRecover function. To do this, simply select the corresponding function under File > Information > Manage document. Unsaved versions are displayed directly.

By double-clicking, you can access the latest version of your file. To restore the changes, save the document by clicking the corresponding button in the bar at the top.

How to recover unsaved files with AutoRecover
If you’ve been working on a document you haven’t saved, Word has a built-in solution via the AutoRecover feature. Navigate to File > Information > Manage Document and select the option Recover unsaved documents. A folder of all saved intermediate statuses will open, from which you can select the desired file.

Learn how to recover Excel files and presentations in PowerPoint.
How to adjust AutoRecover
You can also adjust settings in Word AutoRecover to make it suit your needs. Open Word > Options > Save. This will take you to the settings menu. From here, adjust the duration for Word document recovery and specify the location for intermediate states.

In case of unforeseen problems such as Word crashing or a power failure, Word automatically suggests the last saved version when you restart it.
Recover Word documents manually
If the procedures described above don’t work or if you are working with an older program version, you can locate the files in which the intermediate states are stored manually. To do this, you can use using the key combination [Windows] + [E]) to open Files Explorer (or Windows Explorer in earlier versions of Windows). Depending on the Office version, you’ll find the AutoRecover files under one of the following paths:
- C:\User\YourUserName\AppData\Local\Microsoft\Office\UnsavedFiles
- C:\User\YourUserName\AppData\Local\Temp
- C:\Windows\Temp
If in doubt, check the destination folder of AutoRecover in the Word options. You can also use the search function by typing ‘*.asd’ in the search bar. This is the file extension of the files where your clipboards are saved. Sort the results by date and open the desired file in Word. Save it as a DOCX file.
Automatically create backup copies
In addition to AutoRecover, Word can automatically create backup copies of your documents. However, you must first activate this function. You can activate it under Options > Advanced > Save. Simply check the box Always create backup copy.

Word will now create a backup copy every time you save a document with Save as. These copies will be stored in the same folder as the original document and will be named ‘Backup copy of [original filename].wbk’. The backup copy is an image of the last saved version of your Word document. The most recent changes aren’t yet included. If you accidentally delete or replace an important paragraph and then carelessly click Save, you still have the option to restore the paragraph in question.
Recover unsaved Word document
During PC cleanup actions, files can inadvertently be moved to the recycle bin and mistakenly deleted. If the Recycle Bin hasn’t been emptied yet, you can easily recover the Word file by navigating to the Recycle Bin, locating the desired file, and right-clicking to access its context menu from where the recovery option is available.
What recovery tools are there?
But even if your file has fallen victim to an overzealously emptied recycle bin, fear not. To recover deleted Word documents special recovery tools such as Recuva are available.
The freeware not only reconstructs files of various formats on the PC hard drive, but also data stored on SSDs, digital cameras, MP3 players and other mobile devices that can’t be retrieved from the computer’s recycle bin. The tool scans the respective drive and displays the data in a clear tree structure or list. Using filters and search wizards, you can also search the results for specific formats.

