How to change the font size in Windows 10
Windows makes it easy for users to adjust the system font size. The scaling function can be found in the ‘Ease of Access’ settings menu. Learn how to use the tool here.
- Free website protection with SSL Wildcard included
- Free private registration for greater privacy
- Free 2 GB email account
Quick tutorial: change the font size in Windows 10
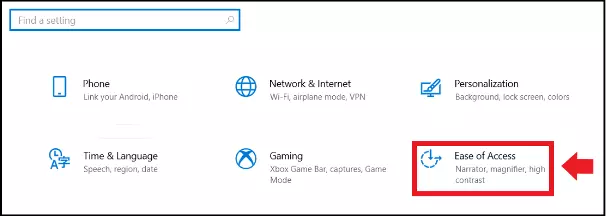
- Press [Windows] + [i] and launch the ‘Ease of Access’ menu.
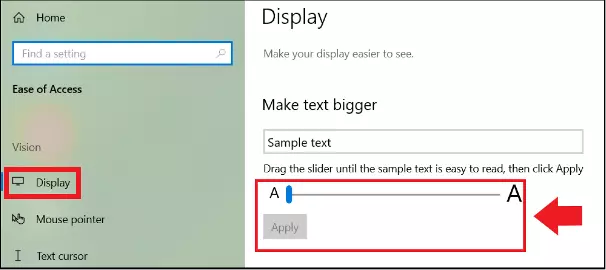
- Navigate to ‘Display’.
- Adjust the font size via ‘Make text bigger’ using the slider.
Change the font size in Windows 10: pros and cons
Out of the box, Windows 10 uses a relatively small font for display text in folders, menus, apps, and settings. The elderly or people with visual impairments, and users who spend multiple hours in front of screens may struggle with the size of the font. Fortunately, Windows 10 offers tools like the screen magnifier, the Windows screen keyboard, the contrast adjustment and the option to adjust the font size to improve readability. These tools can be found in the ‘Ease of Access’ menu.
Prior to the Windows 10 Creators Update (Version 1703), system font size used to be adjusted as needed to improve readability. Unfortunately, the feature was removed and replaced with a text scaling option. This means that changing the text size also enlarges display menus and windows – similar to the ‘Zoom in’ function in Microsoft Word or the zoom function in a browser. As a consequence of the enlarged text, the system menu appears less clear.
How to change the Windows 10 font size
Follow our step-by-step guide below to change the font size in Windows 10. To change the font size in Windows 11, the required steps are almost identical with the exception that the ‘Ease of Access’ menu is called ‘Accessibility’.
Step 1: Launch the Windows settings using the Windows shortcut [Windows] + [i]. Select the ‘Ease of Access’ submenu.
Step 2: Navigate to the ‘Display’ menu item on the left.
Step 3: Use the slider beneath the ‘Make text bigger’ field to scale system font size in Windows. By default, the text size is 100 percent. However, you can increase the font size in Windows up to 225 percent. Click ‘Apply’ to make changes.
Step 4: To enlarge the full display in Windows, you can select ‘Set all larger’ via ‘Make text bigger’. This offers scaling of 100, 125, 150 and 175 percent.
Because changes to your Windows setting can cause errors, it’s a good idea to create regular Windows 10 backups!
Screen magnifier as an alternative
If you’re looking to adjust the display of your system temporarily, use the Windows magnifier function. With the magnifier you can zoom to display the screen and navigate the mouse in the enlarged view. From the ‘Ease of Access’ menu in the Windows settings, activate the magnifier and select the desired zoom. Alternatively, use the Windows shortcut [Windows] + [+] to activate the magnifier and [Windows] + [Esc] to deactivate it.


