0x800f0954 | How to fix this error
When an error occurs in Windows, it’s usually described by a brief error message that in many cases doesn’t provide much detailed information. The message includes an error code consisting of an eight-digit hexadecimal number. The code helps developers and administrators search for a clear technical description of the error on the Microsoft website. However, the description usually not easily understandable for the average Windows user. In this article, we will show you how to troubleshoot error 0x800f0954.
Error 0x800f0954: Problem installing the .NET Framework
Error code 0x800f0954 usually appears when you're attempting to install the .NET Framework or sub-components of the framework. In most cases, Windows will display the following message text in addition to the code:
The following feature couldn’t be installed: .NET Framework 3.5 (includes .NET 2.0 und 3.0).The .NET Framework, often referred to as NetFx, contains development tools, interfaces, and class libraries that are used in many Windows applications and can also be employed by software developers as part of their own software projects. The framework includes features for using the file system, features for accessing the Internet, and local networks and important elements of the graphical user interface.
Most Windows programs that use the .NET Framework are designed to provide the required components or automatically download and install them. If problems occur during this process, error message 0x800f0954 will appear. What can you do to fix this problem?
Fixing 0x800f0954 by reinstalling the .NET Framework
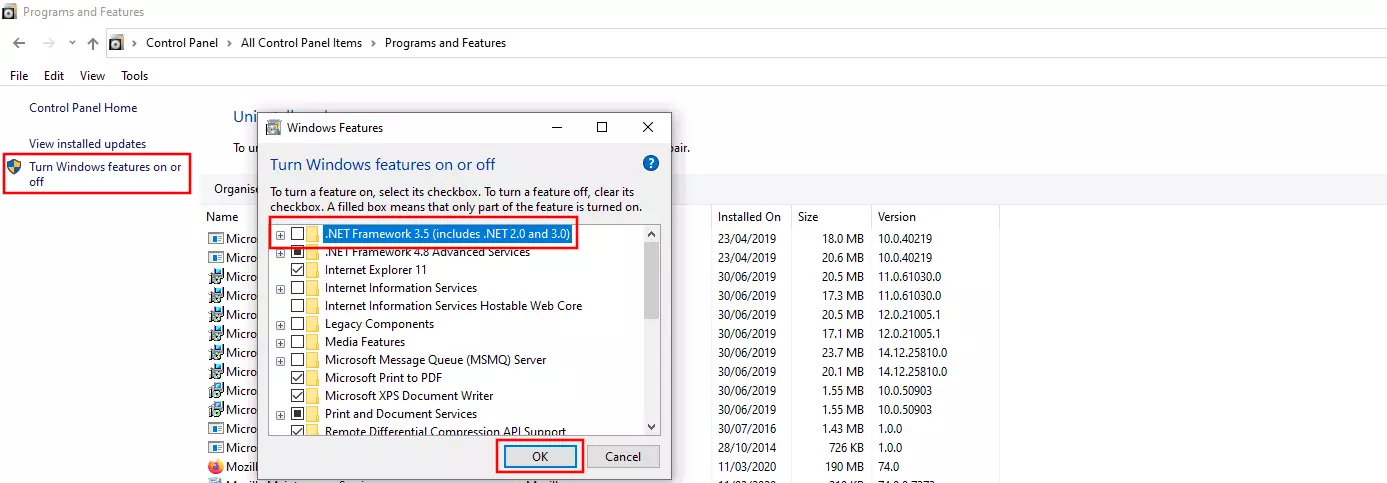
In some cases, all you have to do is turn off the .NET Framework and turn it back on again. This will remove the current installation of the framework from the system and replace it with a fresh installation.
You must have administrator privileges to disable or enable basic Windows components such as the .NET Framework.
To do this, proceed as follows:
- Open the Control Panel from the Start menu or the search box.
- Choose “Programs” and then click Programs and Features.
- Select Turn Windows features on or off from the menu at the top left of the screen.
- Clear the check box next to “.NET Framework 3.5 (includes .NET 2.0 and 3.0)” and click “OK.”
The system then searches for the affected files and uninstalls or disables them. Finally, restart your PC. After restarting, install the framework in the same way. This time, select the checkbox next to the framework and choose “OK.”
Fixing error 0x800f0954 using the DISM command line program
If this simple method doesn't help and the 0x800f0954 problem persists (or if the error still occurs when you turn off the framework), you can try repairing the .NET Framework using the DISM command line tool. To do this, you need the original .NET Framework installation files on the Windows installation media or an ISO file. DISM is a pre-installed troubleshooting tool in Windows that can be run from the command line and requires administrator privileges.
Proceed as follows to fix error 0x800f0954 using the command line (if you already have the installation media, you can skip to step 3):
Step 1: If you don’t have the original Microsoft DVD, you can create an ISO file using the Windows Media Creation Tool. Click the link to download the tool.
Step 2: Once you’ve created the ISO file, double-click it to add it as a new drive. You can access this drive from the File Explorer in the usual way. The name of the drive is ESD-ISO.
Step 3: Open the Start menu by right-clicking the Windows Logo in the taskbar. Select “Command Prompt (Admin) or “Windows PowerShell (Admin).” Only one of these options will be displayed depending on your Windows configuration and version.
Step 4: Type the following command into the command line tool:
DISM /Online /Enable-Feature /FeatureName:NetFx3 /All /LimitAccess /Source:X:\sources\sxsReplace the drive letter “X:” with the drive letter of your DVD drive or ISO file drive. Press Enter to run the command.
Step 6: The .NET Framework will be restored from the original files. This process can take several minutes. Once you've recovered the framework, you can start using it right away without having to restart your PC.
Always download the Windows Media Creation Tool directly from Microsoft. Some untrustworthy vendors offer fake versions of this program that may contain malware.


