Deleting print jobs - how to clear the print queue in Windows
Perhaps you had already clicked on ‘Print’ when you suddenly noticed that you were printing the wrong file or more pages than needed, or maybe a seemingly failed print job is blocking subsequent jobs. There are many reasons why you might want to delete a print job from the queue. Fortunately, the methods for doing so are straightforward and easy to learn.
- Free website protection with SSL Wildcard included
- Free private registration for greater privacy
- Free 2 GB email account
Why would you want to delete a print job?
Anyone who has ever used a printer will have had this experience: The printer has already woken up and started to print when you suddenly realise that you were too hasty in clicking ‘Print’. There are numerous reasons why you might want to cancel a print job. The following list presents just a few of them:
- The print job contains too many or too few copies
- There are still mistakes in the document that need to be corrected
- The wrong file is in the print queue
- The printer settings still need to be configured
- A failed job is blocking the print queue
Stopping and restarting print queues (Windows)
Even if the printer has already started running, you can still delete the print job in Windows 10. When you start a print job, it first goes into the print queue which sends all the scheduled print jobs to the printer one by one. Follow the instructions below to delete one or more jobs from the queue.
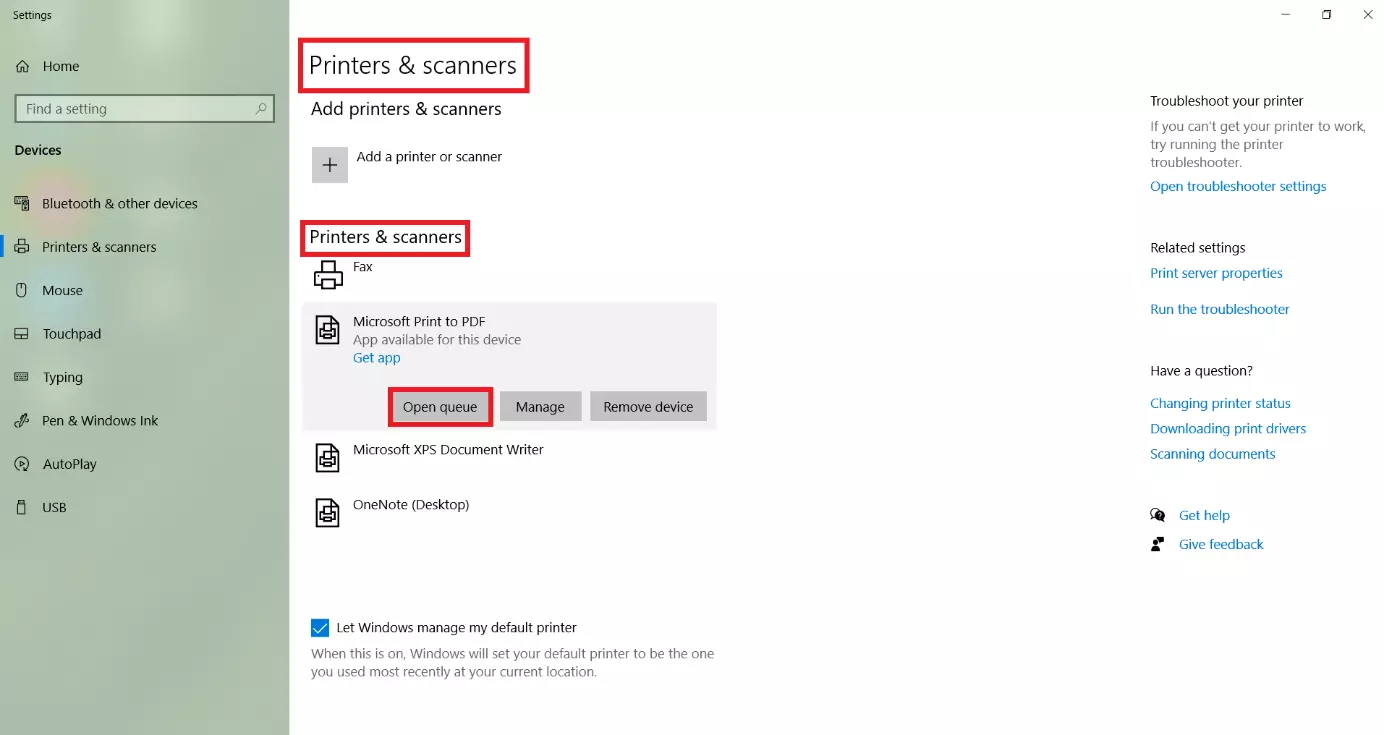
Step 1: Open the ‘Printers & scanners’ menu
If the print job is currently in progress, double-click on the printer icon located in the taskbar in the bottom right-hand corner of the screen. Alternatively, you can enter ‘printer’ in the search bar and double-click on ‘Printers & scanners’ from the results.
Step 2: Open the print queue
Step 3: Delete the print job
Right-click on the desired file in the print queue and select ‘Cancel’ to delete it from the queue. If part of the file has already been printed, the job will stop in the middle of printing. If you wish, you can also use this method to delete all jobs in the print queue.
If you do not wish to completely delete the print job (e.g., if you just need to refill the ink cartridge), click ‘Pause printing’. When you are ready to continue printing, click ‘Pause printing’ again to uncheck it.
Deleting a print job using a keyboard shortcut
If you need to be quick, you can also access the print queue using Windows keyboard shortcuts. The following shortcuts can be used.
Option A: [Windows] key + [X]
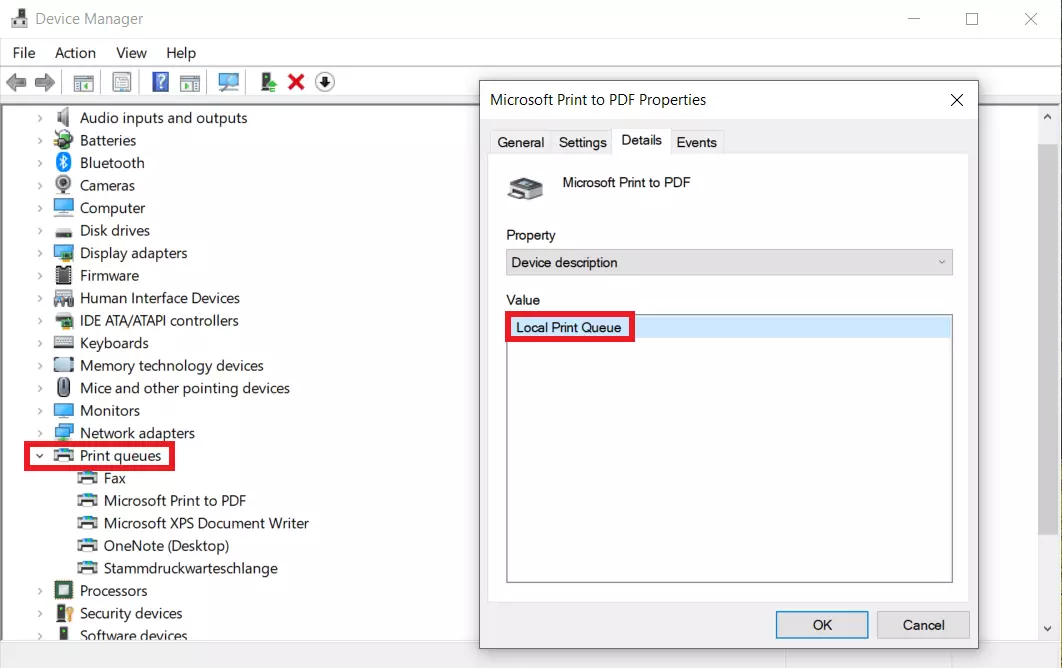
Step 1: Press and hold the [Windows] key + [X]. Then click on ‘Device Manager’.
Step 2: Under ‘Device Manager’ you will find the tab ‘Print queues’. Double-click it and select the queue for the desired printer.
Step 3: Right-click on the desired print job in the queue to cancel it.
Option B: [Windows] key + [pause]
Another way to quickly access the ‘Device Manager’ and the print queue is to use the keyboard shortcut [Windows] key + [pause].
Step 1: Use the shortcut [Windows] key + [pause] to first open the ‘system settings’.
Step 2: Select ‘Device Manager’ and open it as administrator.
Step 3: Under ‘Print queues’ you can now cancel the print job for the relevant printer.
Print jobs cannot be deleted: What now?
Were you unable to delete or cancel a print job? Were you even unable to remove the job from the print queue by restarting the system? Then, you may need to remove the print job manually using a Windows CMD command. Otherwise, these failed print jobs may block all further jobs. We will show you three quick and easy solutions for this problem.
Stop and restart the print spooler using a CMD command
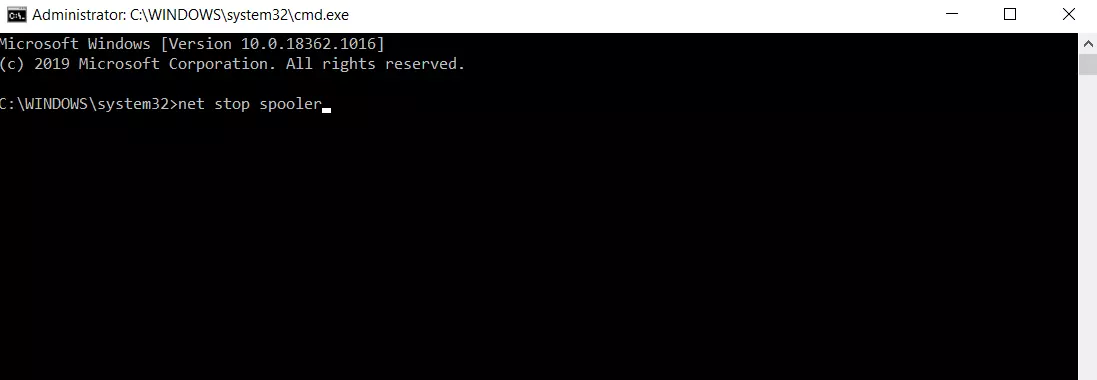
Step 1: Enter ‘cmd’ in the search bar and click ‘Run as administrator’ in the dialogue box that pops up. Alternatively, you can also use the keyboard shortcut [Windows] key + [R], enter ‘cmd’ and then use the shortcut [Ctrl] + [Shift] + [Enter].
Step 2: In the opened command prompt window, enter the following CMD command: net stop spooler.
Step 3: In the Windows File Explorer, enter the path ‘WINDOWS\System32\spool\PRINTERS’ and delete all temporary SHD and SPL files.
Step 4: Go back to the command prompt window and restart the print spooler using the following CMD command: net start spooler.
Stop and restart the print spooler service in the ‘Services’ menu (services.msc)
Step 1: As with the previous option, type ‘cmd’ in the search bar at the bottom of the screen and open the command-line window as administrator.
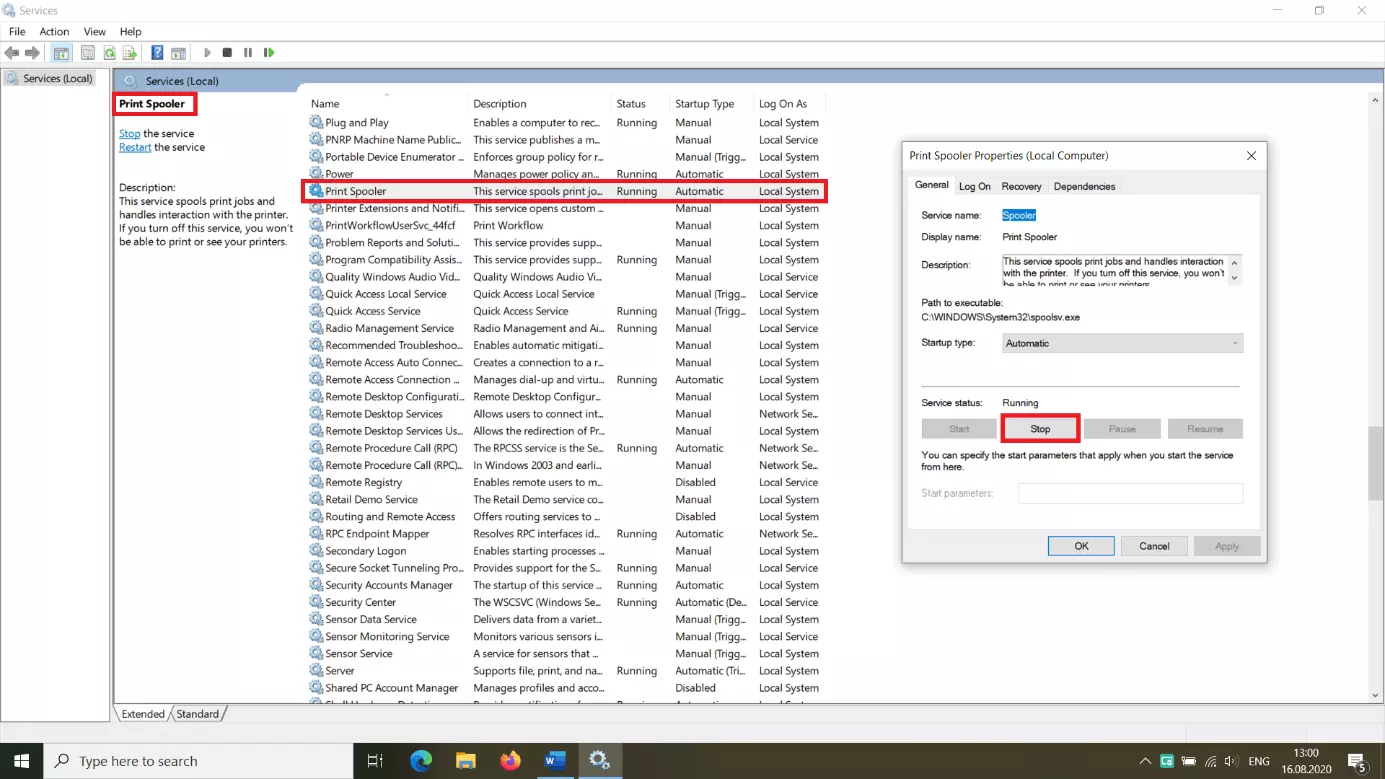
Step 2: Now, enter the following CMD command: services.msc.
Step 3: This opens the ‘Services’ menu. In this window, click ‘Print Spooler’ and then ‘Stop’ in the ‘Print Spooler Properties’ window that pops up.
Step 4: In the Windows File Explorer, enter the path ‘WINDOWS\System32\spool\PRINTERS’ and delete all temporary printer files.
Step 5: Open the ‘Services’ menu again by entering the CMD command ‘services.msc’ in the command prompt window and restart the print spooler by clicking ‘Start’.
The emergency brake: unplug the printer
A rather crude but often effective solution to stop the current print job as quickly as possible is to unplug or turn off the printer.
Wait for about ten minutes before turning the printer on again. Once you have turned it back on, you should find that the print queue is empty again. However, you need to keep in mind that any jobs that have been put on hold will also no longer be in the queue.
If you want to be able to manage your print jobs easily and clearly and check them before printing, we recommend using a format and page checker through Microsoft Word. You can get this word processing program as part of the Microsoft 365 package directly from IONOS!


