How to set up an ATLAS server: a step-by-step guide
Together with a crew of like-minded pirates, you can discover the huge open world of ATLAS. If you want to avoid crowded online servers, an ATLAS game server is a great way to have a private session with friends in PvP or PvE mode. In this article, we’ll show you how to set up an ATLAS dedicated server.
ATLAS is an early access game. This means that it’s still in development. As a result, bugs may occasionally appear and the game itself may evolve over time.
Should I choose the online multiplayer version or a dedicated server?
ATLAS can be played both as a multiplayer or single-player game. To discover the pirate world together with others, you can use the online multiplayer version of the game. However, if you only want to play with your own crew and don’t want to encounter other players on the map, you can host the session using a private server.
In theory, it is possible to host an ATLAS server on your home PC. However, an ATLAS map is very large and complex, which means most home PCs will be pushed to their limits rather quickly. Therefore, when setting up a private server for ATLAS, it’s a good idea to set up a dedicated server for ATLAS.
What requirements does an ATLAS server need to meet?
The online world of ATLAS is played on a map of 15 x 15 grids, creating a huge world. Those who want to host their own ATLAS server will quickly find that it is hardly possible to host such a large world privately, because each grid of the map is hosted on its own server.
On a private server, it is more realistic to choose a significantly smaller map. In the ATLAS community, clusters of sizes 1 x 1 to 2 x 2 are common in private games. Even these smaller maps can be configured to have all the biomes needed to play on the islands. The smaller maps are also large enough to guarantee many hours of gaming.
To install a private server, both Windows and Linux can be used as the operating system. The following server requirements are required to host these clusters:
- 1 x 1 Map: 4 GB RAM, CPU with 2 cores, 20 GB storage
- 2 x 2 Map: At least 16 GB RAM, CPU with 8 cores, at least 40 GB storage
What options does IONOS offer to host an ATLAS dedicated server?
If you want to invest in your own gaming server, you need to first figure out which server is the right one for your gaming requirements. At IONOS, you have the possibility to choose between different server models:
- Cloud Server: cloud servers provide you with virtualised resources that are flexibly scalable. This means that capacities can be expanded as required. The capacities used are billed exactly to the minute on a monthly basis.
- vServer: with a vServer, virtualised resources are made available to you at a fixed monthly price. Although other customers also use the hardware, this does not affect the performance of your server.
- Dedicated Server: a dedicated server, on the other hand, is used only by you. You can access the rented hardware at any time.
Because ATLAS requires a very powerful server environment, a dedicated server for private hosting is best. This will provide you with the maximum performance possible.
IONOS Server options for different map requirements
| ATLAS map size | IONOS server recommendation |
|---|---|
| 1 x 1 Grid | VPS RAM L |
| 2 x 2 Grid | Dedicated Server AR8-64 HDD |
If you like to play together with friends, a TeamSpeak server is a great a way to communicate with each other. In another article in our Digital Guide, we also go over how to set up a Teamspeak server.
How to create an ATLAS dedicated server: step-by-step instructions for a 1 x 1 Map
Once you have decided on a server, you can start setting up your ATLAS dedicated server. Below we will show you step by step how to do this. For this example, we are using Windows Server 2019, but you can also set up your ATLAS server on Linux.
Step 1: establish a remote desktop connection to the server
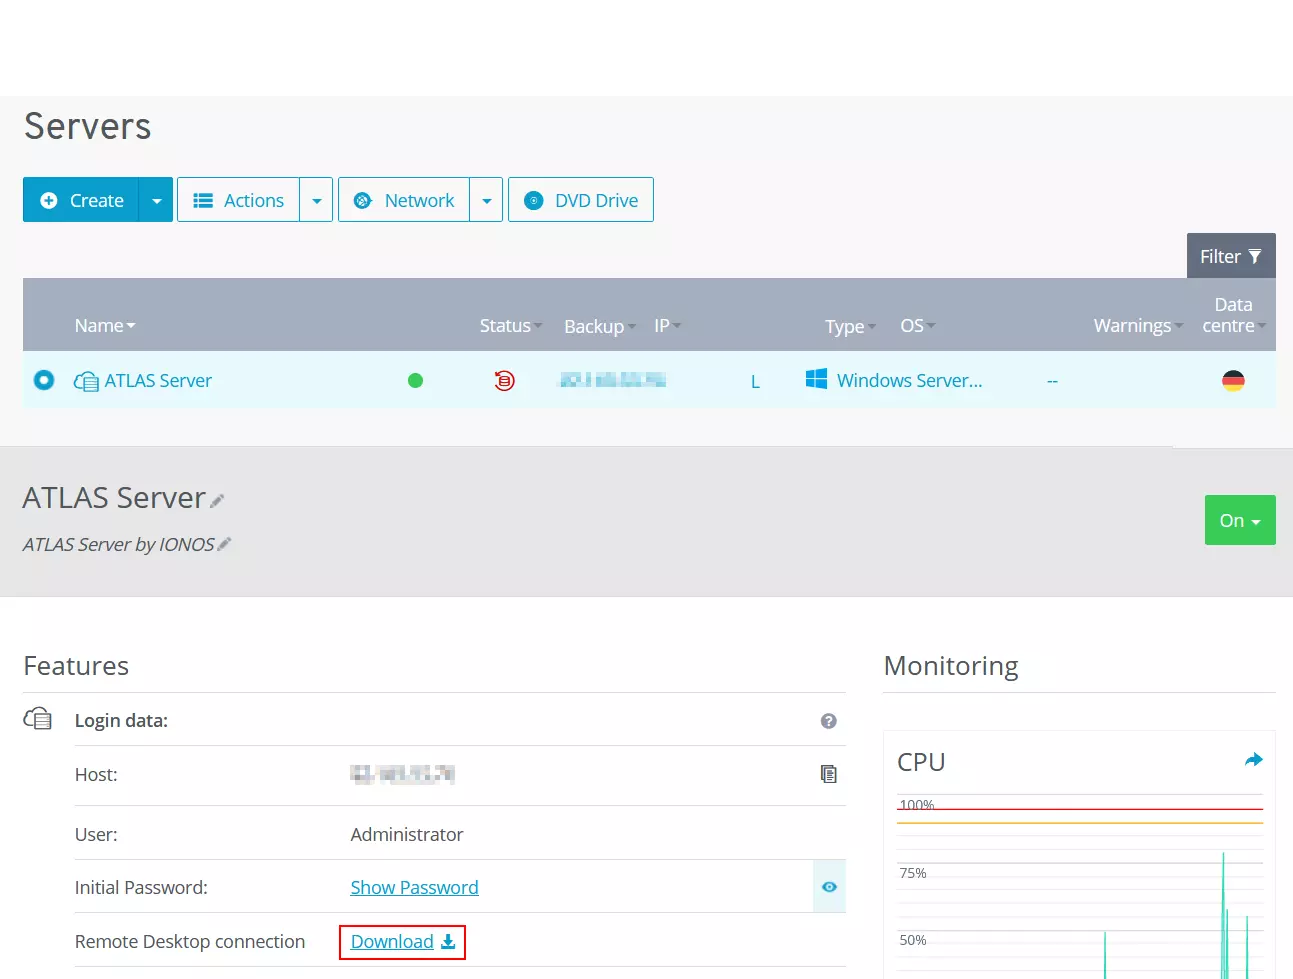
Before you can start installing the software for your ATLAS server, you need to establish a remote connection to your IONOS server. To do this, log in to your IONOS customer account, go to the Server and Cloud category and select your server. In our example, we are using a cloud server to set up the ATLAS dedicated server.
Next to Remote Desktop Connection, click Download to set up remote access. Once the file has finished downloading, open it and enter the credentials for your server. If this is the first time you are connecting to the server, you will also need to unblock the firewall for your computer. You are now connected to your server.
Step 2: download and unzip the necessary files
Once you have access to your server, download the files that are needed to install the ATLAS server. For an ATLAS dedicated server, these are:
To prepare, create a folder named C:\Atlas on your server. In this folder, you should place all the files you need. Open this folder and create two more folders: Steamcmd and AtlasTools.
Step 3: SteamCMD installation
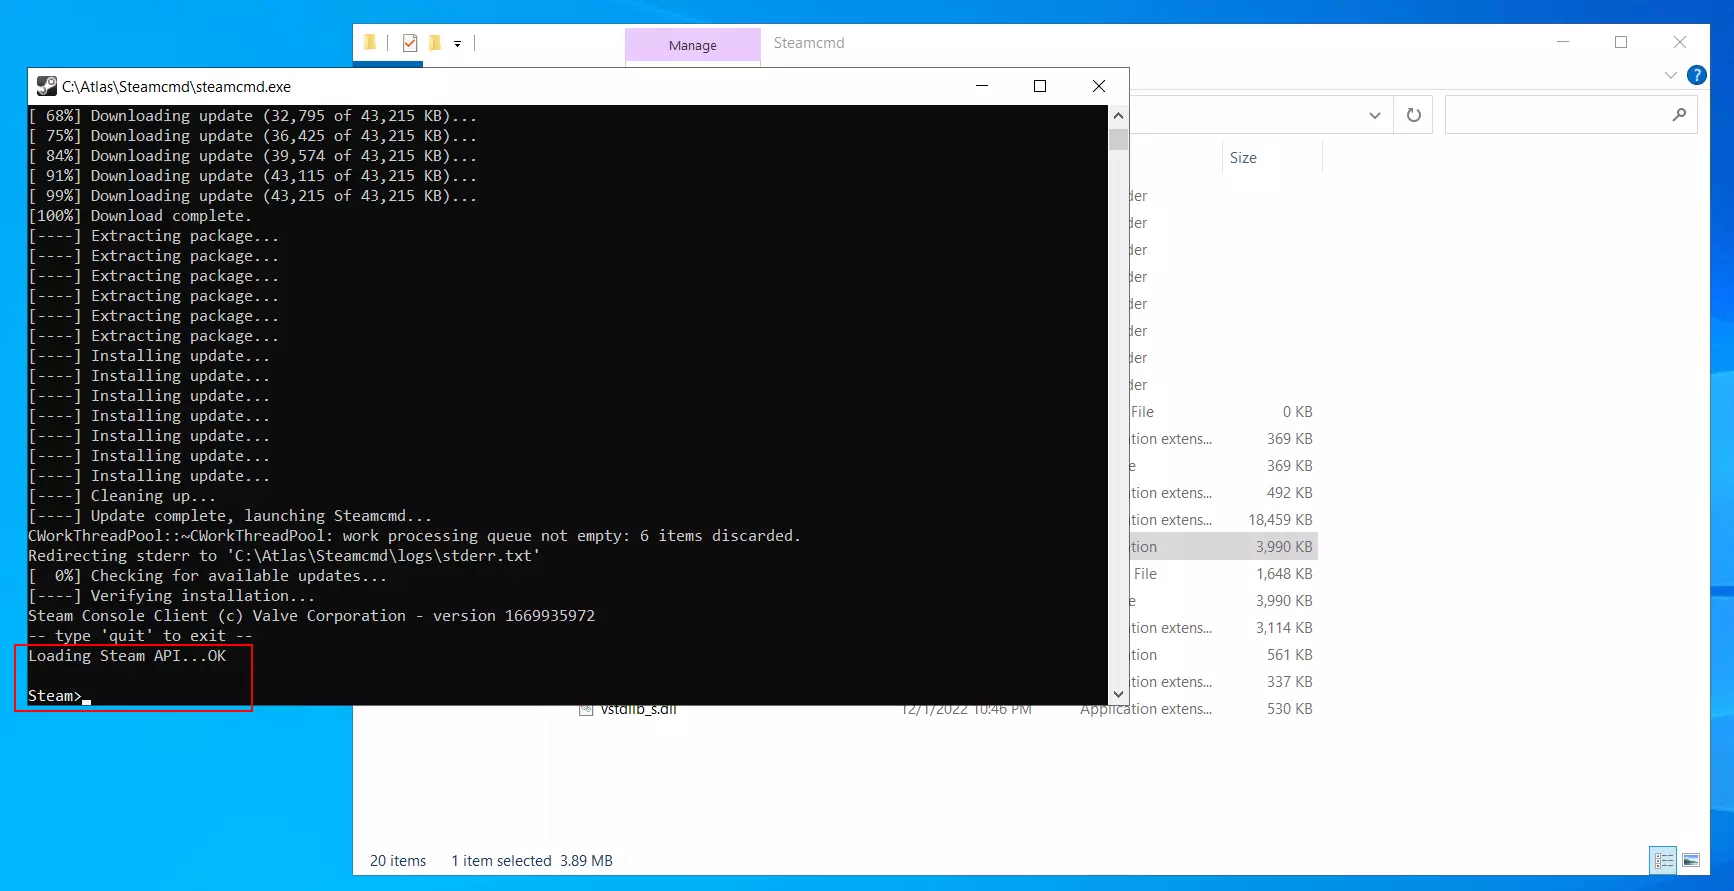
First, install SteamCMD. Without this, the game will not be able to start later. You have already downloaded the files needed for this in the previous step. Go to the Downloads folder and unzip the file steamcmd.zip to C:\Atlas\steamcmd.
Afterwards, go to the same folder and double-click the steamcmd.exe file to start it. Now the application will be installed. Once you see Steam> and an OK in the line above it, you can close the window.
Step 4: ATLAS server installation
Now it’s time to install the actual ATLAS server. To do this, go to your Atlas folder and right-click > New to create a new text document. Change the name of the text document to ATLAS SteamCMD.bat and click OK in the warning box that says that the file may become unusable.
Now you need to edit the file. To do this, right-click on the file and then click on Edit. Enter the following in the window:
@echo off
start "" steamcmd.exe +login anonymous +force_install_dir C:\ATLAS +app_update 1006030 validate +quit
exit
Save and close the file again. Then start the edited file by double-clicking on it. The current server version of ATLAS will now be downloaded. This may take a few minutes. Once this process is complete, your ATLAS dedicated server will be set up in its basic form. The next step is to set up the map for your game.
Step 5: set up the 1 x 1map on the ATLAS server
Go to your Downloads folder and unzip the Server Grid Editor to C:\Atlas\AtlasTools. Then go to the AtlasTools folder and open the folder ServerGridEditor-master. In it you will find the file ServerGridEditor.exe. This is the island editor that you can use to configure your personal map. In this tutorial, we’ll show you how to create a 1 x 1 map. However, in the island editor, you can also create other larger maps later.
Start the ServerGridEditor.exe file and click on Load project. Then you can choose from different map templates. Here take the file ServerGrid.json.
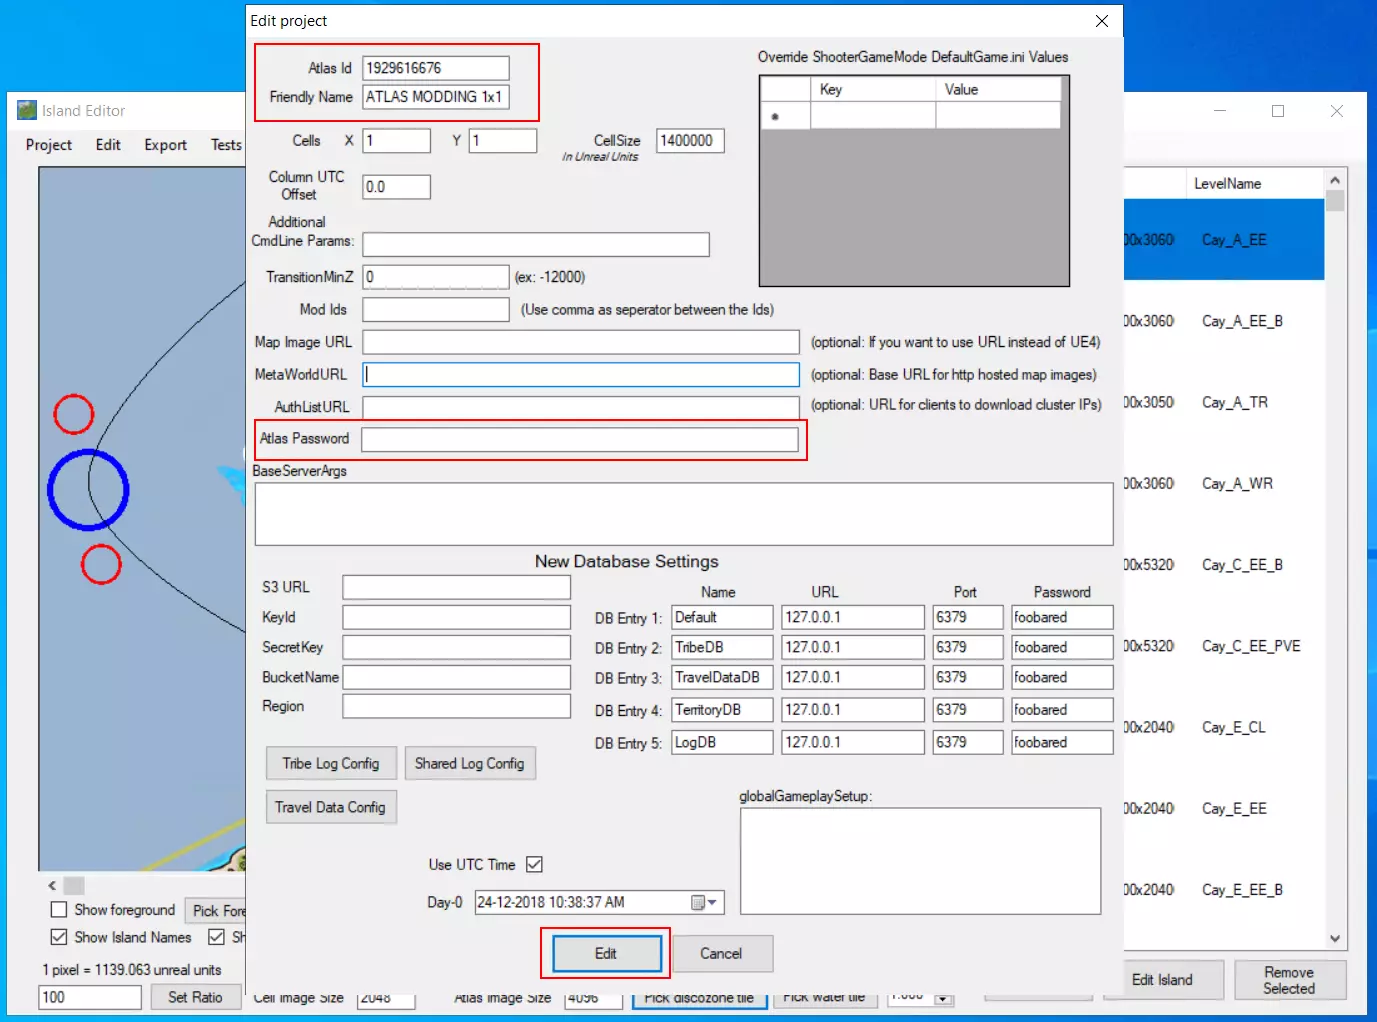
Now the template for the 1 x 1 map opens. Go to Project > Create in the upper left corner and click Okay to the warning that states that all unsaved changes will be lost. Copy the Atlas ID and click Cancel.
Then go to Project > Edit at the top left of the island editor and paste the Atlas ID from the clipboard into the Atlas Id field at the very top. If you want to give your ATLAS server its own name, enter it in the Friendly Name field. A password can also be assigned at this point to protect the server from unauthorised access. The password can be assigned in the Atlas Password field. You can save the changes by clicking on Edit.
The next step is to set up a freeport for the map. To do this, press [Ctrl] and left-click on the map. At the top of the window is the Name field. You can enter any name for the freeport. So that other players can access your server externally, enter the IP address of the IONOS server in the IP field and then click on Save.
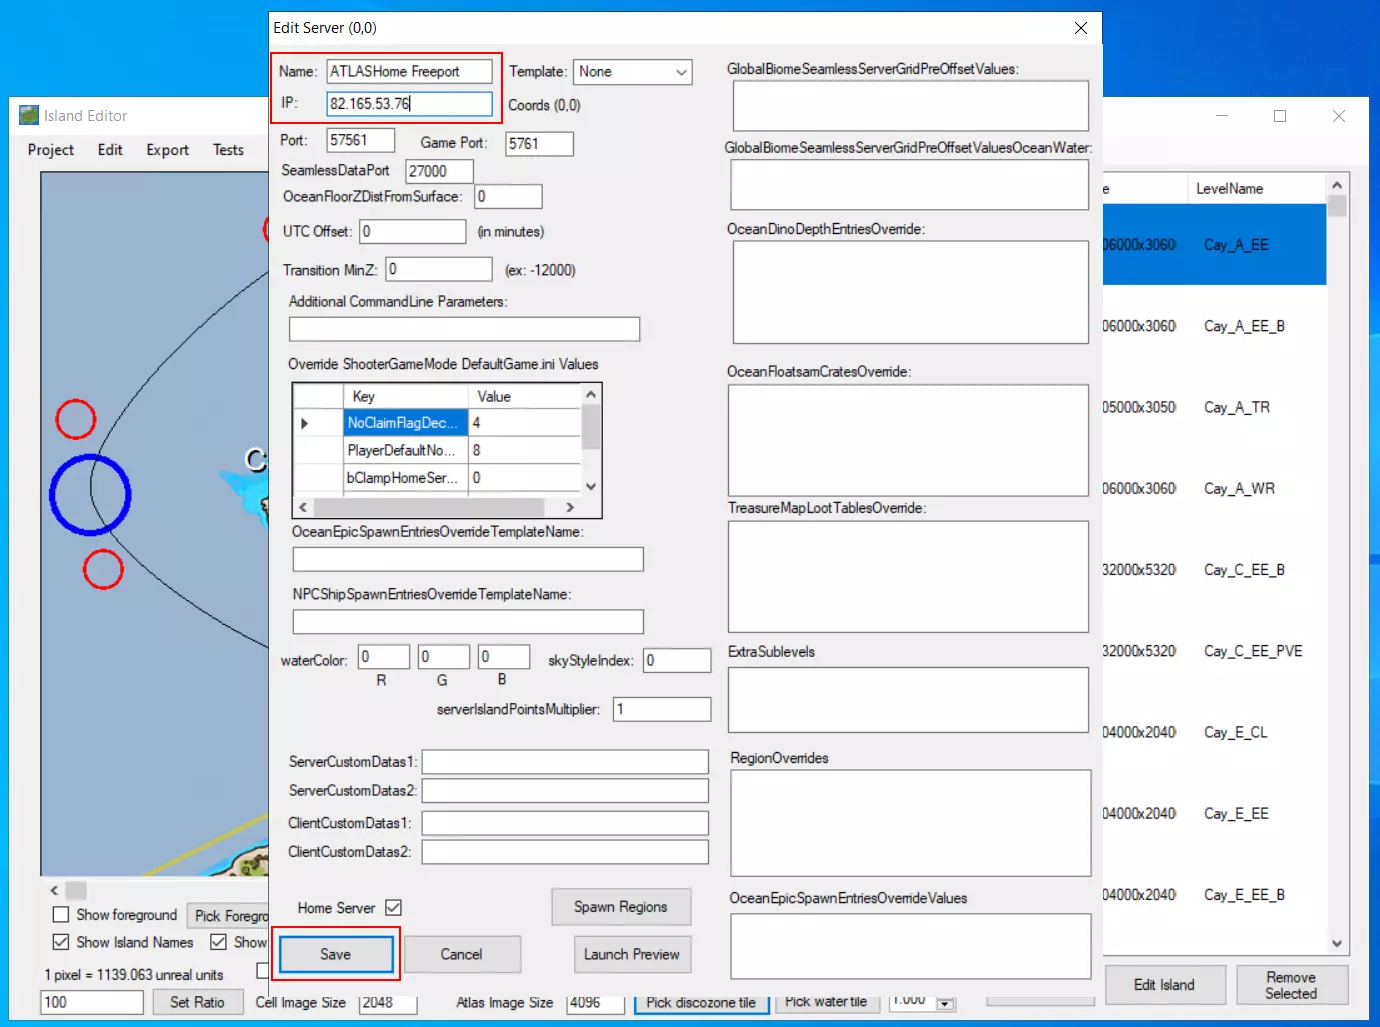
The next step is to export the map. In the island editor, go to Export > All. Select the directory C:\Atlas\AtlasTools\ServerGridEditor-master\Export\ServerGrid and click Ok. A pop-up window should appear with the wordSuccess. You can now close the Island Editor.
In order for your ATLAS server to access the map, it needs to be moved to the appropriate folder. Open the folder …/AtlasTools/ServerGridEditor-master/Export and copy the ServerGrid folder and the two .json files. Go to the C:\Atlas\ShooterGame folder and paste the files you copied.
Step 6: start the ATLAS server
To start the ATLAS dedicated server, you need a launch file. To do this, create a text document as outlined above and convert it into a .bat file by naming it ATLAS_LAUNCH.bat. Right-click and choose Edit. Then paste the following code into the file:
start /high X:\AtlasSrv\ShooterGame\Binaries\Win64\ShooterGameServer.exe Ocean?ServerX=0?ServerY=0?AltSaveDirectoryName=00?ServerAdminPassword=123?MaxPlayers=30?ReservedPlayerSlots=25?QueryPort=57561?Port=5761?SeamlessIP=1.2.3.4 -log -server -NoBattlEye
exit
Replace ‘X:\AtlasSrv’ with your directory (in our example C:\Atlas) and enter the IP address of your IONOS server after ‘SeamlessIP=‘. Then save and close the file.
Afterwards, navigate to AtlasTools/RedisDatabase and start the redis-server_start.bat file. Wait until the following is displayed:
* The server is now ready to accept connections on port 6379Leave the window open as long as the ATLAS server is online.
Step 7: open ports
In order for other gamers to be able to access your server, the ports on the server need to be open. To do this, go back to the user interface of your IONOS server. In the Network menu, navigate to Firewall Policies.
Select your server there and enter the following ports and data:
- Seamless Port: 27000:27008, TCP/UDP
- Query Port: 57561:57594, TCP/UDP
- Game Port: 5761:5794, TCP/UDP
- Rcon Port: 28000:28008, TCP/UDP
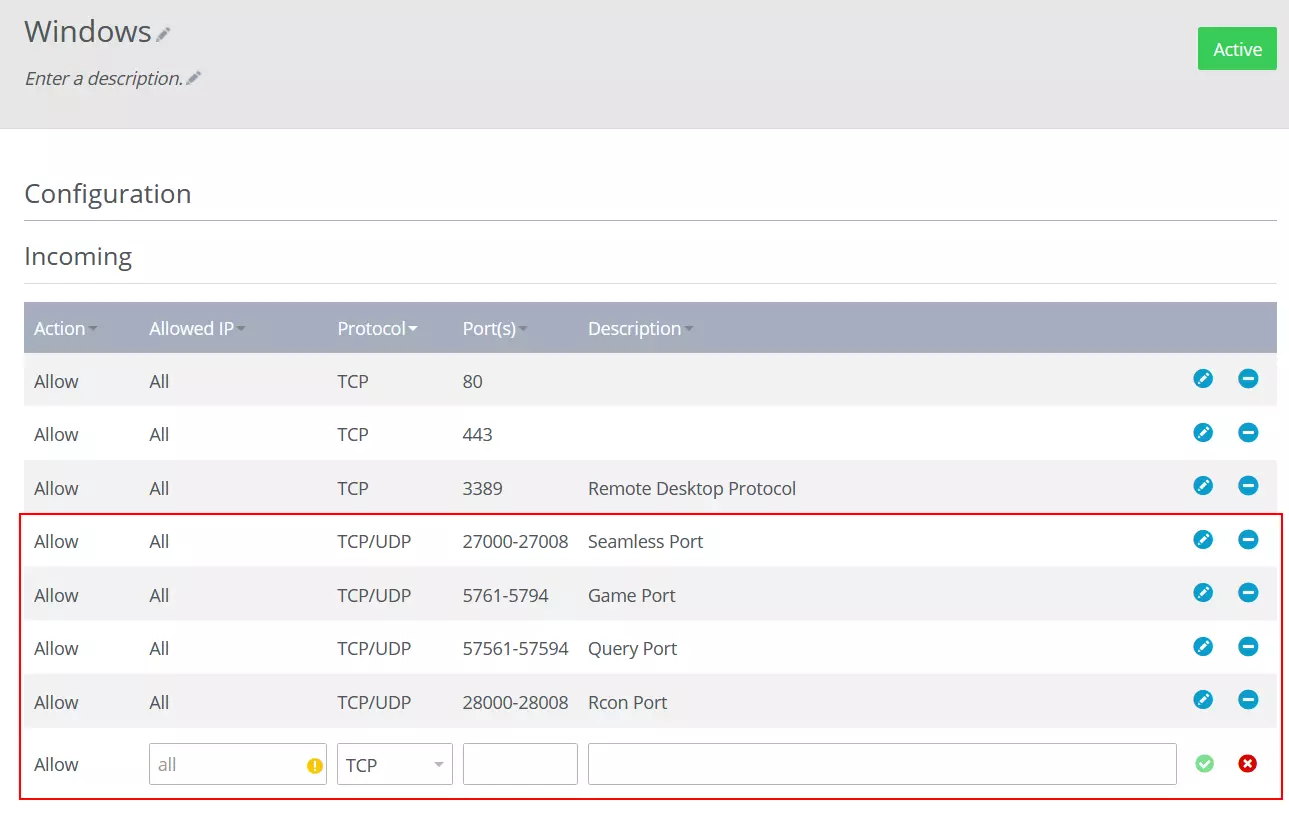
The seamless port transmits metadata such as maps and spawns. The query port is responsible for transferring information between the server and a client. The game port establishes contact with the server during gameplay. And the RCON port allows remote control of the server.
Step 8: finalise setup
Now go back to the ATLAS folder on the server and run ATLAS_LAUNCH.bat. The window should show how many cores are currently running. If this is the case, everything has been set up correctly.
Step 9: join the ATLAS server
Now, you can start playing on your own private server. Start ATLAS in online player mode. At the bottom right, you can set the session filters.
Set the session filter to ‘unofficial’. Search for your server’s name and click on Choose ATLAS World. In the next step, join the server and off you go on your adventure!
