How to create and configure an Icarus server
Hosting the wild open world of Icarus on your own server allows you to enjoy maximum freedom over availability and playing. With the right hardware, you can install your own Icarus server in just a few steps using SteamCMD.
What are the requirements for hosting an Icarus server?
The dedicated server app for Icarus is designed for Microsoft operating systems. If you want to install it on Linux, you’ll need emulation software like Wine. Alternatively, you can install Docker on your Linux server and set up an Icarus server using a container.
In any case, it’s best to install it on rented server hardware. In theory, you could also run the app on your personal computer, but that would use a very high amount of resources (including internet resources). You would also need to keep your computer on 24/7 to keep the server online. If you rent professional server space, none of that is a problem.
Regardless of how you choose, you’ll need to meet the following minimum requirements:
- CPU/processor: Quad-core CPU with at least 2.0 GHz
- RAM/memory: 4–6 GB minimum
- Hard drive storage: 5 GB
The operating system you’re using will bring its own requirements. For example, if you have Windows Server 2022, you’ll need an additional 1.4 GHz CPU, 2 GB RAM (for graphic user interface) and 32 GB of storage.
Try out your VPS for 30 days. If you're not satisfied, we'll fully reimburse you.
What options does IONOS offer for an Icarus server?
You can rent suitable hardware for your Icarus dedicated server from many providers, including IONOS. With IONOS’s vServers (also called VPS), you have access to a fully virtualised server for a fixed monthly rate. Alternatively, dedicated servers offer dedicated hardware that’s suitable for demanding applications and are billed by the minute.
In the table below, we summarise three typical use cases for a dedicated Icarus server and indicate the best IONOS server package for each of them.
| Icarus server scenario | Best IONOS server package |
|---|---|
| Server for mission mode; 2–4 players | VPS Windows L |
| Open world server for 4–8 players | VPS Windows XL |
| Open world server for 8+ players | Dedicated Server AR6-32 SSD |
- Enterprise hardware
- Configurable hardware equipment
- ISO-certified data centres
How to save money as a beginner
If you’re just planning a small co-op adventure in Icarus or only want to go on an occasional mission with others, you can start with a smaller VPS package. If that turns out to be too small to smoothly run your Icarus server at any point, you can always switch to a different package.
The most affordable package with enough computing power is Windows VPS M.
How to install an Icarus server on Windows step-by-step
Once you’ve decided on a server package, you can start setting your Icarus server up. You don’t need any special licenses for a dedicated Icarus server and you also don’t need to have Icarus installed on the server. Below we’ll walk you through the most important steps, using Windows Server 2022 as an operating system.
Step 1: Connect to the server remotely
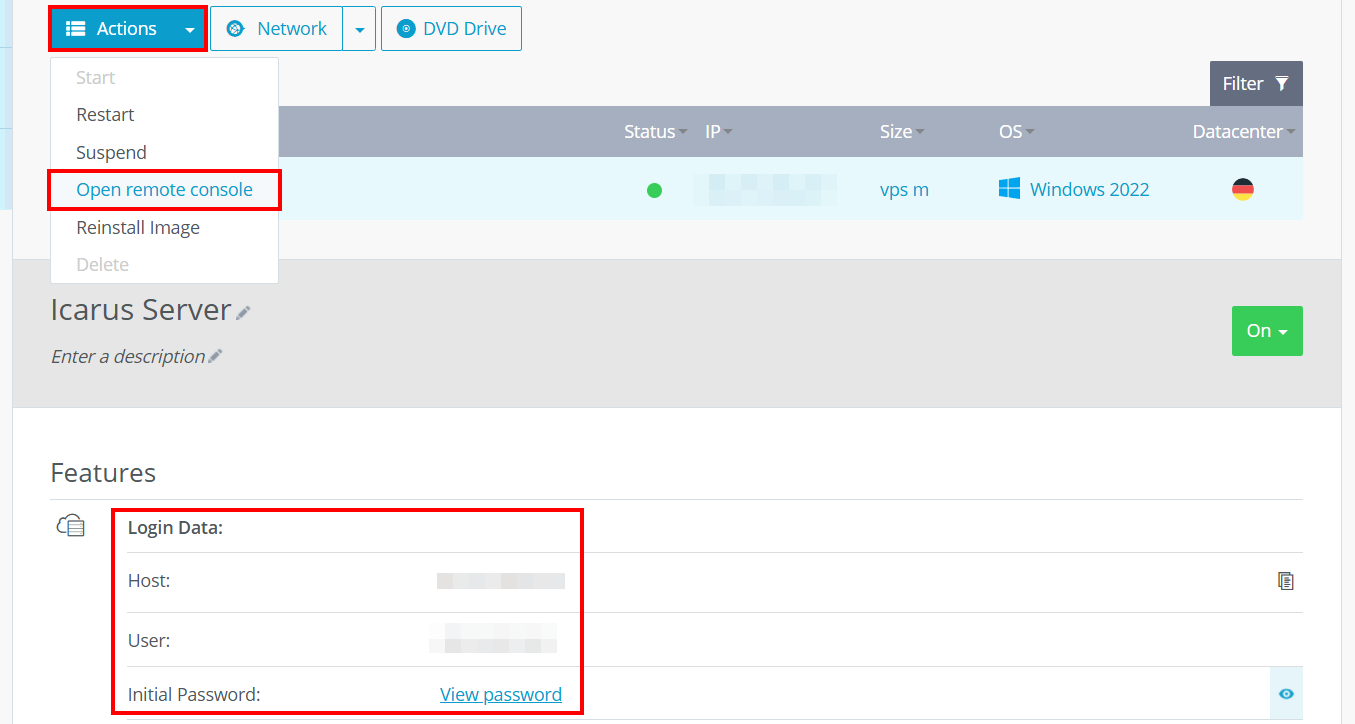
To access the hardware you rented, you’ll first need to establish a remote connection to the server. You can generally connect to the Windows server using Remote Desktop. Or, as an IONOS customer, you can use the remote console in the Cloud Panel in your IONOS account:
- Log in to your account on the login page.
- Open the category ‘Server & Cloud’.
- Select the server you rented.
- Click on ‘Actions’ and ‘Open remote console’.
- In the window that opens, log in with your server login information. You can find your login info under ‘Login Data’.
Step 2: Install SteamCMD
Once you’ve established a remote connection to your Icarus server, you can install SteamCMD. SteamCMD is a command-line client that enables easy access to servers on the popular Steam platform and can be downloaded for free.
To install it, simply unzip the zipped file in a directory on your server such as C:\SteamCMD. Then double click on the unzipped file steamcmd.exe to start the installation process. After installation is finished, you’ll see the line Steam> in the command prompt.
Step 3: Install the Icarus dedicated server
Next, we’ll use SteamCMD to obtain the server application for the Icarus server. To do this, first create a directory for the program data, e.g. C:\icarus-dedicated-server, by executing the following command:
force_install_dir C:\icarus-dedicated-server\Then log in anonymously to the public Steam servers:
login anonymousFinally, install the Icarus dedicated server application with the command app_update and the software ID from the SteamDB (2089300).
app_update 2089300 validate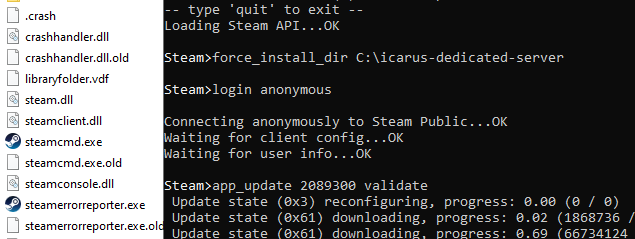
When the installation is finished, enter the command quit to properly log out of the Steam servers.
When the development team releases a new version, you can update your Icarus server with the command app_update 2089300. This is particularly necessary if the players accessing it are already playing with the new client version. If the versions don’t match, it won’t be possible to connect to the server!
Step 4: Open ports
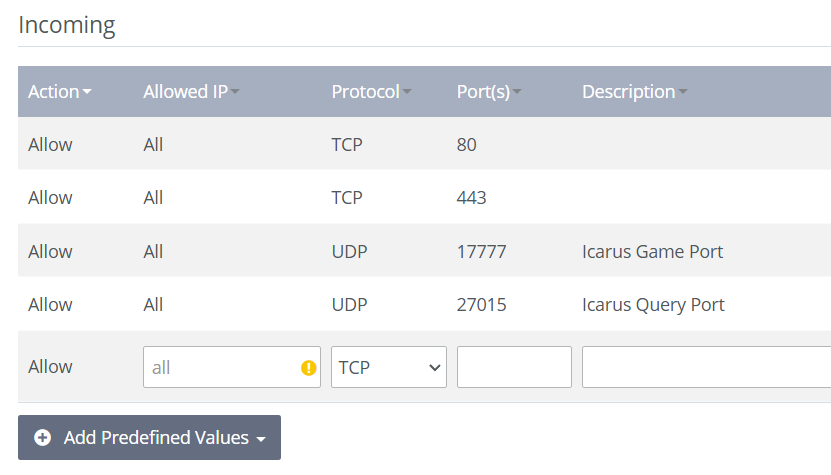
The relevant ports need to be open on your Icarus server for communication with incoming game clients. In this case, those are UDP ports 17777 (game port) and 27015 (query port).
With IONOS, you can also open ports from your server’s firewall in the Cloud Panel. To do that, follow these steps:
- Open the IONOS login page and log in.
- Select ‘Server & Cloud’ and then choose the server you rented.
- In the menu on the left, click on ‘Network’ and ‘Firewall policies’.
- Under ‘Incoming’, create rules for UDP port 17777 and UDP port 27015.
Step 5: Configure your Icarus server
You can configure your Icarus server using the ServerSettings.ini file, which is only created after the server has been started for the first time.
To observe the activities of your Icarus server in a window in the command prompt, create a shortcut for Icarus.Server.exe (right click -> Create shortcut). Open the properties of the shortcut and add the parameter -Log to the Target line.
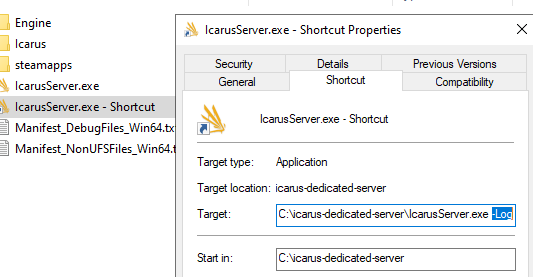
There are some other useful parameters, like -SteamServerName, that you can append to the shortcut you created. You’ll find a list of them in this Icarus dedicated server post in RocketWerkz’s official GitHub directory.
If you double click on the link now, the server will start automatically in a command prompt window. You’ll then find ServerSettings.ini in the .\Icarus\Saved\Config\WindowsServer path in the server’s directory. Alternatively, you can create the file yourself in the folder. Copy the following lines of code into the file and enter the relevant values for maximum number of players, administrator password, etc.
[/Script/Icarus.DedicatedServerSettings]
SessionName=
JoinPassword=
MaxPlayers=
AdminPassword=
ShutdownIfNotJoinedFor=300.000000
ShutdownIfEmptyFor=300.000000
AllowNonAdminsToLaunchProspects=True
AllowNonAdminsToDeleteProspects=False
LoadProspect=
CreateProspect=
ResumeProspect=True
LastProspectName=Step 6: Start your Icarus server
Once you’re done configuring it, you can start the server any time using the shortcut. If it started successfully, you’ll see the line ‘Dedicated server begin processing commands’. Leave the command prompt window open, otherwise the Icarus server will shut down.

Step 7: Connect with the server
Now that the server application is running, you can finally start your Icarus adventure. You and the other players can connect to the server as follows:
- Start Icarus using Stream as usual.
- Select your preferred character.
- Click on ‘Join’.
- Select ‘Dedicated server (beta)’ at the top right of the screen.
- Use the search function to search for your Icarus server. Alternatively, click on ‘Direct connect’ to join the server by entering an IP address.

Now you can start a new open world game, continue old games together or play single missions in co-op mode – on your own Icarus server!
To give your server a little extra something, you can connect it with a unique domain. That way you and your friends can access it using an individualised web address instead of a cryptic IP address. Use the IONOS domain check to find the right address!

