How to host a TF2 server
Team Fortress 2 is a popular multiplayer game developed by Valve corporation. It’s got a large and loyal fan base that has been playing together for years. If you want to create your own server to play with friends and others then you’ve come to the right place. This step-by-step guide will explain how you can create your own server. You’ll be playing in no time!
The advantages of a dedicated Team Fortress 2 server
Creating an external dedicated server for Team Fortress 2 gives you many advantages when compared to using a server on your own computer. First of all, a dedicated server gives you improved performance and a seamless gaming experience. Since the server isn’t running on the same computer as the game, you’re not having your resources try to do two things at once and therefore network latency is reduced.
Another advantage is that your server will be running 24/7 whether you’re playing the game or not. This means that other players will be able to access the server even when you’re not online. On top of this you will have full control over the server and can configure it and modify it however you like. Hosting an external dedicated server for Team Fortress 2 therefore offers you improved performance, more stability and flexibility compared to running one on your own computer.
Requirements for a TF2 server
The requirements for a server will change depending on how often you play and how many other players you play with. To create a simple Team Fortress 2 server you will need the following requirements:
- Operating system: Windows or Linux
- Processor: 2.4 GHz or higher
- Memory: 1 GB or more
- Hard drive memory: at least 5 GB of free memory
- Network connection: Broadband connection with an upload speed of at least 1 Mbps.
A Cloud Server offers a wide range of flexibility and can be made bigger if you need it.
Which IONOS server is suitable for hosting a TF2 server?
Team Fortress 2 can be hosted on a small and simple server. The more players you have and the more data you use, the bigger your server will need to be. You essentially have three different server options:
- vServer: vServers give you virtual resources for a fixed monthly price. With this type of server, you will know exactly what you need to pay each month. You will also have access to your resources at all times.
- Cloud server: Cloud servers are also virtual servers, however, they offer more flexibility than vServers. If your requirements change you can simply scale the size of your server. You essentially pay for what you use.
- Dedicated Server: This type of server gives you the best performance. When you opt for this type, you rent all the hardware. You can configure a dedicated server exactly to your needs.
Which server is suitable for my needs?
Depending on how you want to use your server, you have different options. Here’s an overview of what you will need:
| Use | Server |
|---|---|
| 2 players, occasionally online | VPS L |
| 2–5 players, occasionally online | VPS XL |
| 5–10 players, often online | Dedicated server AR6-32 HDD |
Do you already know how you will use your server and what capacity you need? Then opt for a vServer and choose your size.
Tutorial: Create a TF2 server
In this step by step guide we will explain how you can create your own Team Fortress 2 server. As soon as your IONOS account is up and ready you will be able to set it up.
Step 1: Connect to the server
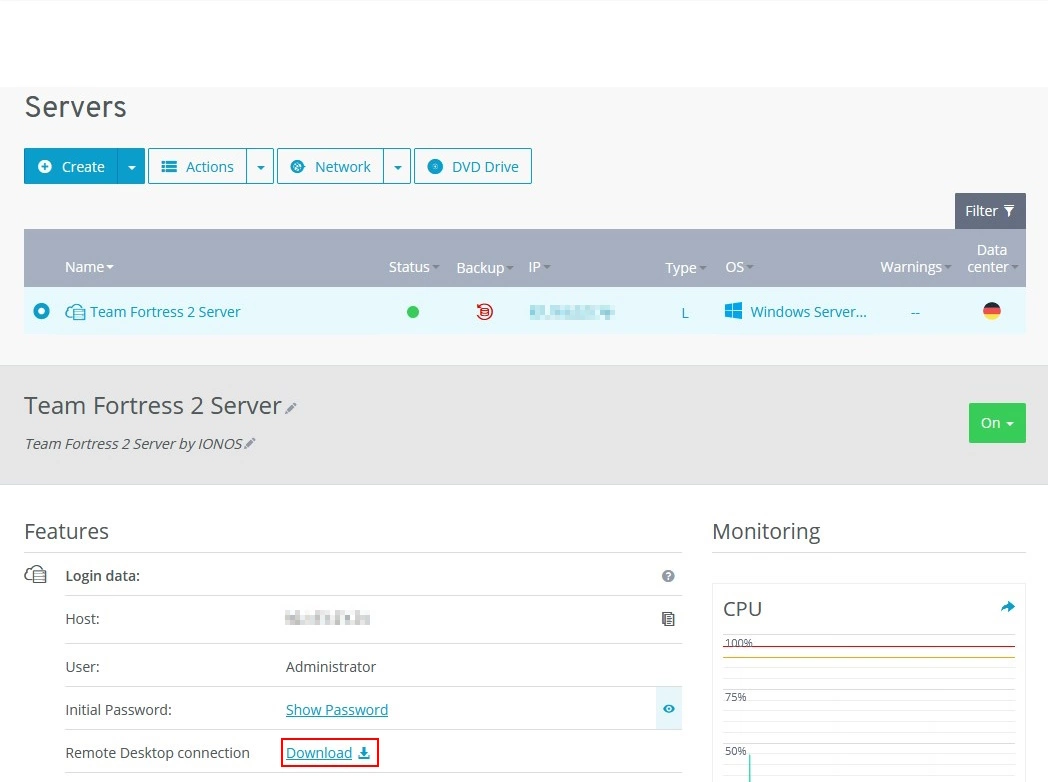
In order to access your IONOS server, you will need to create a connection to it. To do this you need to log into your IONOS account. Under ‘Servers & cloud’ you will find your IONOS server. Select the server you want to install your TF2 server on.
In this tutorial we are using a cloud server with Windows 2022. You can, of course, use another server and Linux to set up a TF2 server.
To create the remote desktop connection, go to ‘Download’ and download the file. Open it up and carry out the steps shown. If you’re connecting to the server for the first time, you will be asked to enter your username and password. Enter ‘admin’ as your username and your initial password to log in. You will then need to open the firewall. You are now logged into your server.
Step 2: Install SteamCMD
Before you can install your TF2 server, you will need SteamCMD. This is the command line version of Steam. Download SteamCMD from Valve Software and unpack the file. To save it, create a folder and call it ‘TF2_Server’.
Run the file steamcmd.exe. You can then install the TF2 server. Copy the path to the folder you’ve just created and enter the following commands:
force_install_dir C:\TF2_Serverlogin anonymousapp_update 232250This will then download the TF2 server. This can take a couple of minutes. As soon as the process is finished you can close the window.
Step 3: Configure the start file and start the server
To start the server, you will need a start file. Go to your ‘TF2_Server’ folder and add a new text file and call it Start.bat. You can then edit the file and enter the following command:
srcds.exe -console -game tf +sv_pure 1 +map ctf_2fort +maxplayers 24If you want to, you can change the map and maximum number of players from here.
Your TF2 server is now ready. You can now start your server by double clicking on Start.bat. Open the firewall and you and your friends will now be able to access the server.
Step 4: Forward your ports
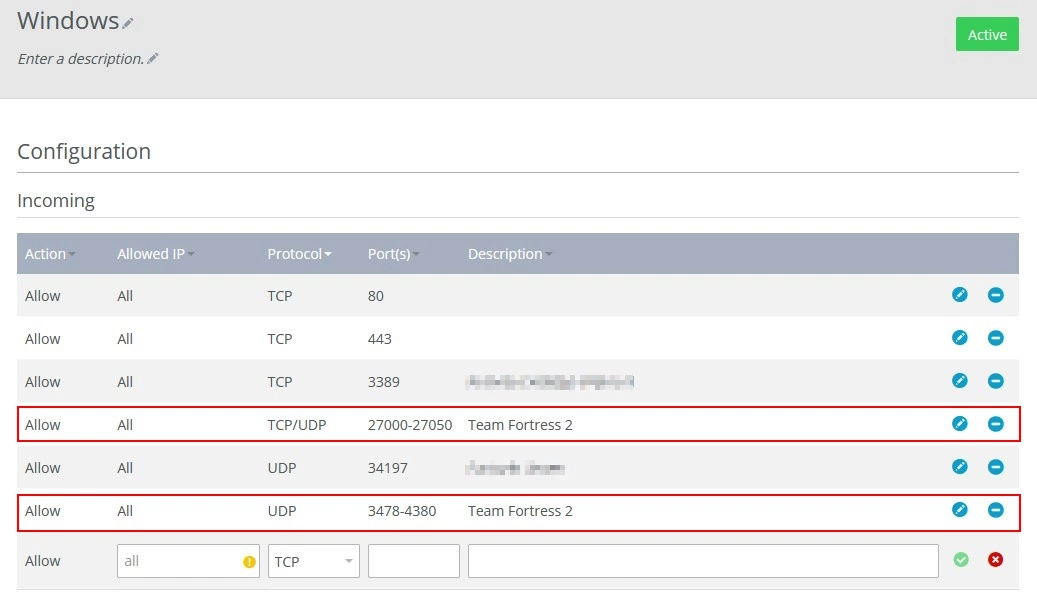
So that you and your fellow players can access the server, it’s important that you forward the necessary ports. Go back to your IONOS account and click on the ‘Firewall guidelines’ in the network menu. You can then open the ports you need for TF2. Enter the following:
- Port 1: 27000-27050 with the TCP/UDP protocol
- Port 2: 3478-4380 with the UDP protocol
Step 5: Create the connection to the TF2 server
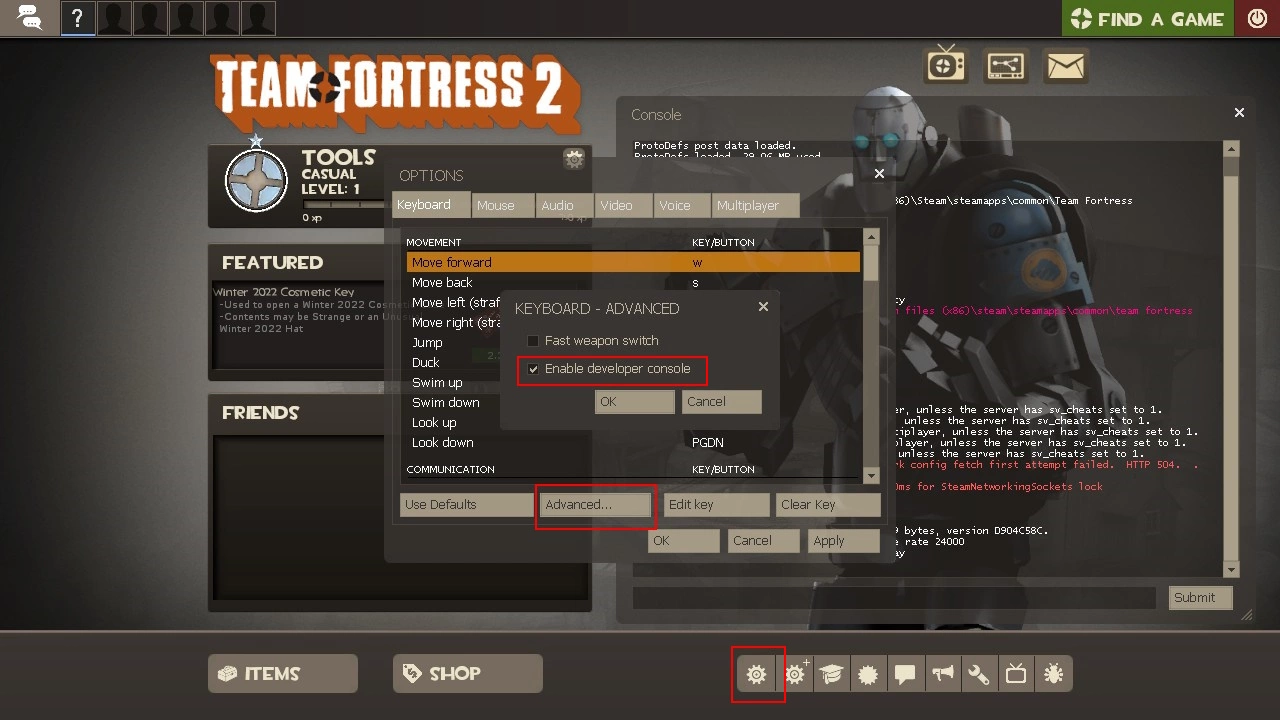
Open Steam and start Team Fortress 2. Go to your settings and select ‘Advanced’. You can then activate the developer console by ticking the box next to ‘Activate developer console’. Then close the game.
In your Steam library you can right click on ‘Team Fortress 2’ and go to settings. In the ‘Launch options’ enter ‘-console’.
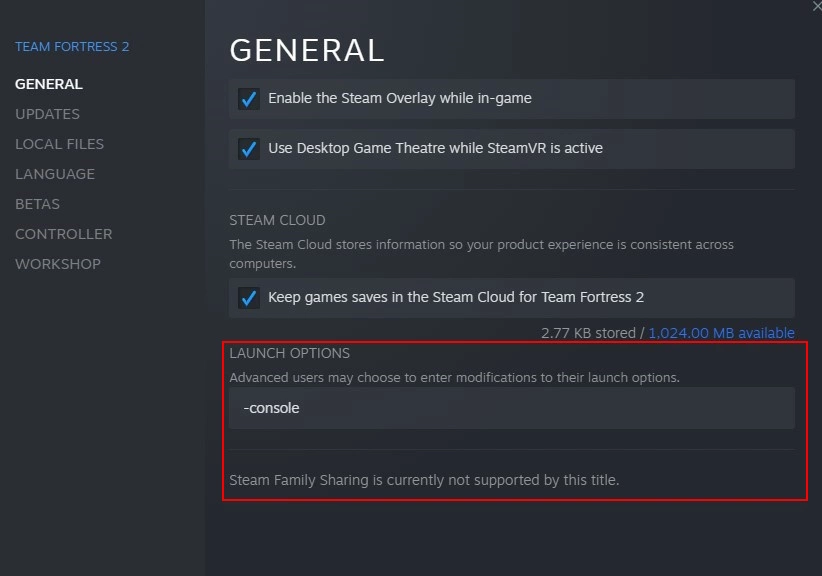
You can now restart the game. You will now see the developer console from where you can connect to your server. In the entry row of the console you can now enter the following command: Replace ‘Server IP’ with your server’s IP address.
connect Server-IPYou will now be connected to your server and can start gaming.
