Piwik in the WordPress dashboard: Web analysis directly in the CMS
If you want to improve your web offer and tailor it precisely to the behaviour of your visitors, then you need a web tracking programme. The most prominent online service for this is Google Analytics. A worthwhile alternative to Google Analytics is the free open source programme Piwik. This alternative is in no way inferior to its more widely known competitor — it’s even slightly ahead of Google when it comes to data protection: With Piwik, you can save the collected data on your own server. Plus, the necessary settings for legally using tracking methods can be configured much more easily with Piwik than with Google Analytics. Piwik can also easily be used as a plugin for WordPress websites; the extension for the content management system enjoys relatively high popularity thanks to its highly successful implementation. After installing the plugin, activate Piwik in WordPress by generating and pasting a tracking code. In the following paragraphs, we’ll tell you how exactly it works and which benefits the Piwik WordPress extension offers.
Piwik: Lots of functions and full control over collected data
Piwik is a web tracking programme that analyses and statistically processes data about traffic on your website. After Google Analytics, it’s one of the most-used analysis tools for evaluating your internet presence. With Piwik, you get information about how often and from where your web presence is accessed, as well as how visitors behave while they are on your site. You’ll be able to see which subpages of your website were visited, when, and for how long. You will receive information on whether your guests reached you directly by entering the URL, or whether they found you via a search engine or by clicking on links and arriving via other websites. If your site was found using a search engine, you can also see which search terms visitors used. These statistics and others are made available by Piwik. In addition, the tool can be used to check the extent to which certain defined goals of your website are being achieved. If for example, specific subpages are preferably accessed, special files downloaded, or user contact data transmitted (for example, for a newsletter), you can use Piwik to understand how often this happens and how successful your actions are. In addition to many other useful functions, the programme also enables the automatic creation of reports on how your website is being used. As opposed to Google Analytics, Piwik gives you the possibility of installing the programme on your own server and saving collected data on your own server (Google’s tool stores all of the data on the company’s servers, which is potentially critical in terms of data protection). This makes the tool an interesting alternative, especially for users who place a lot of worth on the security and full control of data. The maker of the web tracking tool also offers a paid cloud version of the application with Piwik PRO, which gives users access to premium functions, support, customer service, and much more.
Important Piwik functions in the WordPress dashboard
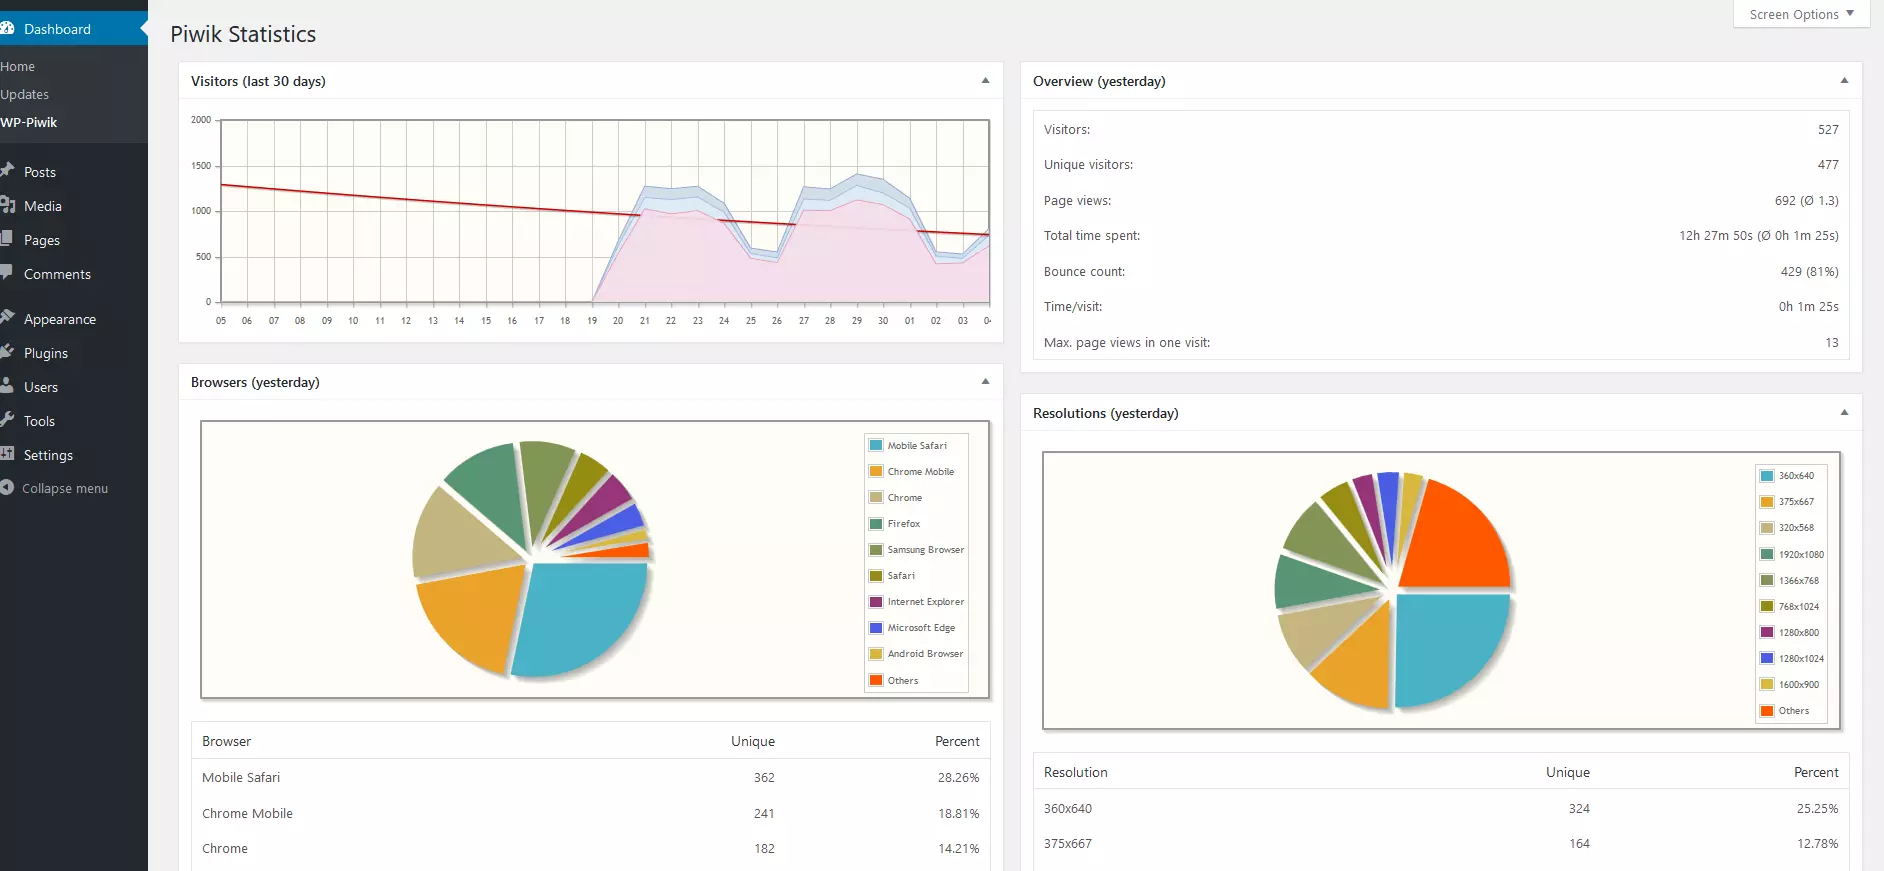
In 2009, the plugin published for the first time in version 0.2.0 under the name WP-Piwik – this was the first publicly accessible Piwik extension for WordPress. André Bräkling (the author of the plugin) announced in mid-2015 that the developer team had succeeded in offering WP-Piwik as a complete integration of the web analytics tool for WordPress. Users of the extension were now given a variety of features and analysis options — with Piwik for WordPress, you have access to the following functions in the dashboard:
- Statistics on individual WordPress website traffic:
- Geographic location of users and time of day for page visits
- Information about the operating system, the browser (in addition to the provider, which plugins are activated during the site access are also noted), and the user’s type of device (whether a desktop, tablet, or smartphone was used)
- Visitor source (was the website accessed via a link or with the input of the address into the browser’s URL bar?)
- Executed actions of the user on the website (which links were clicked on, which areas of the site were scrolled through, etc.)
- Retention time of website visitors
- World map, showing where all website visitors are located in real time
- With the “Row Evolution” function, you can choose certain categories from the collected data and compare their development over a freely definable period of time
- E-commerce tracking: Documentation of various actions from online shop visitors (orders, shopping cart updates, product and category page views).
- Set and analyse goals in connection with the website: Downloading particular files, subscribing to a user account or a newsletter, or accessing a particular web page or video, can all be tracked, among other actions.
- Information on the speed of website file transfers: How quickly is the website’s content presented to the visitor?
- Usage analysis of the internal website search function: Evaluation of the search terms used by visitors in the website’s internal search mask, as well as the general usage of the search function.
- Comment function: Comments (i.e., statistics, analysis results, and changes to a website) can easily be retained using the comment function.
Setting up Piwik
Even though Piwik isn’t as simple to get up and running as Google Analytics, the installation still isn’t especially difficult. The Piwik software always has to be played on your web server - this process is also necessary if you want to utilise the web analysis tool on its own in WordPress with the plugin.
Install Piwik on the server
To link your site to Piwik, you need access to the web server of the internet presence that you want to analyse with web tracking. To be able to use Piwik in the WordPress dashboard, you first need to set the programme up on the web server that is linked to your WP site. The installation of the programme really is quite straight forward:
- Use the download programme for the official Piwik site.
- Unpack the ZIP file.
- Download the unzipped directory to your server completely in binary mode via an FTP client. It’s recommendable to create a new Piwik folder at this interval.
- On the server, you can place Piwik in a subfolder of your website (Example: example.com/piwik) — or give the programme its own subdomain (Example: piwik.example.com).
- Access the appropriate your website’s Piwik domain that you created in step 4 in the web browser. An assistant will now lead you through the installation process.
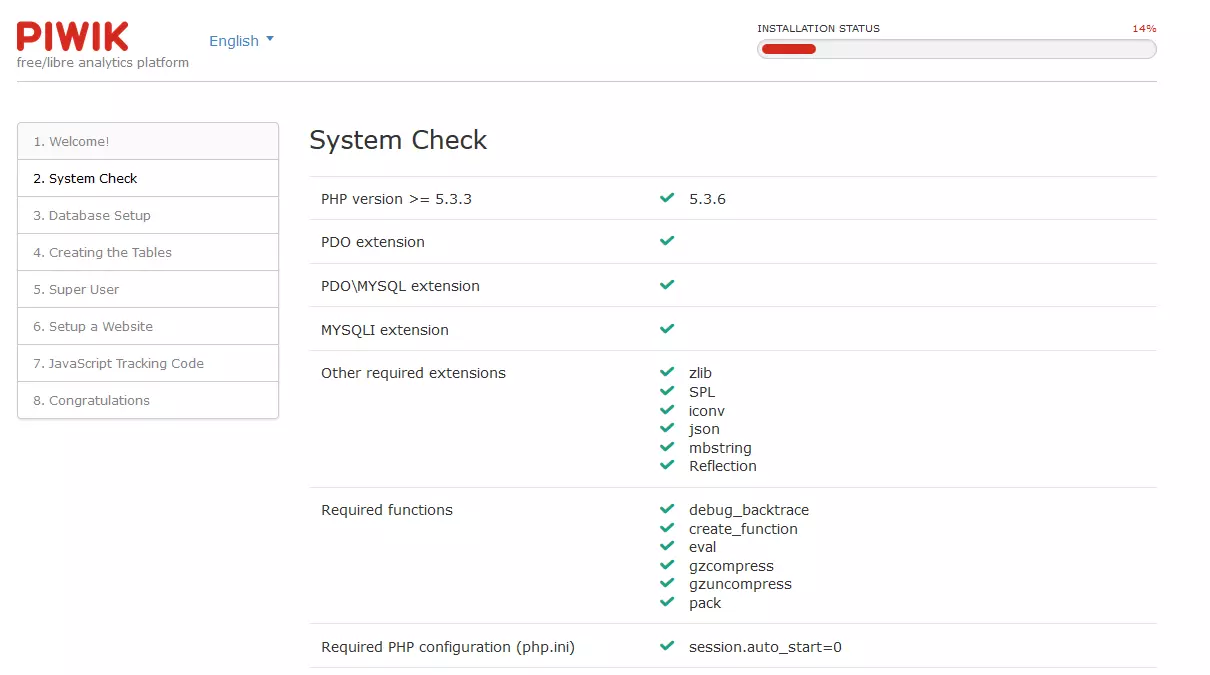
- After the installation assistant has evaluated your system requirements, it will request the required information about your database. It’s a good idea to create a new database for Piwik on your host. Piwik requires a MySQL or MariaDB database.
- Now enter the website that you wish to have analysed using Piwik (you can add other websites later).
- A code is now displayed. This is a so-called tracking code. It can track the behaviour of visitors on a website that it’s linked with. It is, therefore, very important when it comes to web analysis. To evaluate your entire website with Piwik, copy the tracking code into every website of your online presence. If you use a content management system, then it’s generally sufficient to enter this code once in the footer section of the template before the final body tag. Your site is now linked with Piwik and can be analysed by the tool.
Install Piwik in WordPress by tracking code
If you want to connect Piwik to your WordPress site, it’s easiest to use the WP-Piwik extension (the official Piwik plugin for WordPress). With this, you can automatically integrate the Piwik code into WordPress, replacing step 8 from the process explained above. To do this, perform the following steps after installing Piwik:
- Log in to WordPress.
- Go to the “Plugins” menu and search for “WP-Piwik”. Install this and activate it.
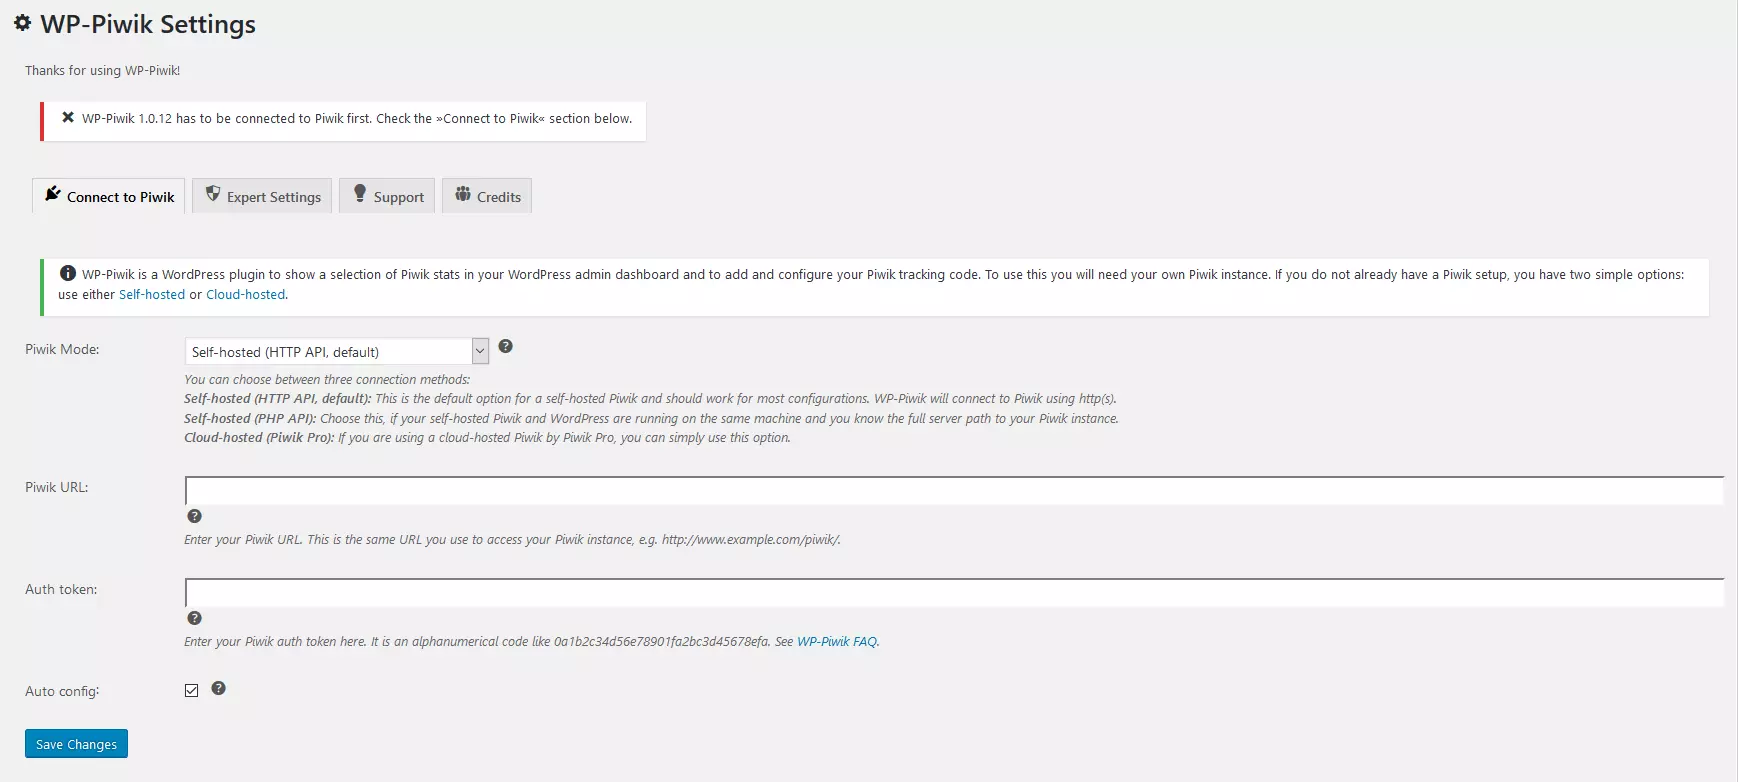
- In WordPress, click on the tab “Settings” à “WP-Piwik”. Enter the Piwik domain of your website under “Piwik URL”. In the next field, enter your Auth Token. You can find the Auth code by accessing your Piwik domain and looking under the “API” menu tab in the personal settings. Once you’ve entered the URL and Auth Token in WordPress, apply the changes.
- Now switch to the “Activate tracking” tab in the WP-Piwik settings, change the tracking code in “Standard tracking” and save.
- Go back to the “Connect with Piwik” tab. Untick the box next to auto-configuration and apply the changes. Now you can click on your website in the “Select site” menu tab.
- After you have selected your website and saved these changes, your WordPress is equipped with Piwik. Now you can access the tool either via the WordPress dashboard or simply using the Piwik directory of your website in the browser.
Piwik’s service and privacy-compliant configuration
It doesn’t matter whether you access Piwik via your domain or using WordPress: You always operate the programme through an orderly user interface in the browser, giving you access to the desired statistics. The menu navigation is seen by some users as slightly hazier than that of Google Analytics; but after a short training period at the most, Piwik will become easy to handle. You also have mobile access to the usage data of your website — both Android and iOS have a Piwik app available. Piwik scores particularly well regarding the protection of information that it collects. The tool can be set to comply with various data protection regulations without requiring much effort.
In regard to the legal situation of the analytics programme, it is generally considered safe and compliant software when it comes to privacy regulations. The data privacy agencies in both Germany and France have publicly recommended the software. It is used by the governments of many other countries as well. This is partially because it’s one of the few analytical tools that doesn’t require the use of cookies and because collected data is stored directly in your own database and not automatically shared with any other servers. While many data protection policies in the US are voluntary, we will tell you in the following sections how to change the tracking settings of the software in regard to IP address use or the use of cookies so as to be privacy compliant.
Automatically anonymise visitor IPs
While there is no official ruling in the US, IP addresses have been ruled in the EU to count as personal data in some cases. Because of this view, the preference is that they not be stored in order to protect privacy. The developers of Piwik know that web tracking can quickly come into conflict legally speaking, so they have provided users with the appropriate options for customising their web analytics. For example, the IP addresses of your visitors can be automatically anonymized to ensure policy-compliant web tracking.
Making the IP addresses of all website users anonymous only requires a few clicks: You simply have to make a few changes under “Settings” à “Privacy” in the server-installed Piwik software. In the menu, click to “Anonymise the IP address of visitors” and then determine that the last two bytes of the IP addresses of all of your visitors should be obscured. Also, in the last selection field, confirm that the anonymous IP address is used for the preparation of visits.
These settings significantly limit the geolocation of users (only the country of origin can be traced instead of the city and region). This is a policy-compliant way to continue to collect data on your users and successfully analyse your website.
Offer an opt-out
Beyond the concealment of an IP address, you should take further measures in regard to data protection: Website visitors must have the opportunity to make a general decision against the collection of user data — this option is called an opt-out. With the help of an HTML<iframe> tag, these elements can be implemented. The code snippets can also be found in the Piwik menu under “Privacy” (at the bottom of the page). You can easily embed the opt-out by copying the displayed code and inserting it into a web page.
After implementing the opt-out HTML code, website users can decide against the collection of their data with just one click. When this happens, a cookie is created in the visitor’s browser that prevents tracking from Piwik.
WordPress and Piwik: What to do when you encounter an error message?
It’s possible that Piwik may experience errors during tracking. This is more likely to happen with a self-hosted Piwik installation than the Google Analytics tool, primarily because you take care of the programme’s maintenance yourself (as opposed to leaving the process to Google). Here, a missing update of Piwik is oftentimes responsible for the problems with the web tracking. Piwik’s developer publishes new versions of the open source application fairly regularly. If malfunctions still exist after updating the software, then a look at the official Piwik forum could help. Frequently occurring problems with the programme are also discussed on the Piwik website in the “Troubleshooting” section. There you’ll find information on more than 50 different issues. If you don’t want to deal with managing or updating the tool, or simply lack the necessary knowledge, then you have the opportunity of subscribing to the premium version of Piwik. The application will no longer be free but you can profit from support services offered by Piwik's developer (i.e., programme installation and setup, advice on how Piwik works, etc.).
Professional web tracking with Piwik – also in the WordPress dashboard
Overall, Piwik is a web analytics programme that earns points based on its range of functions as well as the possibilities of data protection-compliant usage. The WP plugin allows you to view the tracking results directly in the backend of WordPress. It also impresses with its user-friendly operation. All in all, this makes Piwik a very sophisticated tracking programme that remains available to users free of charge.
However, when operating this web analysis tool, you still need to make sure that you’re aware of and compliant with the legal framework in regard to data protection. It’s also important to adequately maintain the software and keep up-to-date with the most current version of the plug-in. If this seems like too much effort to you, or you don’t have the necessary know-how for the required administration, the paid Piwik PRO version might be the alternative for you. With the pro version, you’re not only relieved of the responsibility for maintaining the software, you are also given lots of help, extra functions, and more.
Last but not least, there’s yet one more point to consider: As soon as you connect the programme with your website and use it for web analysis, you must also transparently disclose the Piwik usage in the privacy policy of your website and refer to the use of the tool.


