How to set up a RTMP streaming server
Streaming servers have a number of advantages over online providers, because you retain control over your content. The RTMP server is a popular solution to make data available in real time. The software required for the setup is available free of charge.
What is a RTMP server?
Streaming services are extremely popular. Twitch, for example, is an established part of everyday life for many gamers. However, streaming music, art, food, and other content is also much more common these days.
With an RTMP server, you don’t need platforms like Twitch, but can set up your own streaming server. The Real Time Messaging Protocol (RTMP) is used for this purpose. The network protocol, developed by Adobe Inc, sends content such as video or audio to a Flash player, which can then play media in real time.
Though Adobe discontinued support for the Flash player in 2020, the RTMP protocol is still widely used. Even if you no longer display the stream directly in a browser, streams can be received via the RTMP protocol by video applications such as the VLC Player. In addition, RTMP is now mainly used in conjunction with a HLS server.
Advantages of RTMP servers
A private streaming server lets you stream content of your choice without restrictions. Even advertisements, which are sometimes embedded in streams on popular platforms, won’t show up on a private RTMP server. It’s not surprising then that livestream servers are widely used in the gaming scene.
Want to use the RTMP server for streaming multiplayer games? It may be time to install your own gaming servers. These guarantee uninterrupted game play with friends and you don’t have to worry about trolls either. We have compiled some tutorials on the most interesting gaming servers in our Digital Guide:
But setting up your personal streaming server can be worthwhile in other areas as well, such as offering better livestreams or video content on your website, without having to take a detour via external third-party platforms such as YouTube. It’s certainly an interesting option for webinars, for example.
Prerequisites for setting up a RTMP server
Before you begin to set up your streaming server, a few things are needed. First, you should decide on a suitable server solution. You’ll want to guarantee an interference-free streaming experience and should not rely on your PC’s or laptop’s performance – which you might want to use for gaming at the same time. The bandwidth of your Internet connection plays a decisive role here.
Processor performance (CPU)
In principle, a RTMP server is not particularly CPU-intensive. A single CPU core may be sufficient for small projects. Where a server is also used for transcoding, processor needs can quickly increase.
Working storage (RAM)
An RTMP server is hardly demanding in terms of RAM, either. Even 1 GB can be enough for small projects. For more extensive plans, you should aim for 4 GB.
Hard disk space
The installation files of the required Nginx software are not particularly large. You just need to pay attention to the hard disk space if you want to store the streams on the server. The length of the stream and its quality are important factors.
Band width
Pay attention to the bandwidth. Consider the size of streams – measured in terms of picture and sound quality. This is multiplied by the number of viewers, but also by the number of streams. If you want to distribute several streams via one server, the bandwidth must be higher.
Host RTMP server with IONOS
IONOS offers three different options for server solutions:
- Dedicated Server: the hardware is used exclusively for your server, and billed by the minute.
- vServer: With a Virtual Private Server (VPS), the server environment is virtualised on a dedicated hardware.
- Cloud Server: A cloud server allows for complete flexibility, resources can be quickly added or removed from the configuration.
Server solutions differ in flexibility and billing model. Cloud servers and dedicated servers are billed by the minute. Once you release the resources, i.e., delete the server, you will no longer be charged. With a vServer, on the other hand, a monthly fee is incurred. A cloud server provides a high degree of flexibility. In just a few clicks, you can add more resources (storage space, memory, processor cores) to your server or remove them again.
With all IONOS server models you enjoy the advantage of unlimited traffic. So even if you have a lot of viewers, you won’t incur additional charges at a guaranteed 400 Mbit/s. If you decide on a dedicated server, you have a bandwidth of 1 Gbit/s at your disposal.
Our recommendation:
For beginners, a cloud server is recommended. With the Cloud Server S package, you get a processor core, 1 GB of RAM, and 40 GB of SSD storage. It’s a good starter package for a streaming project. As your demand grows, you can easily scale up and add additional resources.
Free Cloud Server Trial from IONOS
Try out a Cloud Server for free now - test your IONOS Cloud Server for 30 days!
RTMP server step by step
The following tutorial shows how to set up a RTMP server. We’ll use a cloud server from IONOS with Windows in our example. If you’re using a Linux distribution, you’ll need to adapt the instructions in certain places.
Step 1: Establish connection to the server
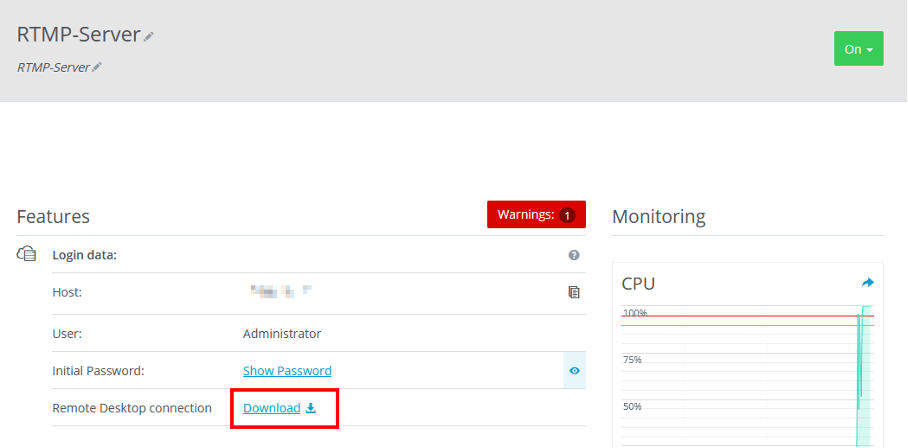
First, you need to connect to your server. To do this, log into your IONOS user account and navigate to the ‘Server & Cloud’ section. After you have selected the appropriate contract, you’ll be directed to the Cloud Panel. Here, you’ll find the ‘Remote desktop connection’ link in the access data. Click on the link to download a file that automatically loads the correct settings for the Windows ‘Remote Desktop Connection’ tool. Simply enter the password (also displayed in the Cloud Panel) and establish the connection.
Even if you are not working on a Windows PC, you can establish a remote connection. To do this, download the appropriate remote desktop software and use the information from the Cloud Panel to log in to the server.
Step 2: Install Nginx with RTMP module
For the RTMP server, we use Nginx. The software is a web server, but with the help of an additional module it also enables streaming via RTMP. Download the current version of the software, which should contain the module. Unzip the ZIP file. You can then start Nginx using the command prompt. Navigate to the unzipped folder in the command line utility and start the web server with a single command:
start nginxThe server will run in the background. To test if the Nginx software is working, you can open the IP address of the server in the browser.
Step 3: Configure RTMP
To prepare your server for RTMP, you need to modify the configuration file. In the Nginx folder, search for the nginx.conf file. You can open it with a text editor. Add the following code to the end of the file:
rtmp {
    server {
        listen 1935;
        chunk_size 4096;
        application live {
            live on;
            record off;
        }
    }
}
To apply the new settings, go to the command prompt again and restart Nginx:
nginx -s stop
start nginx
Step 4: Release port
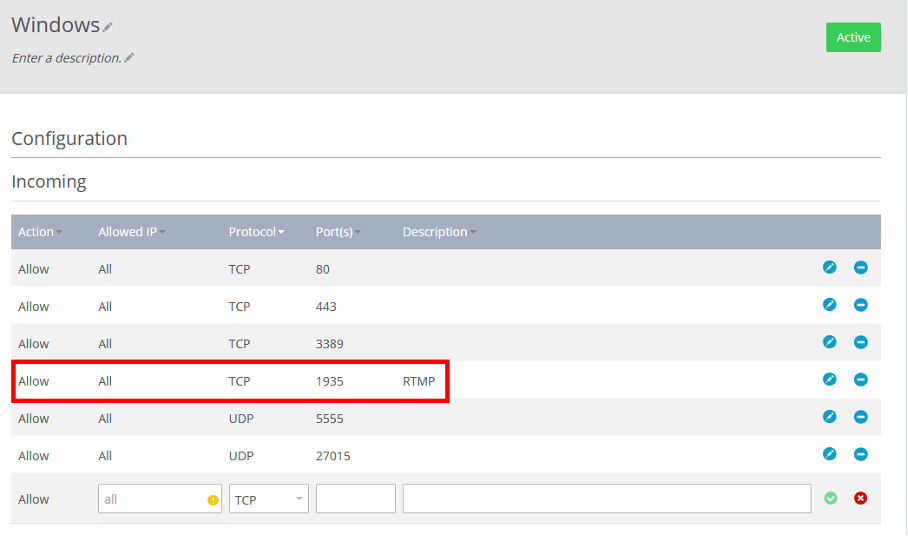
To allow other users to access your stream, you must enable the corresponding TCP port in the server firewall. As an IONOS customer, you do this by logging into your account and then opening the Cloud Panel. In the menu item ‘Configuration’ you will find the firewall setting from where you can release the TCP port 1935.
Step 5: start stream
Once you’ve adjusted the settings and can send streams, you just need to download the appropriate software. OBS is a popular option. Simply enter your server in the streaming software:
rtmp://<ip address>/live</ip>Enter the correct IP address of your server. You can also find this information in the Cloud Panel. Other users will then receive the stream via this URL.


