8 Tips to speed up Windows 10
When you replace your Windows computer with a new model, you’ll notice a much improved performance. It’s normal for a PC to get slower over time, making work more tedious. But it’s not always necessary to invest in a whole new machine. Windows 10 offers lots of ways to improve performance and increase speed noticeably. We show you eight features and settings that allow you to speed up Windows 10.
- Free website protection with SSL Wildcard included
- Free private registration for greater privacy
- Free 2 GB email account
How to speed up Windows 10: a quick guide
Windows 10 offers various ways to improve system performance considerably. To prevent your computer from slowing over time, it’s a particularly good idea to regularly check the factors that affect performance. For instance, you can uninstall unnecessary programs or defragment your hard drive at regular intervals. Read the following sections to find out how this works and what other strategies exist for making Windows 10 faster.
A possible cause for long loading times is excessively high CPU load. Find out how to overclock the CPU and improve performance in our dedicated article.
Deactivate auto start-up for programs
When you switch on your Windows computer, a number of selected programs start automatically. This feature is especially useful for software you use every day. But often other programs creep into the auto start-up routine which you hardly ever use. These applications continue to run in the background after automatically starting, taking up precious working memory. Windows therefore offers you the ability to manually edit the auto start-up list in the Task Manager.
Follow our guide to deactivate automatic launching of programs and make Windows 10 faster:
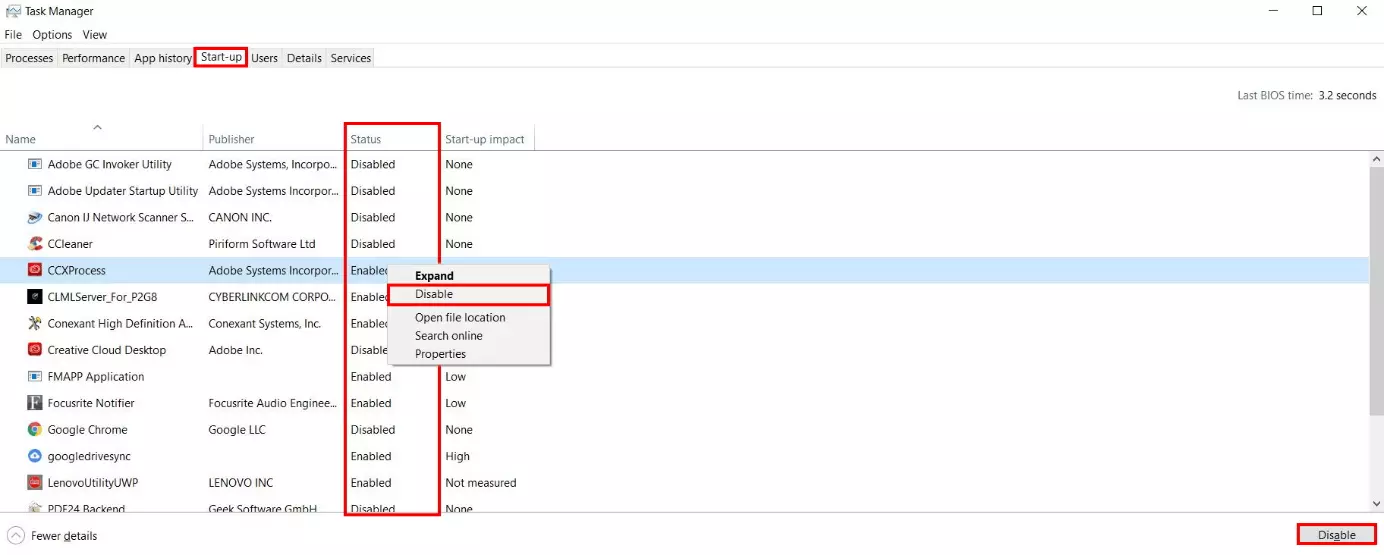
- Open the Task Manager using the key combination [Ctrl] + [Shift] + [Esc].
- Select the 'Start-up' tab.
- The Task Manager shows a list of all programs installed on the computer. The 'Status' columns indicate whether automatic start-up is enabled or disabled for each program. Look through the list for processes that don’t need to be launched automatically when you start your computer. To change the status, click on “Enabled” or “Disabled” in the relevant row using the right mouse button and select the desired option from the context menu.
- Alternatively, click on the respective program using the left mouse button and then choose 'Disable' in the bottom-right corner.
Defragment hard drive and optimise read processes
Your computer saves files in individual data blocks and reads them out when needed. But the arrangement of these fragments gradually becomes mixed up over time if you delete data or save existing documents again. These processes separate related blocks from each other (producing fragments) and read speed therefore slows down. When defragmenting your hard drive, the data is re-arranged – making Windows 10 faster. This not only increases speed but also the lifetime of your hard drive. To defragment your hard drive(s), follow the guide below:
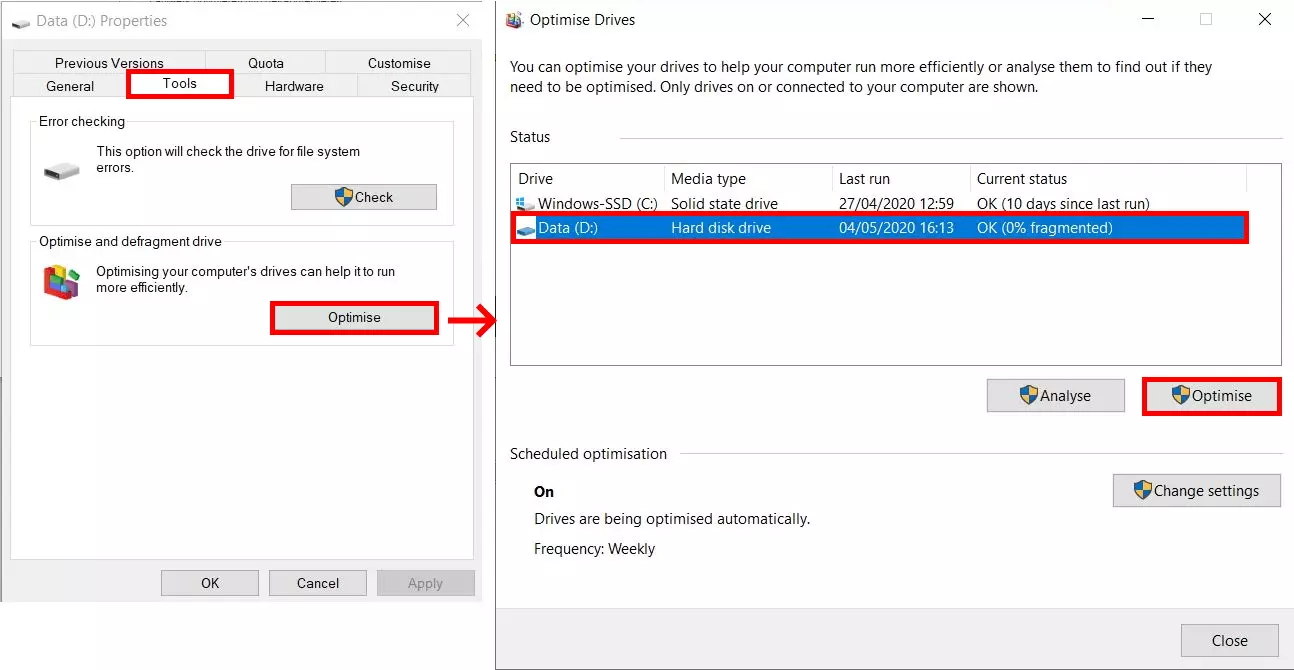
- Open Windows Explorer and select ‘This PC’ in the left area.
- Next, right-click on the hard drive where you wish to re-arrange data blocks. Select the option ‘Properties’ in the context menu.
- A dialogue window will then appear with information about the selected hard drive. Select the ‘Tools’ tab and then click on ‘Optimise’.
- In the new dialogue window ‘Optimise Drives’, select the desired hard drive again with the left mouse button and initiate the defragmentation process by clicking on the button ‘Optimise’.
SSD hard drives do not contain a write/read head. Defragmentation therefore provides no benefits and has no effect on the performance of the operating system.
Deactivate virtual working memory
Virtual working memory is activated by default on Windows 10. This is used when the physical working memory (RAM) is completely utilized. But if your Windows computer does not have a SSD hard drive, the use of virtual storage can have a negative impact on performance. In this case, it is advisable to disable the additional working memory to speed up Windows 10.
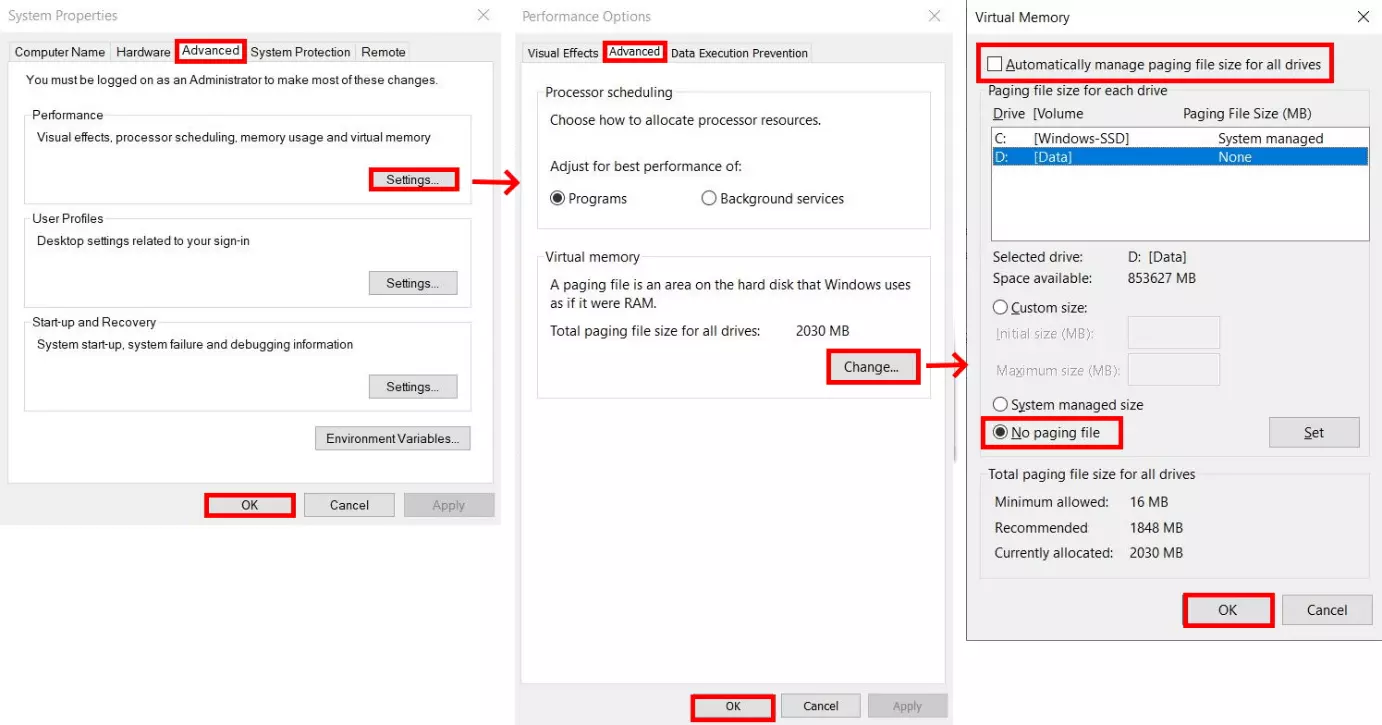
- Enter “Show advanced system settings” into the search field in the task bar and select the correct result.
- In the dialog window “System Settings” that appears, select the “Advanced” tab. Now click on the “Settings” button in the “Performance” section.
- The “Performance Options” window will then open. Click on “Advanced” and then on the button “Change” in the “Virtual Memory” section.
- Remove the checkmark for “Automatically manage paging file size for all drives”. You can then select the option “No paging file”.
- To apply the settings and disable the virtual memory, confirm your changes in all opened windows with “OK”.
Turn off visual effects
Windows 10 not only sets itself apart from the previous version with its new technical features, but also with its neater design including many visual effects. This also includes animations, refined edges, and the display of window shadows. However, these effects take up computing power. If the performance of your computer is deteriorating, it’s worth deactivating them. Although you will then forego a number of design elements, you will benefit from a performance boost. In the performance options, you have the possibility to activate or deactivate individual effects:
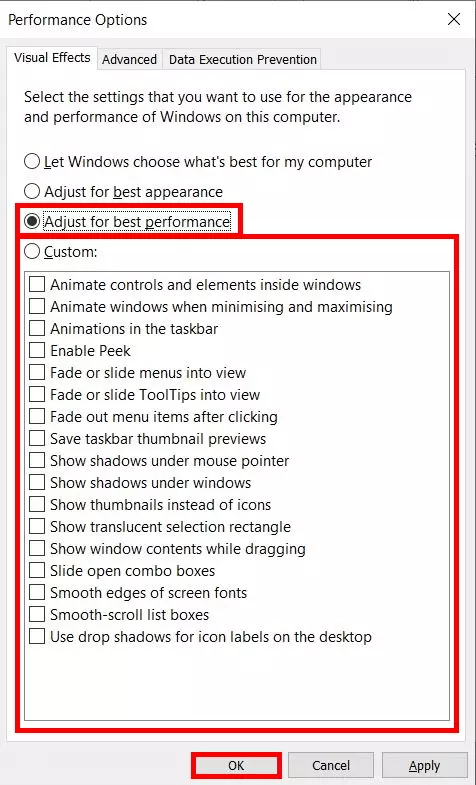
- Enter ‘Adjust display and performance of Windows’ in the search field of the task bar and select the right search result.
- The ‘Performance Options’ window will then open. The required tab ‘Visual Effects’ is already selected as standard.
- Choose the option ‘Adjust for best performance’. Windows will then prioritise performance over visual effects. Alternatively, you can also apply user-defined settings. Manually select the effects you want to have displayed.
- Finally, confirm your changes with ‘OK’.
Remove unnecessary programs
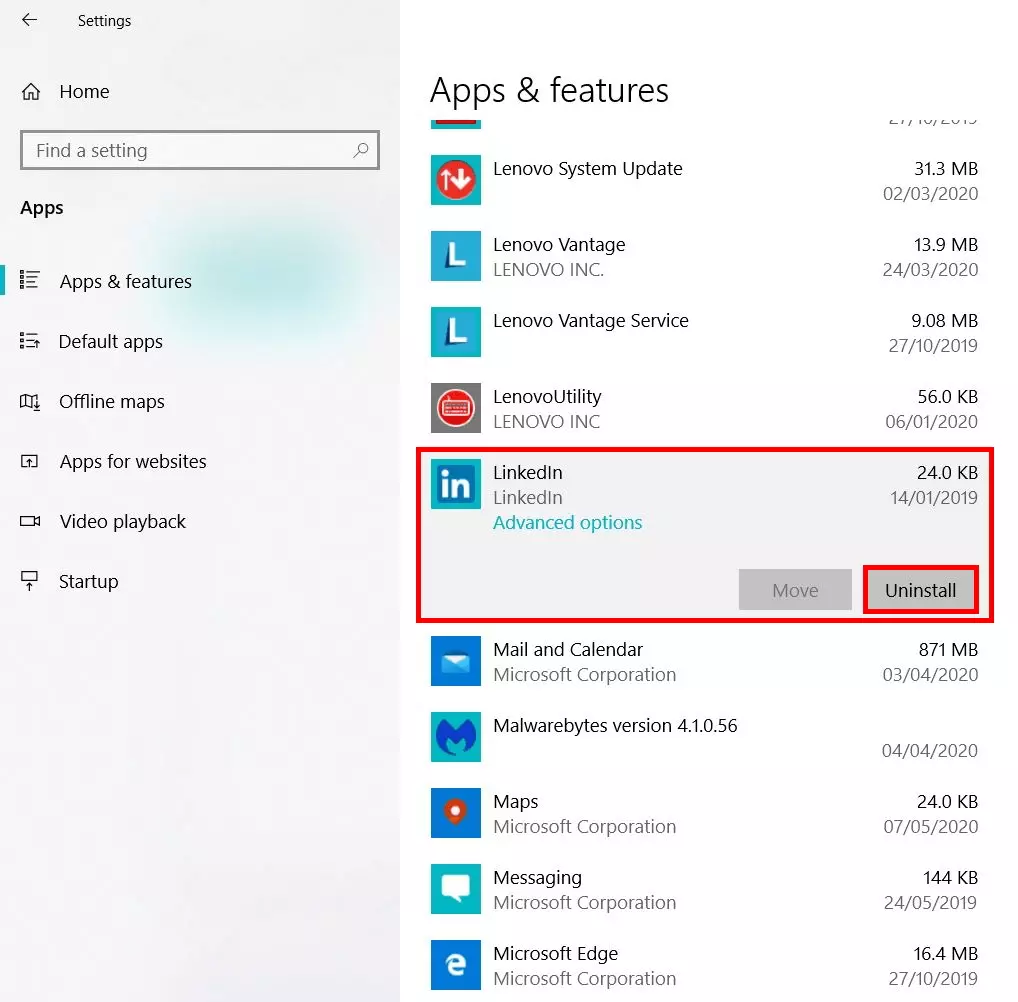
A number of programs and tools are available to download online for free. It can be tempting to try a range of different applications. But even when you don’t use a program, it still takes up precious storage space – and this can have a negative effect on your computer’s performance. For this reason, it’s a good idea to regularly check the list of installed programs and apps. Deinstall any programs you don’t need in order to speed up Windows 10.
- Open the Windows Settings by clicking on the Windows symbol in the task bar and then on the cog symbol.
- Select the option ‘Apps’.
- Windows 10 will show you a list of all programs currently installed. If you come across an application you no longer use, you can simply remove it using the left mouse button.
- Then click on the button ‘Uninstall’.
- Repeat this process for all the programs you don’t need.
With most programs, it’s necessary to follow additional instructions to complete the uninstallation process.
Switch off background apps
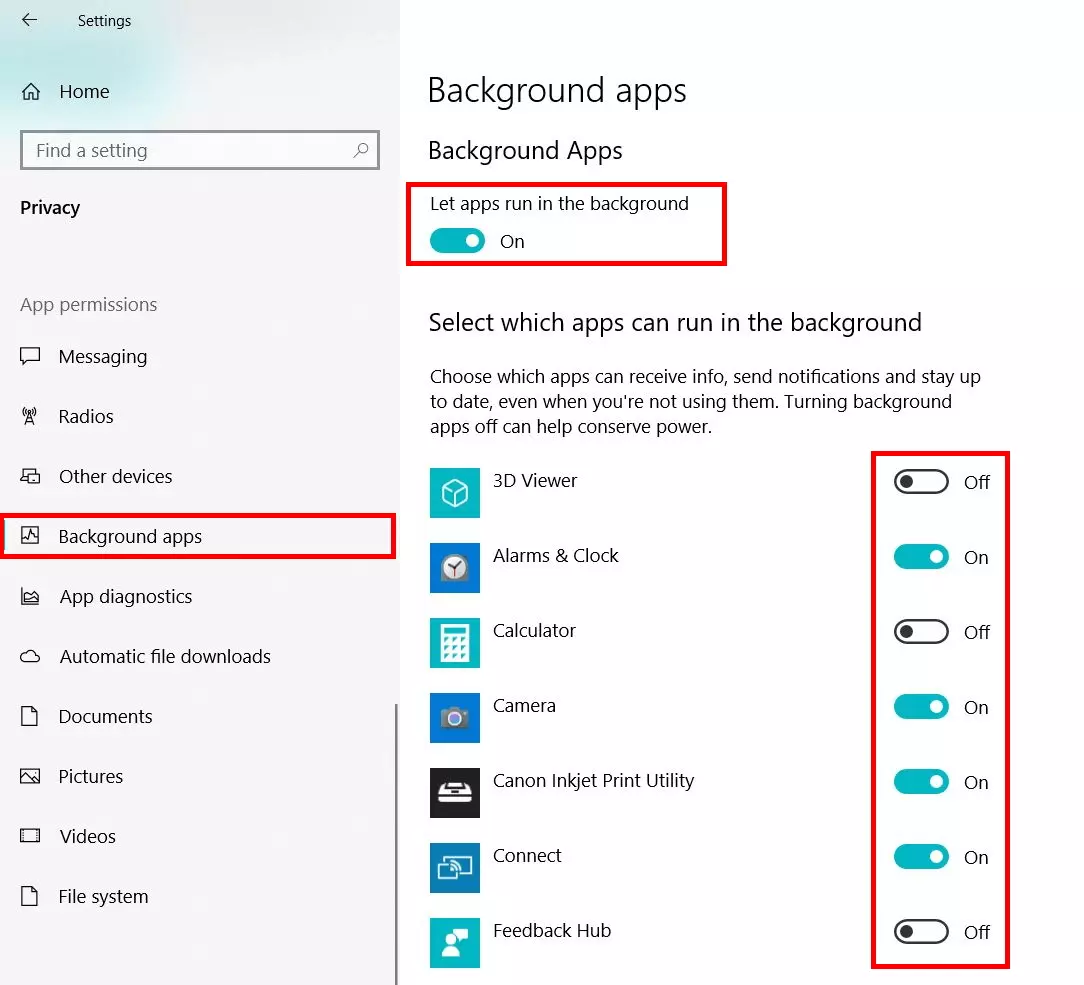
Windows sometimes continuously runs apps in the background in order to provide you with ongoing information and notifications – such as for an email client. However, this feature is a burden on working memory and can have a negative effect on overall performance. Here too, Windows offers the option to manually manage the use of apps in the background and to deactivate this function completely or for selected programs.
- To change the settings for background apps, click on the Windows symbol in the task bar and then on the cog symbol.
- Select ‘Privacy’.
- Now select ‘Background Apps’ in the side menu on the left.
- Disable the feature ‘Let apps run in the background’ to disable the notification function for all apps. Alternatively, you can deactivate the feature for selected apps only.
Empty cache and junk data
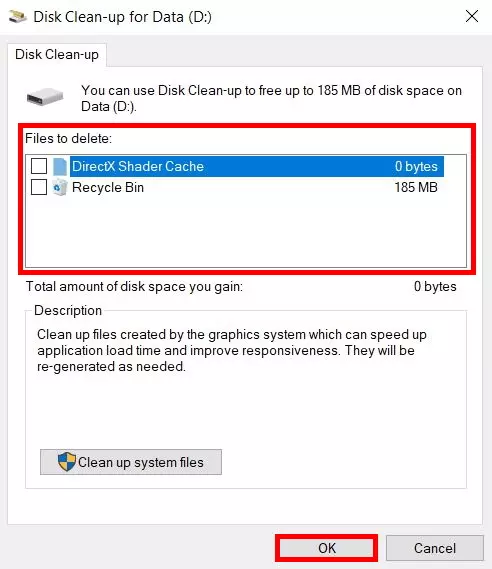
Every computer system has a cache. This is a form of interim storage where programs can quickly save and access data at any time. However, data is often left in this storage area that is no longer required, thus slowing down the system. Regularly clearing the cache is one of the most important steps you can take to speed up Windows 10:
- Enter ‘Disk clean-up’ into the search field in the task bar and open the matching result.
- Select the desired drive for the clean-up and confirm your choice with ‘OK’.
- Windows 10 automatically calculates how much storage space the clean-up will clear. What’s more, you have the option to select and delete files manually.
- Decide which files should be deleted and confirm your entry with ‘OK’.
Use of working memory can affect the performance of your computer in a similar manner. Since it also works with an interim storage, you have the option to clear it in order to speed up Windows 10. Find out how this works in the article 'Empty Working Memory: A Step-by-Step Guide'.
If your computer’s CPU is heavily utilised, this will have a negative impact on the speed of programs and processes. Learn more about the CPU and the possible reasons for high processor load in the article 'High CPU Load – What Causes This?'.
Reset Windows 10 as a final option
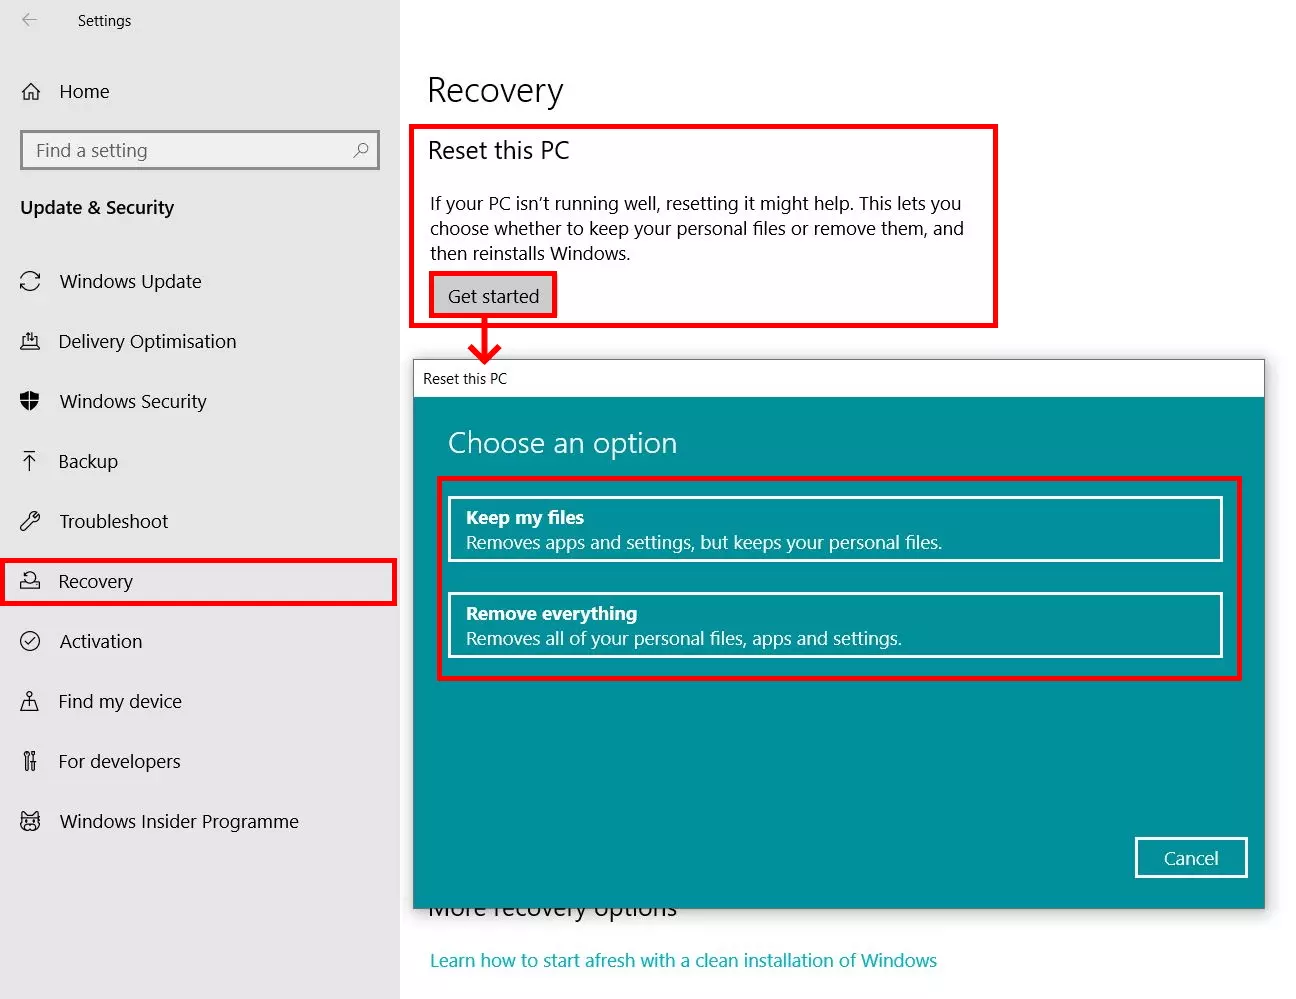
Have you followed all the tips above but your computer’s performance still hasn’t noticeably improved? In this case, resetting the system remains the final option. This means Windows resets all system settings to the factory settings and deletes all installed programs. You can also delete your personal data during this process if you wish, but the data can also be kept. It’s a good idea to try this option before completely reinstalling the system or buying a new computer.
- Open the Windows Settings by clicking on the Windows symbol in the task bar and then on the cog symbol.
- Select the ‘Update and Security’ option.
- Click on ‘Recovery’ in the area on the left.
- Initiate the recovery process by clicking on ‘Get started’ under ‘Reset this PC’.
- The ‘Reset this PC’ window will then open. Here you can choose whether to retain or completely delete your personal data.
- Follow the dialogue and finally click on ‘Reset’ to start the process.
The feature for resetting Windows 10 is also practical when you plan to sell your computer. This way, you can delete all data automatically so that no personal information is passed on to third parties. Find out more in our in-depth article.


