How to install HAProxy on Debian 12 step by step
HAProxy is a powerful open-source software that enables load balancing and proxy configuration for TCP- and HTTP-based applications. It can be installed on Debian 12 in just a few steps and is often used in highly available systems to efficiently distribute requests, thus improving application stability and performance.
What is HAProxy?
HAProxy (High Availability Proxy) is a high-performance and reliable load balancer and reverse proxy that’s used for distributing network and application traffic. The application supports both Layer 4 (Transport Layer, e.g., TCP) and Layer 7 (Application Layer, e.g., HTTP) of the OSI model with regard to load balancing. Thanks to its low latency, high efficiency and comprehensive configuration options, HAProxy is suitable for companies of all sizes.
Companies and developers use HAProxy to balance the load across multiple backend servers, intercept server outages and improve overall application performance. The software plays a central role in many web infrastructures, especially in highly available and scalable applications. Its main features include SSL/TLS termination, backend server health checks, rate limiting and DDoS protection mechanisms.
- Enterprise hardware
- Configurable hardware equipment
- ISO-certified data centres
How to install HAProxy on Debian step by step
Step 1: Update the system
Before installing HAProxy, you should update your Linux distribution. This ensures that all packages are up to date and that the installation runs smoothly.
The following command updates the package lists and installs all available updates for Debian 12:
sudo apt update && sudo apt upgrade -yStep 2: Install HAProxy
Debian 12 includes HAProxy in its official package sources, so installation is easy using the built-in package manager apt.
sudo apt install haproxy -yThis command downloads and installs HAProxy with all required dependencies.
Step 3: Check HAProxy version
After installation, you should check whether HAProxy was installed successfully. You can do this by retrieving the installed version of HAProxy:
haproxy -vThe output should look something like this:

This ensures that HAProxy has been installed correctly.
Step 4: Enable HAProxy as a service
In order for HAProxy to start automatically at system startup and run permanently, the service must be enabled and started.
sudo systemctl enable haproxy
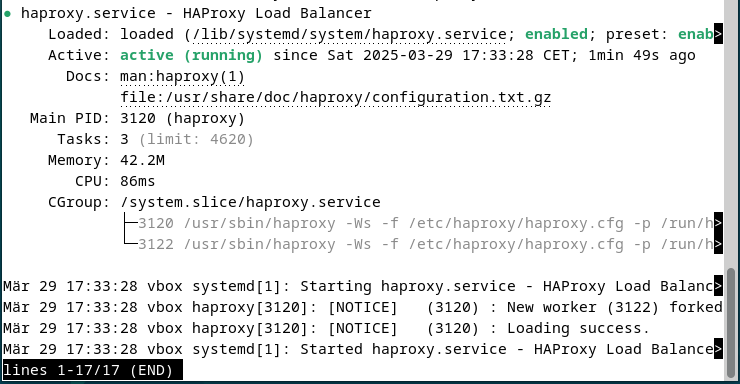
sudo systemctl start haproxyFinally, to check whether the service is running successfully, the following command can be used:
sudo systemctl status haproxyIf HAProxy is running correctly, you should see an active (running) output that looks something like this:

Step 5: Basic configuration of HAProxy
The HAProxy configuration file is located at /etc/haproxy/haproxy.cfg. Before making any changes, it’s advisable to create a backup copy that you can fall back on in case of errors:
sudo cp /etc/haproxy/haproxy.cfg /etc/haproxy/haproxy.cfg.bakNow you can edit the file with an editor of your choice (such as Vim or nano):
sudo nano /etc/haproxy/haproxy.cfgA simple HAProxy configuration could look like this:
global
	log /dev/log local0
	log /dev/log local1 notice
	chroot /var/lib/haproxy
	stats socket /run/haproxy/admin.sock mode 660 level admin
	stats timeout 30s
	user haproxy
	group haproxy
	daemon
defaults
	log global
	option httplog
	option dontlognull
	timeout connect 5000ms
	timeout client 50000ms
	timeout server 50000ms
frontend http_front
	bind *:80
	default_backend web_servers
backend web_servers
	balance roundrobin
	server server1 192.168.1.10:80 check
server server2 192.168.1.11:80 checkThis configuration distributes HTTP requests across two web servers in a round-robin fashion. It’s divided into several sections. First, there’s the global section, which defines basic settings for HAProxy. For example, this section specifies the user account under which HAProxy runs, the number of concurrent connections allowed and where logs are stored. A chroot directory can also be defined to run HAProxy in a restricted environment and thus increase security.
Following the global settings is the defaults section, where default values for all subsequent configurations are defined. For example, this section specifies that HAProxy operates in HTTP mode and HTTP logging is enabled. Various timeouts are also defined.
The other sections of the configuration file, such as frontend and backend, control the actual data traffic. The frontend section specifies which ports HAProxy accepts requests on and how they are forwarded. The backend section then defines the servers to which the traffic is forwarded. Load balancing algorithms can be used here.
After editing, you need to save the file and restart HAProxy:
sudo systemctl restart haproxyThe installation of HAProxy on Debian 12 is now complete. The configuration can be adjusted at any time by changing the configuration file.
Manage any workload with flexible GPU computing power, and only pay for the resources you use.

