How to set up Nextcloud Cron
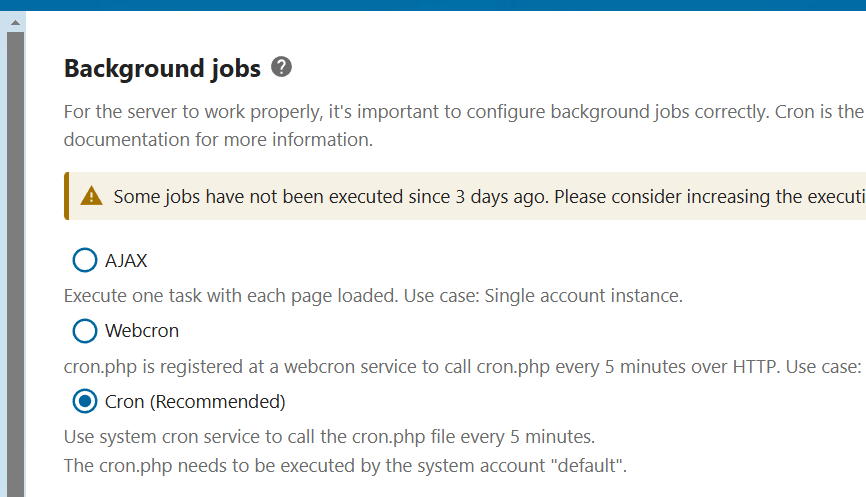
Nextcloud cron jobs are automated processes that perform regularly recurring tasks such as maintenance, synchronisation, or notifications. If you want to set up a cron job in Nextcloud, you have three different methods available: AJAX, WebCron, and Cron.
Why are cron jobs useful in Nextcloud?
In Nextcloud, cron jobs are crucial for ensuring the efficiency and reliability of the cloud software. They allow for automated execution of background tasks without requiring user interaction. These include, for example:
- Emptying the recycle bin: Nextcloud moves deleted files to a recycle bin. Older versions of files are also stored there to enable recovery. Cron jobs automatically delete these items after a set period to save storage space.
- Regular updates of search indices: When files are uploaded, changed, or deleted, it’s necessary to update Nextcloud’s search indices. Cron jobs handle this task at set intervals so that users can always access up-to-date search results.
- Email notifications and activity updates: In Nextcloud, cron jobs are also used to inform users about events such as uploads to shared folders or new calendar entries.
- Background file scanning: To detect changes made outside of the user interface, Nextcloud regularly scans the file system. This task is automated by cron jobs.
- Maintenance tasks and cleaning: Temporary files, old session data, and no longer needed database entries might impair Nextcloud’s performance. Cron jobs automatically perform cleaning and optimisation tasks to ensure the system’s stability and efficiency.
From a technical perspective, a cron job consists of a script and a command that are executed regularly via the Nextcloud cron.php. The various Nextcloud apps automatically register when the cron.php performs the respective tasks.
Creating correctly configured cron jobs prevents routine tasks from piling up, which can lead to performance degradation and affect the user experience. Therefore, it is advisable or even essential to set up cron jobs in Nextcloud.
- Keep your data safe with industry-leading security
- Save time on updates and maintenance
- Easily add apps and online office tools
What are the options for setting up cron jobs in Nextcloud?
Nextcloud offers three different methods for setting up and running cron jobs: Cron, AJAX, and WebCron. Each of these options has specific advantages and disadvantages and is suitable for different use cases.
AJAX
AJAX is set as the default method in Nextcloud, but it’s considered the most unreliable option. As soon as a user accesses the Nextcloud page, a single background task is executed. The main advantage of the AJAX mechanism is that neither special server configuration nor logging into a third-party service is required. However, the disadvantage is that the system reliably completes cron jobs only if the page is visited regularly. Otherwise, data loss or faulty tasks may occur.
Suitable use case: AJAX is recommended for small, private user instances.
WebCron
With the WebCron method, the address of the Nextcloud cron.php script is registered with an external service to ensure the regular execution of cron jobs. The basic requirement for this is that you have the ability to access your server via the internet. However, the web server usually offers only limited resources for executing background tasks.
Suitable use case: WebCron is ideal for small instances with a maximum of five users.
Cron
According to the official Nextcloud documentation, Cron is the preferred method as it enables reliable and efficient execution of background processes. When you set up cron jobs in Nextcloud via Cron, the operating system’s Cron function is used, allowing routine tasks to be executed independently of web server limitations. However, setting it up requires server access and basic knowledge of configuring cron jobs.
Suitable use case: Relying on cron in Nextcloud is especially recommended for larger instances or productive environments.
Our article on Kubernetes cron job explains how to automate routine tasks in Kubernetes.
How to set up cron jobs in Nextcloud (Cron)
To create cron jobs using the Cron service, you must have administrative server rights. The following step-by-step guide demonstrates how to configure cron jobs using the Cron method to execute routine tasks every five minutes:
- Access Crontab: Log in to your Nextcloud instance and open the Crontab file by executing the following command:
sudo crontab -u www-data -e. - Set up cron job: In Crontab, add the command line
*/5* ** * php -f /var/www/nextcloud/cron.php. This ensures that cron.php runs every five minutes. Replace the path/var/www/nextcloud/cron.phpwith the path to your current Nextcloud installation. Then, save the changes. - Adjust configuration in Nextcloud: Navigate to the basic settings (under ‘Administration’). In the background jobs section, select ‘Cron’ as the option to ensure the method is used.

Whether the cron job has been added can be verified using the command # crontab -u www-data -l. If everything has worked, the console output should look like this:
[snip]
*/5* ** * php -f /var/www/nextcloud/cron.phpManaged Nextcloud Hosting from IONOS provides you with access to a fully maintained Nextcloud instance without requiring any technical expertise. IONOS handles all server administration, allowing you to fully focus on your work.
Cron jobs can also be created via systemd
If systemd has been installed on your system, you alternatively have the option to manage cron jobs in Nextcloud via this session and maintenance manager. It is used by default in many Linux distributions and provides timers for scheduled tasks. This solution offers more detailed control over task scheduling and is excellent for server-side environments.
- Enterprise hardware
- Configurable hardware equipment
- ISO-certified data centres

