Windows Recycle Bin missing? Here’s what to do
One of the most useful inventions in the early days of Windows was the Recycle Bin, a feature that has not changed much over the years. Files or documents are not gone forever when you delete them. Just like paper documents, they are put into a recycling bin. You can always recover files from this bin as long as it’s not been emptied. Even though the Recycle Bin can be difficult to find on many Windows 10 computers, it’s still there and can be unhidden in a few simple steps.
Why is my Recycle Bin missing?
The Recycle Bin itself, meaning the Windows functionality for storing deleted files, is never really gone, so there’s no need to panic if the Recycle Bin suddenly goes missing in Windows 10. In the vast majority of cases, only the Recycle Bin icon is missing from your desktop. You might have removed the icon on purpose or by accident. Windows updates that make changes to your Windows settings can also cause the Recycle Bin to suddenly disappear from the desktop.
Microsoft 365, formerly known as Microsoft Office 365, is a server-based office solution that allows you to collaborate from anywhere. One especially convenient feature: You always automatically have the latest version, making tedious updates a thing of the past.
Adding the Recycle Bin as a desktop icon
Long-time Windows users are accustomed to having a few icons on their desktop by default: Computer, User’s Files, Network, Recycle Bin, and Control Panel. By the time Windows XP was released, all of these icons, except for Recycle Bin, were no longer displayed on the desktop by default. These icons are actually still available in Windows 10, they’re just well hidden. You can add the Recycle Bin icon to your desktop in just a few steps:
- Go to the ‘Settings’ app. The quickest way to get there is to use the Windows keyboard shortcut Windows logo key + I.
- Click on ‘Personalisation’.
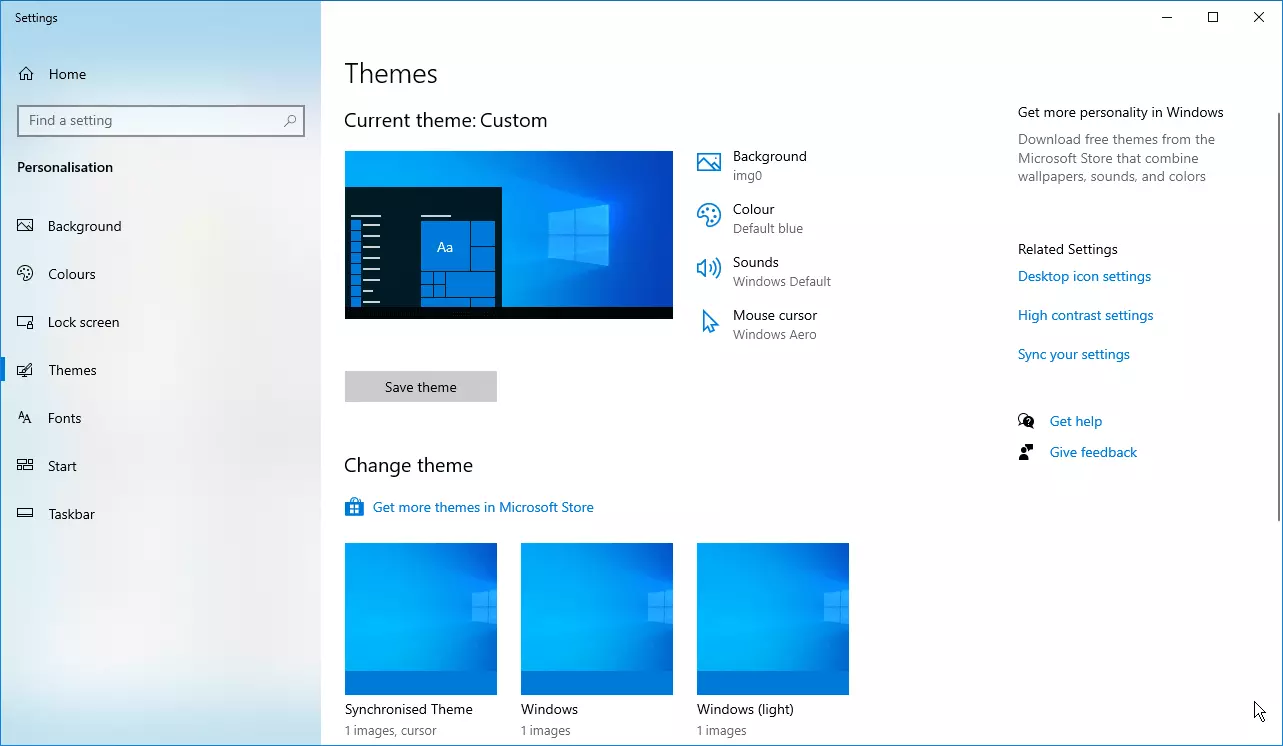
- Select ‘Themes’ from the sidebar on the left.
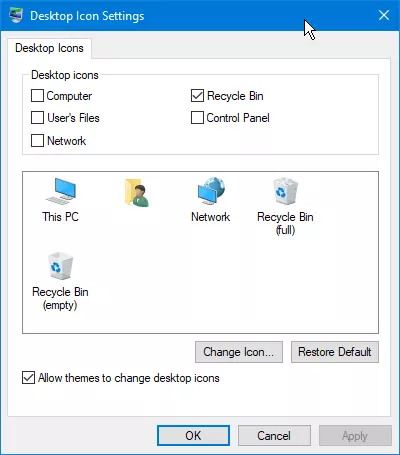
- On the right side of the window, you’ll see a link to the ‘Desktop Icon Settings’. Click this icon to select the Windows icons you want to appear on your desktop by default.
- Select the ‘Recycle Bin’ checkbox.
Another easy way to reach these settings is by right-clicking the desktop. In the context menu, select ‘Personalise’. In Windows 10, the Settings app will open. Simply click on ‘Themes’ to go to the desktop icon settings. In Windows 7, open the window for the ‘Control Panel’ and change the settings to make the Recycle Bin icon reappear on your desktop.
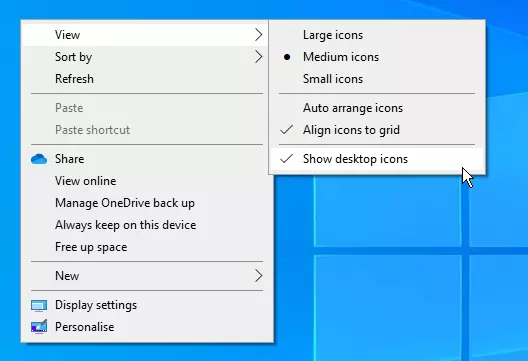
What if you selected the checkbox and you still don’t see the Recycle Bin? This means that the desktop icons are disabled. Once again, the problem is easy to fix: Right-click on the desktop and select ‘View’. In the context menu, select ‘Show desktop icons’. The Recycle Bin and any other icons will immediately appear on the desktop. You can also use this method if the Recycle Bin is missing in Windows 7.
To restore files from the Recycle Bin simply double-click the Recycle Bin icon and then search for the file you want to restore.
Showing the Recycle Bin in the File Explorer
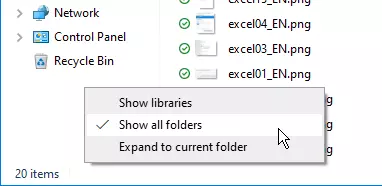
In the latest version of Windows, the Control Panel and the Recycle Bin are no longer shown by default in the navigation pane on the left side of the File Explorer. Here’s a little trick for adding the Recycle Bin to the File Explorer in Windows 10.
Right-click in the empty area below the icons in the navigation pane and select ‘Show all folders’. The Recycle Bin and the Control Panel will then appear in the navigation pane of the File Explorer.
Repairing the Recycle Bin if files are not being sent to the Recycle Bin
If Windows permanently deletes files immediately instead of sending them to the Recycle Bin as a precaution, the problem usually has to do with the properties of the Recycle Bin. You can resolve this issue as follows:
- Right-click the Recycle Bin icon (on the desktop or in the navigation pane of File Explorer) and select ‘Properties’.
- Disable the ‘Delete files immediately’ option and define a new custom size for the Recycle Bin instead.
Repairing the Recycle Bin – message: Recycle Bin on (drive) is corrupted
To the user, the Recycle Bin icon looks like a single recycle bin, but Windows actually uses a separate hidden folder on each drive. The deleted files are temporarily stored in these folders until the Recycle Bin is emptied.
If you get the message ‘Recycle bin on (drive) is corrupted’ when you attempt to restore a file from the Recycle Bin, it’s best to just delete the affected folder. That way you don’t need to empty the trash for all drives. To do this, proceed as follows:
- Right-click the Windows logo in the taskbar to open the command-line tool as an administrator: click PowerShell (Admin).
- Depending on your Windows settings, you will be prompted by User Account Control to confirm.
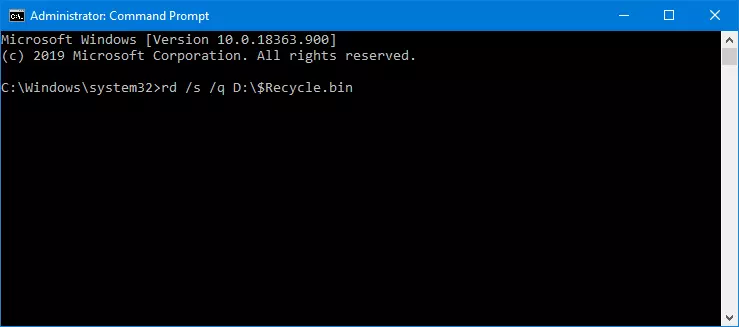
- Enter the following command in the command line: rd /s /q X:\$Recycle.bin. Replace the ‘X’ with the letter of the drive containing the corrupted Recycle Bin. Only the Recycle Bin data on this drive will be deleted.
- Restart Windows. A new recycle bin will be created. If the desktop icon goes missing, restore it as described above.
- If you still get the error message about a corrupted recycle bin, open the command-line tool with administrator privileges again. This time, enter the following command: sfc /scannow
- This command will scan Windows system files, which can take several minutes. Afterward, restart your PC.
In theory, you can also delete the Recycle Bin folder via File Explorer. This can prompt Windows to immediately recreate the recycle bin without restarting, but it will not fix the problem. Therefore, we recommend using the command-line tool as described above.
One way or another, you can always restore the Recycle Bin in Windows. The same applies to other elements of the operating system: Windows has many hidden files and folders, all of which can be unhidden.


