How to recover deleted files from the Recycle Bin
When you remove a file in Windows, it’s not permanently deleted. Instead, it’s first moved to the Recycle Bin. You can always recover the file until the bin has been emptied, just as you would retrieve a discarded paper document from the recycling bin in your office. The Recycle Bin appears as an icon on the desktop so that you can easily access it at any time.
- Free website protection with SSL Wildcard included
- Free private registration for greater privacy
- Free 2 GB email account
Recovering deleted files from the Recycle Bin
If the Recycle Bin icon on the desktop is missing, there are some easy tricks to get it back.
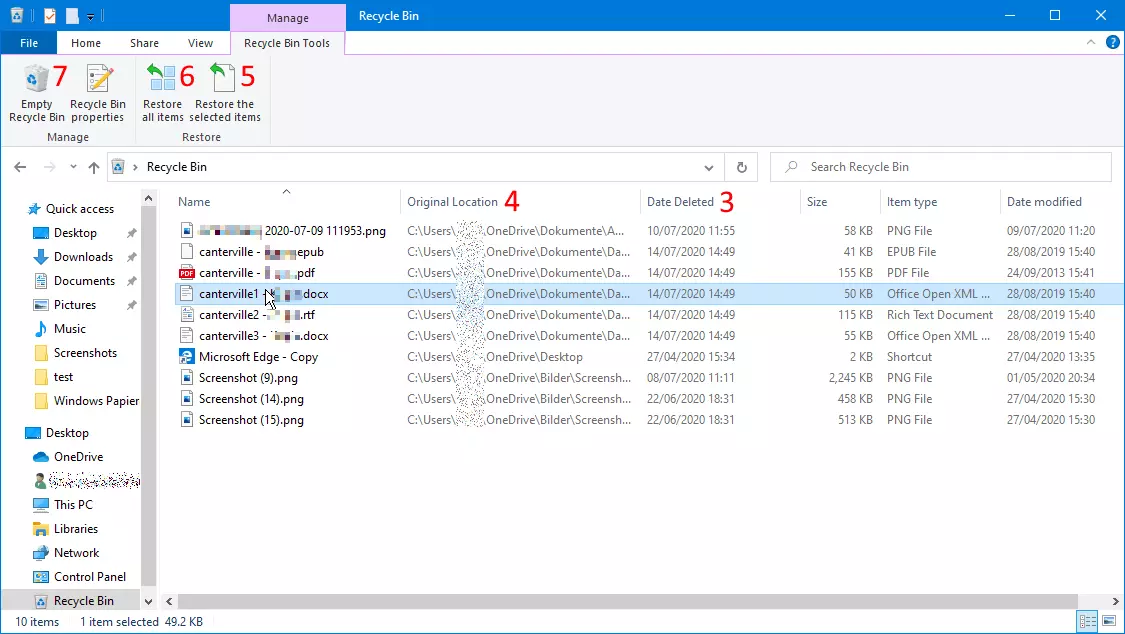
- Search for the file you want to recover. To do this, you can sort the Recycle Bin by file name or deletion date. The most recently deleted files appear first.
- The ‘Original Location’ column shows the folder from which the files were deleted. Windows uses a common Recycle Bin for all drives. Internally, there are different folders that are displayed together in File Explorer.
- In the Recycle Bin, click the deleted file that you want to restore. Under ‘Recycle Bin Tools’ on the ribbon, click on ‘Restore the selected items’. Use the Shift and Ctrl keys to select multiple files and restore them at the same time.
- You can restore all deleted files from the Recycle Bin by clicking on the ‘Restore all items’ icon.
- If you want to completely empty the Recycle Bin, click on ‘Empty Recycle Bin’. The files will be permanently deleted and cannot be restored using basic Windows tools.
Finding recovered files
When you restore files deleted from the Recycle Bin, they will appear in their original location in the folder from which they were deleted. The ‘Original Location’ column in the Recycle Bin shows this location.
Microsoft 365 is a server-based office solution that is ideal for personal users and small businesses. It includes all Microsoft Office applications such as Word and Excel, and you no longer need to worry about updates. You always automatically have access to the latest version.
Deleting Windows files immediately
If you're using the latest version of Windows, the question of how to prevent files from being deleted immediately is no longer a concern. By default, Windows now moves deleted files to the Recycle Bin and does not permanently delete them right away. However, you still have the option of deleting files immediately. We’ll show you how to do this below. If data on your PC is immediately deleted without being moved to Recycle Bin first, the default setting may have been unintentionally changed. In that case, these tips will also help you undo this setting.
Windows can delete files instantly without putting them in the Recycle Bin. You can do this for a single file or make it the default setting for all files.
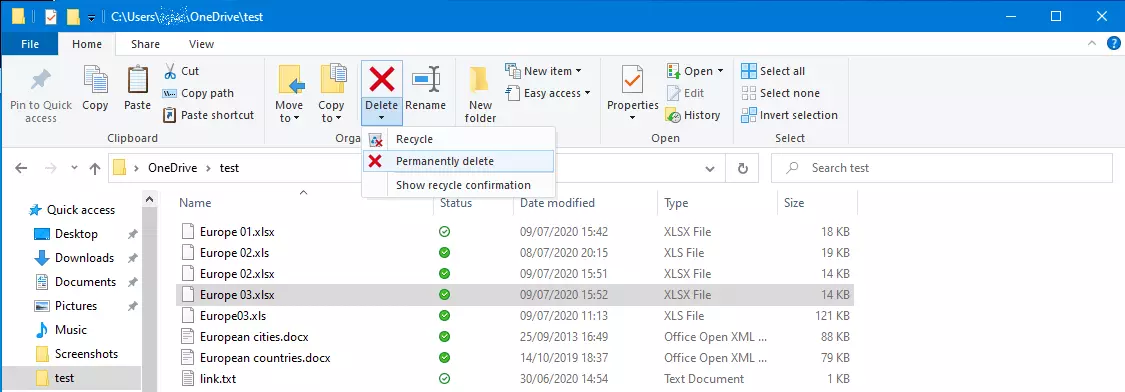
- If you want to delete a file immediately in Windows without using the Recycle Bin, select the file in File Explorer and click on the small arrow under the ‘Delete’ icon in the ‘Home’ tab of the ribbon.
- In the drop-down menu that appears, you’ll see the ‘Permanently delete’ option. If you choose this option, the file will be deleted immediately instead of being moved to the Recycle Bin.
- An even faster method is to select a file and click the ‘Delete’ button while holding down the Shift key. Choose ‘YES’ to confirm and the file will be permanently deleted.
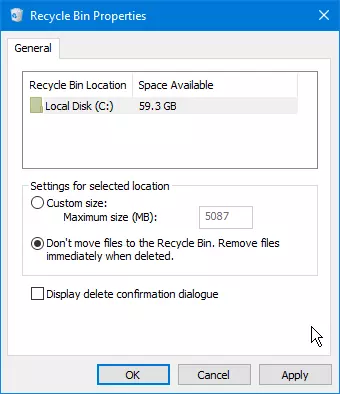
- If you always want to permanently delete files without moving them to Recycle Bin, open the Recycle Bin by double-clicking the desktop icon and clicking ‘Recycle bin properties’ on the ‘Recycle bin tools’ tab on the ribbon. Select ‘Don’t move files to the Recycle Bin. Remove files immediately when deleted’. You can define this setting differently for each drive. Save your changes by choosing ‘OK’. Now all files on the selected drive will be immediately and permanently removed when you delete them.
Changing the storage capacity of the Recycle Bin
In the Recycle Bin properties, you can configure a custom size for each volume. The Recycle Bin may not exceed this storage capacity. This allows you to prevent a volume from filling up too quickly even though data on it has long been deleted.
Automatically deleting content in the Recycle Bin
Very few users empty the Recycle Bin on a regular basis to free up disk space. Windows 10 offers the option of automatically deleting files that have been in the Recycle Bin for a long time. This frees up space on the hard drive.
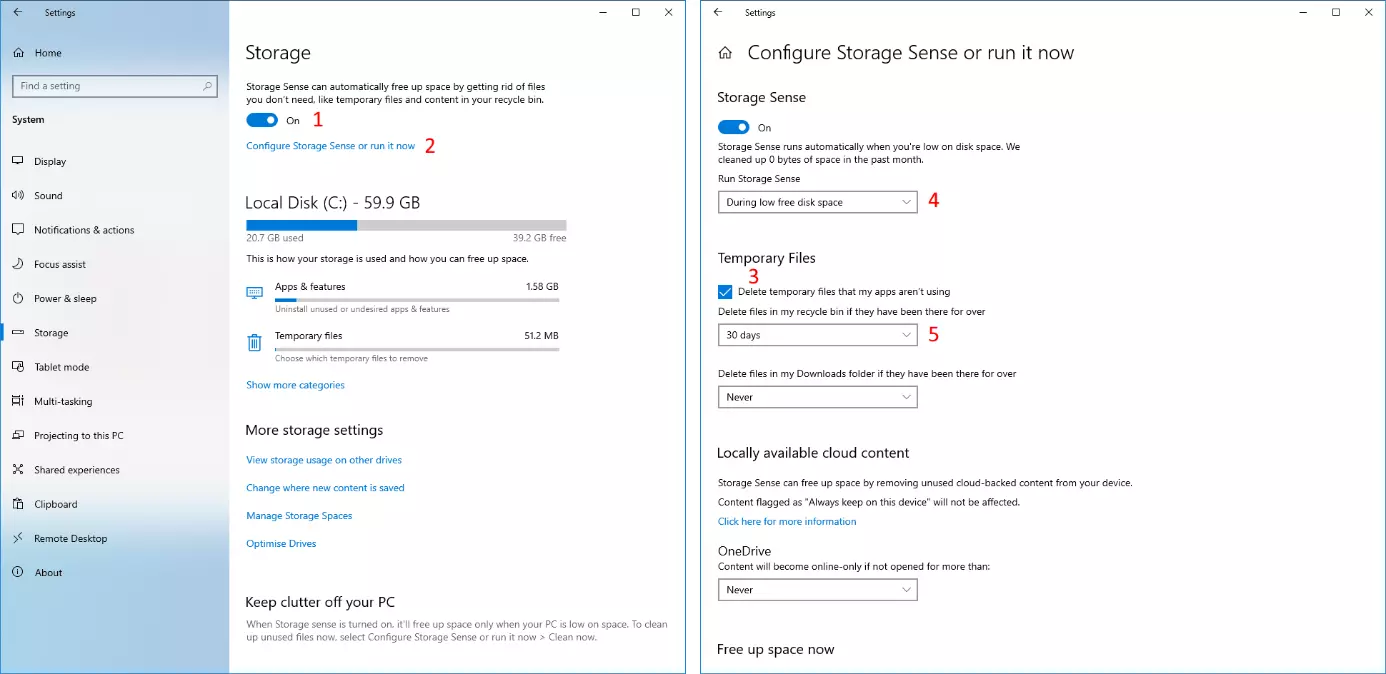
- In the Windows 10 Settings app select ‘System’ -> ‘Storage’ and enable Storage Sense. The quickest way to open the Windows Settings app is to use the keyboard shortcut Windows logo key + I.
- Click on ‘Configure Storage Sense or run it now’.
- On the next screen, select the checkbox under ‘Temporary Files’.
- The drop-down menu at the top of the screen under ‘Storage Sense’ offers various options for running the feature automatically, either at regular intervals or when disk space is running low.
- In the drop-down menu below it, select how old a file must be before it is automatically deleted from the Recycle Bin.
Restoring a file from a deleted folder
If you delete a folder in Windows, it is sent to the Recycle Bin. From there, you can easily restore the entire folder just as you would recover a single file. However, the Windows user interface does not have an option for restoring a single file from a deleted folder in the Recycle Bin. The easiest method is to completely restore the folder in the recycle bin, move the desired file to another directory, and then delete the folder with the remaining files.
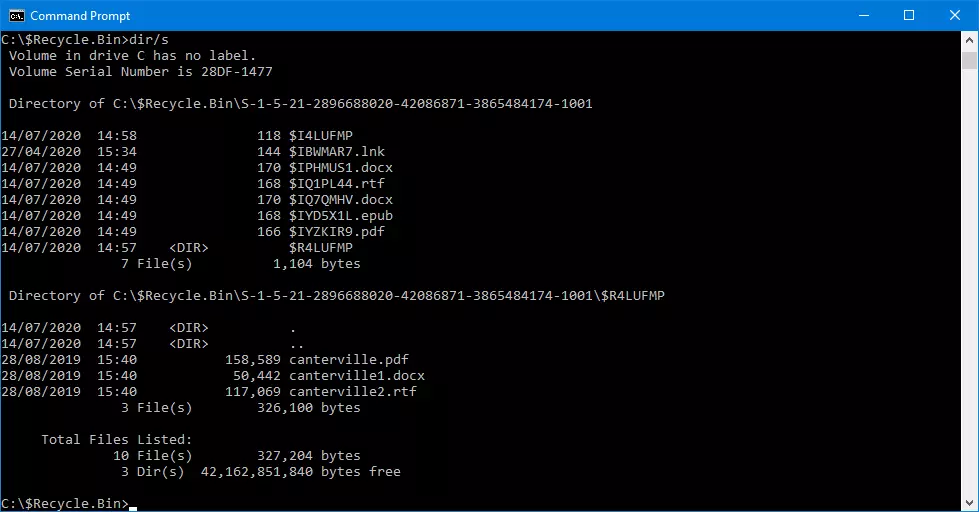
You can also use Command Prompt commands to retrieve a single file from a folder that has already been deleted. Before doing this, familiarise yourself with the directory structure of the Windows Recycle Bin and hidden folders.
- First, open a Command Prompt window
- Go to the $recycle.bin folder: cd \$recycle.bin
- View the contents of this folder including its sub-folders: dir /s
- Search for the folder you want to restore. The folders in the Recycle Bin are assigned system-generated names with cryptic combinations of letters. However, the files in the sub-folders keep their original file names.
- Copy the desired file from this folder into your User profile folder, for example: copy S-1-5-21-2502917888-2135119284-2602881847-1003\$REK0VTP\dokument.doc %USERPROFILE%.
- The file will then appear in your user-profile folder C:\USERS\. You can find this folder in File Explorer under your user name. You can open the file there or move it to another folder using standard File Explorer functions.


