How to create a Core Keeper server
Having your own Core Keeper server means you can enjoy the colourful world of Pugstorm’s mining sandbox game with all its freedoms. With the right server hardware behind you, you can easily install the required dedicated server application via SteamCMD or the Steam client.
Core Keeper server: should you use your own PC or rent hardware?
If you want to explore the underground cave world of Core Keeper together with friends, having a dedicated server is the best option. In principle, you can create and run such a server directly on your own PC. However, if you go this route, the game world will only be available when your device is switched on. Additionally, home internet connections are not always stable or powerful enough to guarantee good server performance.
To ensure a satisfying gaming experience, we recommend using a server from a professional hosting provider. With server hosting, you rent hardware resources that you can install the Core Keeper server on and run at any time. This way, you can guarantee high server availability and smooth gameplay.
If you rent hardware for your gaming server, you can also use the hardware resources for other projects as well. For example, you can host your own in-game communication solution by creating a TeamSpeak server or a Mumble server on the rented hardware.
What are the requirements for a Core Keeper server?
In terms of hardware, there is no concrete information about the requirements for a Core Keeper server. Similar to other game servers, you need to consider different factors to determine the requirements for CPU; RAM and storage. Important factors include the number of simultaneously active players and how far you are in the game world (explored zones, etc.).
In order to host a Core Keeper server, we recommend using hardware resources that meet the following minimum requirements:
- CPU (Processor): AMD or Intel (min. 2 cores) at 2.4 GHz or higher
- RAM (Memory): 2 GB RAM for 1-4 players, 4 GB or more for larger game files or more than 4 players
- Storage: min. 10–20 GB
You’ll also need to plan for further performance depending on the operating system you have chosen. Typically, systems like Windows Server or Linux distributions like Ubuntu and Debian are used. If you are using Windows Server 2022, you’ll need the following additional resources:
- 1.4-GHz Processor (64-bit)
- 512 MB or 2 GB RAM (without or with graphical user interface, respectively)
- 32 or 36 GB disk space (without or with graphical user interface, respectively)
Concerned that the hardware you’re considering might not be suitable for a Core Keeper server in the long run? Or maybe you’re looking for a server that lets you install and run other applications while you host games? With an IONOS Dedicated Server ,you’ll get access to dedicated enterprise hardware with state-of-the-art processors and generous storage capacities.
What hosting options does IONOS offer for a Core Keeper server?
With IONOS you can choose from the following three server options:
- vServer (VPS): when you choose a vServer (VPS) from IONOS, you get access to the virtualised resources of a host system. Each package comes with a fixed monthly price.
- Cloud Server: IONOS’ cloud servers also work with virtualised resources. However, these can be adjusted at any time. Billing is on a minute-by-minute basis, and you only pay for the resources you use.
- Dedicated Server: IONOS’ dedicated server model relies entirely on dedicated, non-virtualised hardware. This enterprise solution is also billed by the minute.
Regardless of which server model you decide on, each one comes with a first-class broadband connection. With speeds of up to 400 Mb/s, you can count on the best possible conditions for your Core Keeper server.
Enjoy the best in both performance and price with a cloud server from IONOS. Book additional CPU, RAM or storage space at any time. You also have the option to shut down the server resources completely. You’ll only pay for what you use.
3 different scenarios for a Core Keeper server with IONOS
Below are three possible scenarios for your own gaming server along with the suitable server packages from IONOS.
| Core Keeper: server scenario | Recommended IONOS server package |
|---|---|
| Up to 4 players, server always online | VPS L |
| 5-8 players, server permanently online | VPS XL |
| 8 players or more, server permanently online | Dedicated Server AR6-32 SSD |
How to create a Core Keeper server: a step-by-step guide
After you choose the hardware for your Core Keeper server, all it takes is a few more steps to install and set it up. First connect to the server, then download and install the dedicated server software via SteamCMD. After you sort out the settings and enable the ports, you can start the server.
Below we’ll show youhow to set up your own Core Keeper server. In our example, we show how to set up the Core Keeper server using IONOS server hosting options (vServer, Cloud Server or Dedicated Server). The server operating system used in the instructions is Windows Server 2022.
Step 1: establish a remote connection to the server
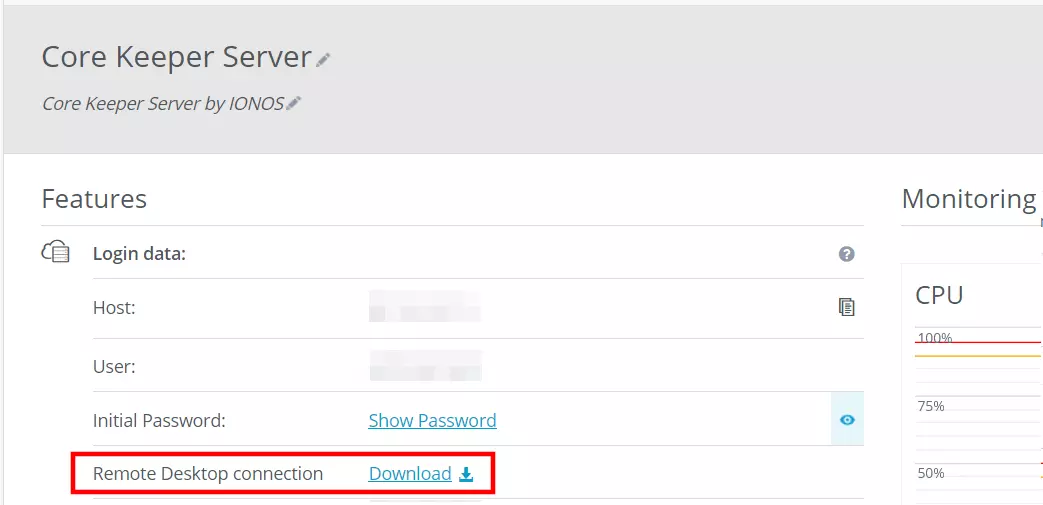
First, connect to your rented server. IONOS customers can set up the necessary remote desktop connection (for connections to Windows Server) via the Customer Centre. You can find the IP address there as well as the access data for the server. Here’s how to configure the server:
- Go to the login page for IONOS Customer Centre and log in with your customer credentials.
- Select the product Server & Cloud.
- Click the server that you want to install the Core Keeper server on.
- Click on the download link in the Remote desktop connection line (found under Access data).
- Execute the downloaded .rdp file.
- Press Connect. Enter your access data (user and initial password) and confirm the server’s certificate.
An IP address is not the only way to give people access to your server. At IONOS, you can register a domain name today and make your hosted application available via a web address that’s easy to read and remember.
Step 2: install SteamCMD
You can get the software for your own Core Keeper server from public Steam servers. The easiest way to connect to these servers and download the application is with SteamCMD. The popular gaming platform’s command-line client can be installed as follows:
- Download the SteamCMD installation file.
- Unzip the ZIP file to any directory.
- Run the steamcmd.exe file.
Detailed instructions on how to install the command-line client on Windows and Linux are provided in our article ‘SteamCMD: How to install the command-line client’.
Step 3: install Core Keeper dedicated server via SteamCMD
After successful installation via the command prompt, you’ll see the Steam input line Steam>. You can now log in to the public Steam servers with an anonymous login. To do this, execute the following command:
login anonymousBefore you start downloading the server files, create a custom directory for the Core Keeper server. Use the following command to install the files in the C:\core-keeper-server path later:
force_install_dir C:\core-keeper-serverFinally, to download and install it, all you need is the ‘app_update’ command and the app ID of the Core Keeper Dedicated Server application (1963720):
app_update 1963720 validate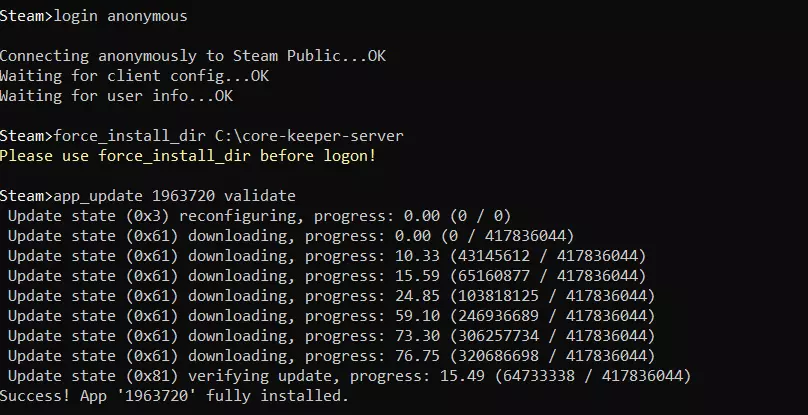
Run the ‘quit’ command to log out of the public Steam servers and close the command-line client.
You can also download and install Core Keeper’s dedicated server application from the library (‘Select Tools’) of the default Steam client. In this case, however, you’ll need to have already purchased a valid license of the game and be logged in.
Step 4: configure Core Keeper server
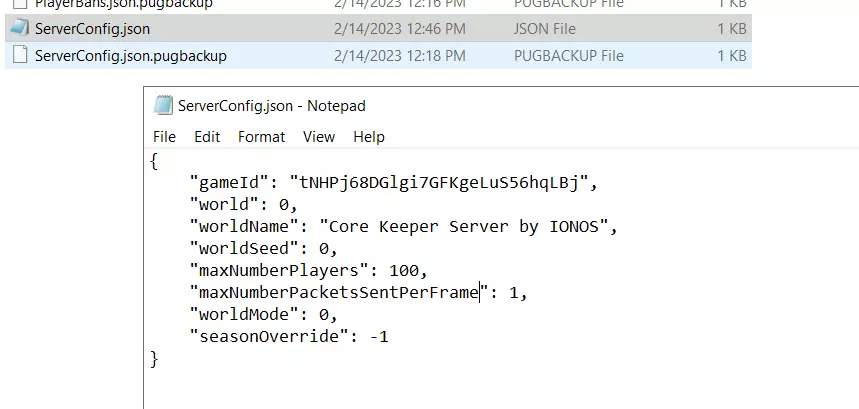
Now go to the created directory and double-click the batch-file Launch.bat. This starts the Core Keeper server for the first time, automatically generating the configuration file* ServerConfig.json*. You won’t be able to find this file in the server directory though. You’ll need to look for it under the following path:
.\AppData\LocalLow\Pugstorm\Core Keeper\DedicatedServerOpen the JSON document with any text editor to set your custom configuration. Here you can set the following settings:
- gameID: automatically generated ID, which is needed to join the server
- world: number of the game world (savegame) to be loaded
- worldname: name of your Core Keeper server
- worldseed: seed used for the game world; ‘0’ for a randomly generated game world.
- maxplayers: maximum number of simultaneous players on the server
Step 5: open server ports
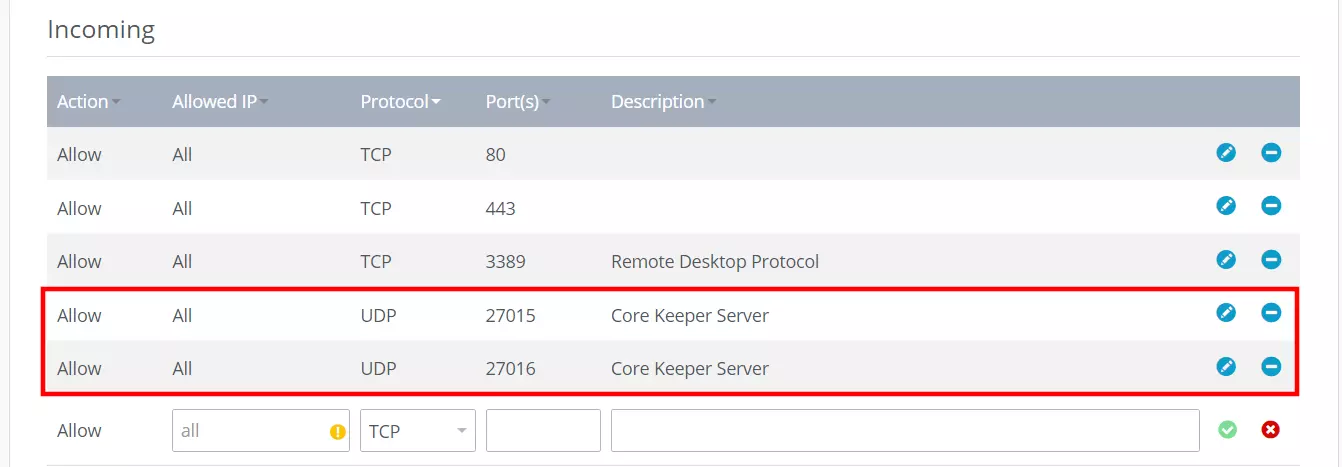
For communication with the Core Keeper server, the two UDP ports 27015 and 27016 need to be open. Once they are open, you and your fellow players will be able to connect to the server.
You can also make adjustments to ports in the firewall settings in the Customer Centre:
- Log in to the IONOS Customer Centre.
- Open the Server & Cloud section and select the appropriate server product.
- Click on the menu item Network and then Firewall policies.
- Create a new rule for UDP port 27015 and UDP port 27016 under Inbound.
- The opening of the ports takes some time. You can monitor the progress in the status display.
Step 6: start the server
Execute the Launch.bat file to restart your Core Keeper server with the new settings and opened ports. At this point, you will also see the Game ID. Copy it and forward it to your fellow gamers.
If you want to shut down the server, press the ‘q’ key in the open command prompt window. If you just close the window, the Core Keeper server will continue to run.
Step 7: connect to the Core Keeper server
Now that your server is running with the required configuration and is accessible online, you and your fellow gamers can connect to it. Here’s how:
- Start Core Keeper as you usually would via the Steam client.
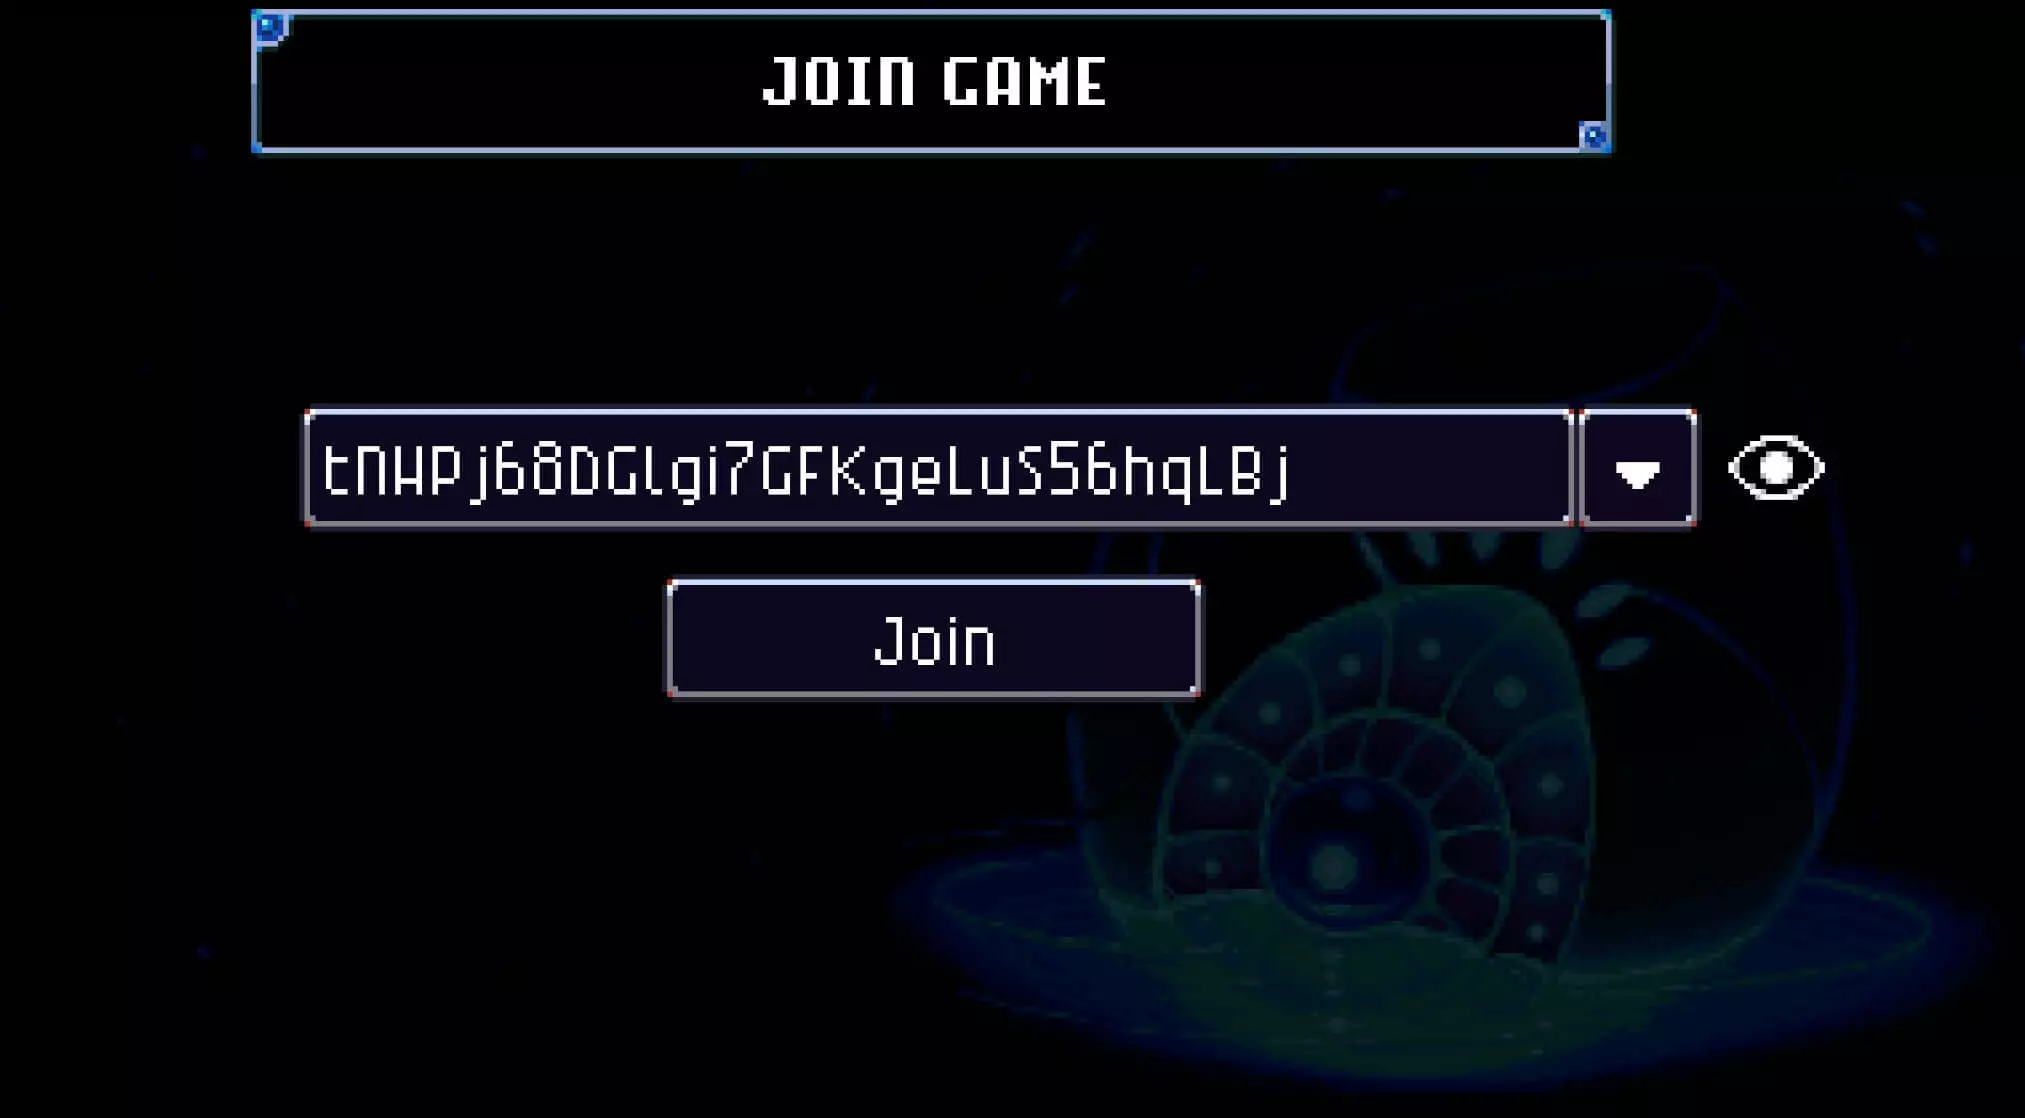
- Click on the Join Game button.
- Enter the Game ID you wrote down or copied.
- Click Join and create a character.
Once you create your character, you can connect to the Core Keeper server and start adventuring together.
