Send bulk messages with Word’s mail merge feature
You often have to send the same letter to different people, whether you’re sending out wedding invitations or business letters to clients. In these cases, modifying the address and greeting line over and over again can be extremely time-consuming. However, if you set up a mail merge, Word inserts most of this information automatically so you can focus on the actual content of the document.
- Write perfect emails with optional AI features
- Includes domain, spam filter and email forwarding
- Best of all, it's ad-free
What is mail merge?
You use mail merge to send a message to many different recipients. To do this, you want the body of the message to be nearly identical for each recipient. However, because you’re sending the message to different people, certain fields have to be personalised. Usually that means the address line and possibly the greeting line. You may also want customer numbers or other personalised information to be automatically inserted into the body of the message.
Most word processing programs, such as Word, have automated features for this. To use this feature, your program must have access to a database maintained by you. The software finds the recipients’ names and addresses in this database and inserts them in the correct places in the document.
Mail merge has a wide variety of applications. Companies use the feature to send brochures, invoices or offers in bulk. At home, most people use mail merge for sending invitations to big celebrations.
Mail merge in Word: a step-by-step guide
Setting up a mail merge involves several steps. First you create a data source, then you compose the form letter and finally you print the document.
You can use mail merge in Word to create more than just form letters. You can also use it for bulk emails, envelopes, or labels. Select your format by choosing Start Mail Merge in Select in the Mailings tab.
Maintain the data source
Word can retrieve the information required for the form letter from various sources: You can import Excel spreadsheets, use your Outlook address book or type the information directly into Word.
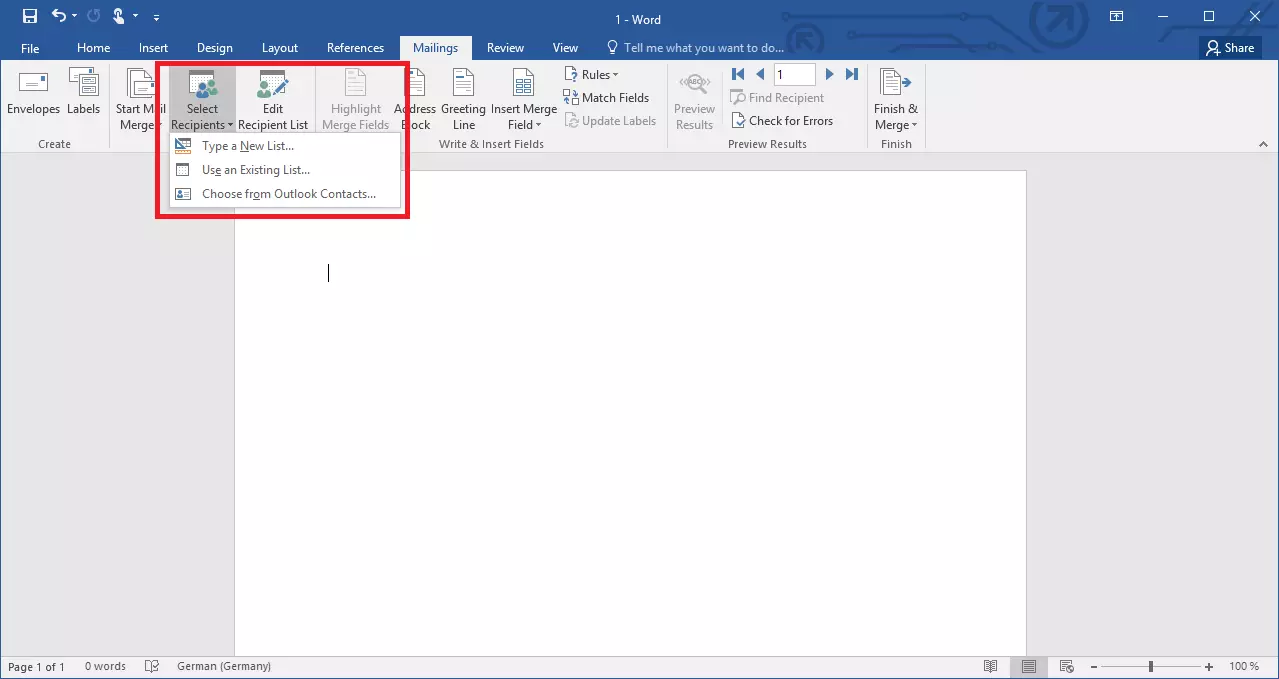
If you want to use an Excel file, make sure you format the data correctly as a spreadsheet and add column headings. Word pulls the information directly from the file. To import an Excel document, go to the Mailings, tab, choose the Select recipients option and click Use an Existing list….
You can also import a Microsoft Access database into Word.
If you’d like to use your Outlook address book, select Choose from Outlook Contacts… from the same drop-down menu. If you use different folders to organise your contacts in Outlook, you can now systematically retrieve the address information you want to use.
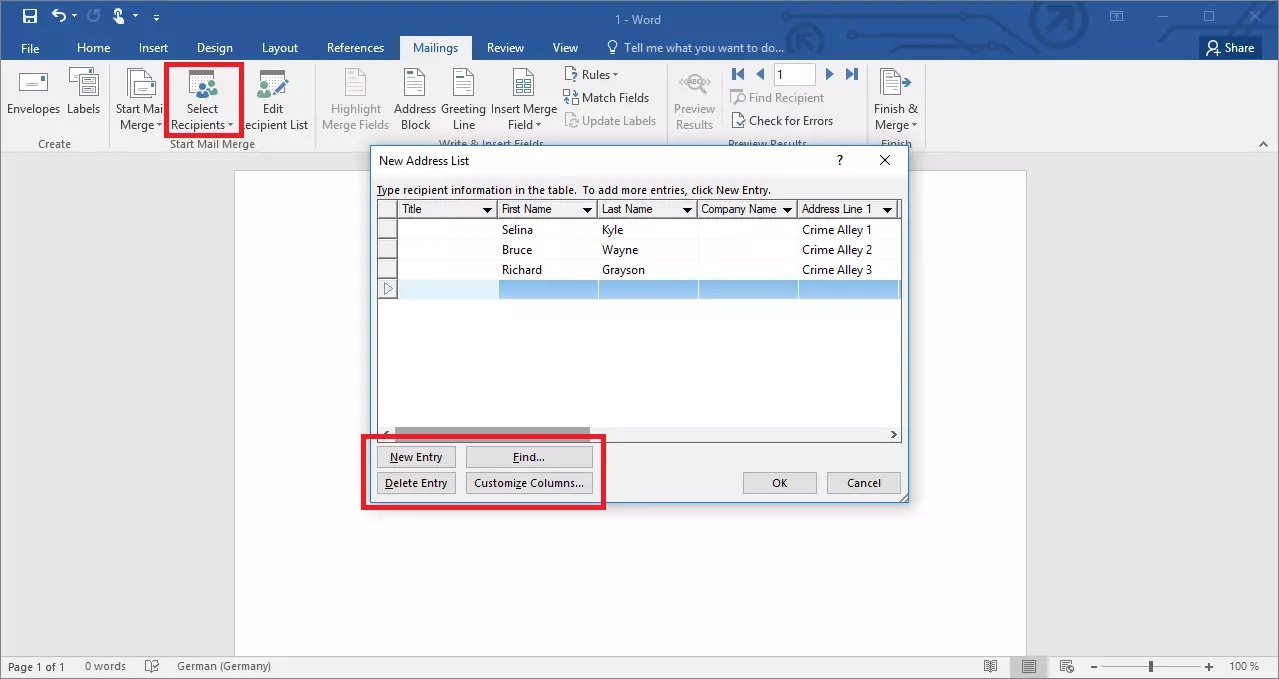
If you don’t want to maintain an Excel spreadsheet or manage an address book in Outlook, you can also type the information directly into Word. To do this, choose the Type a New List… function. Word provides a variety of important columns for entering address information. Click in the fields and enter your data. Once you’ve completed an entry, you can add the next line using the New Entry option.
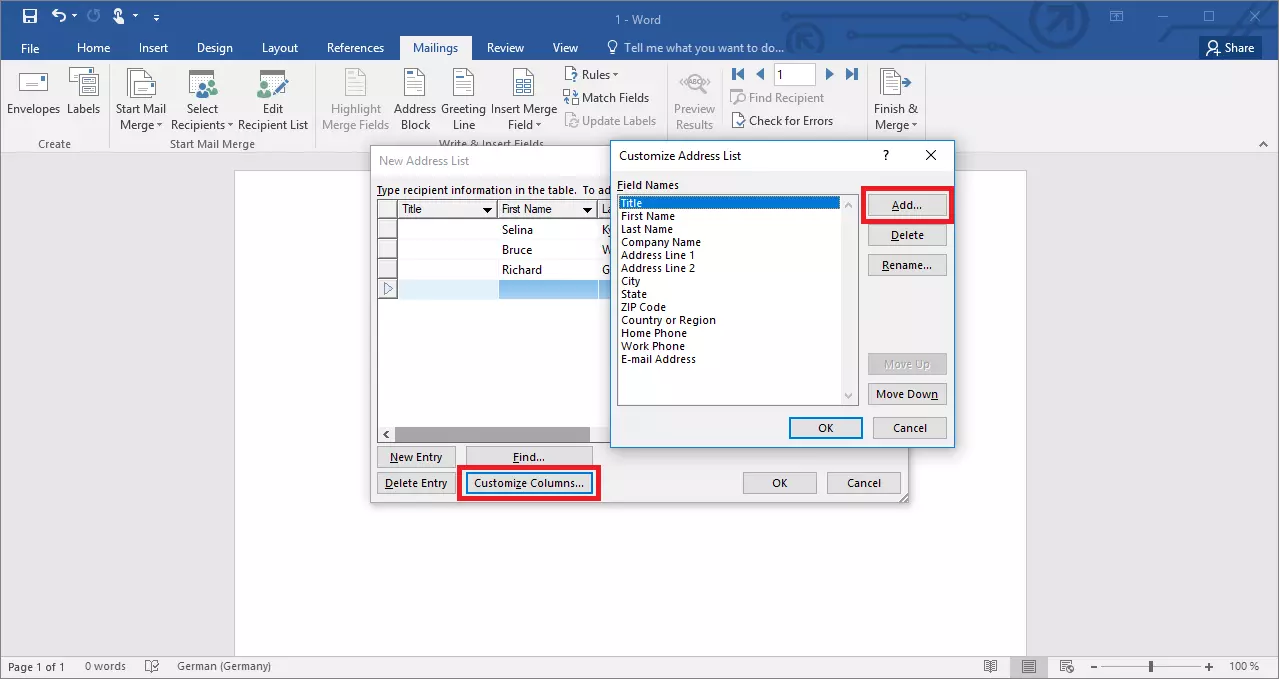
Most likely, you won’t need all the columns Word provides, or you might want to add your own categories. Click Customise Columns... to have Word add, delete or rename columns. Once you’ve entered all the information and confirmed your inputs, Word will prompt you to save the new database. This allows you to reuse the data in other Word documents, so you won’t have to repeat these steps for each mail merge.
Don’t worry: You can still customise the information after you’ve finished creating your new database. To do this, choose the Edit Recipient List button.
When you import data sources from a file, the file should be on your PC. However, you can also integrate databases from servers into the Word document. To do this, use the Data Connection Wizard.
How to do a mail merge
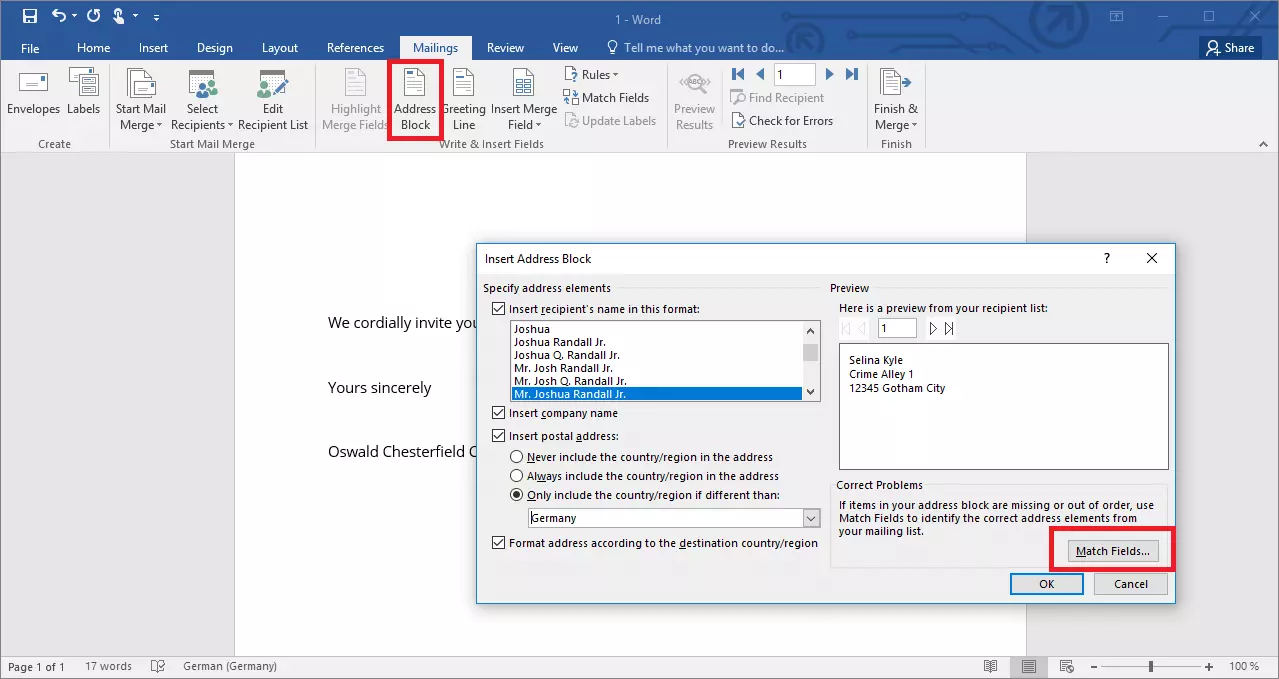
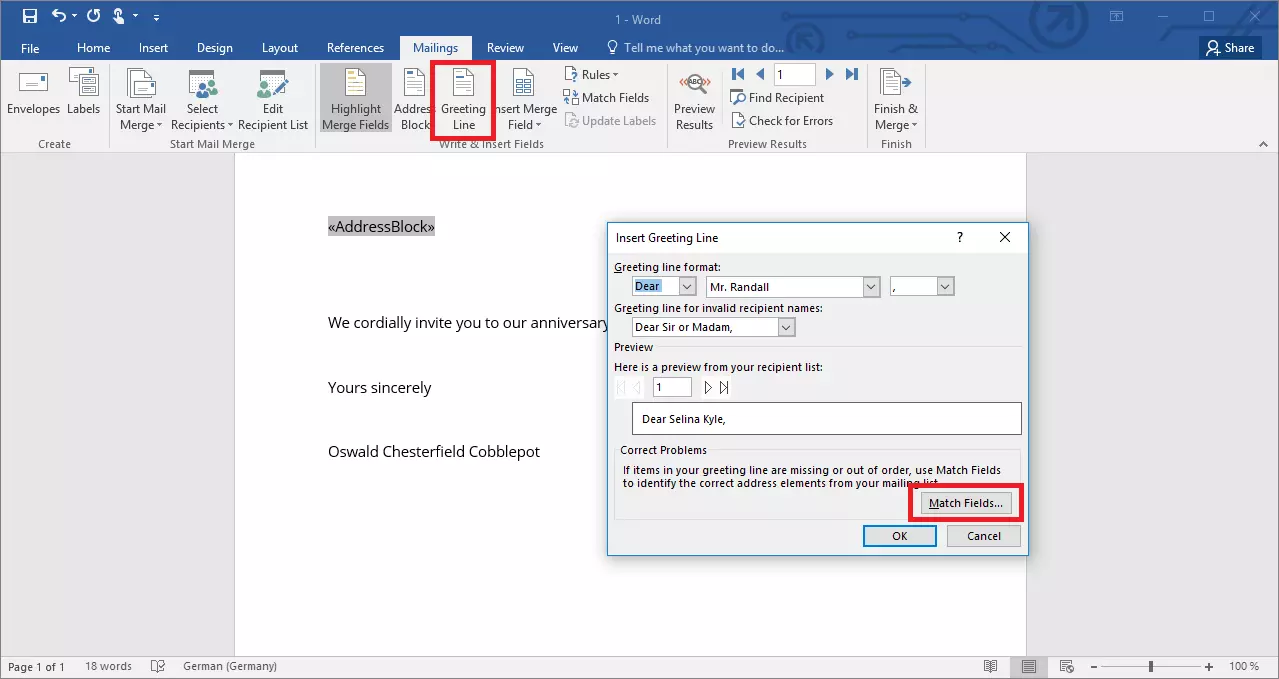
Now that you’ve entered the address information, you can write your message. You can type in text as you would in any Word document, or you can use collections of merge fields. The address block is important for every mail merge. Click Address Block to open a window for configuring the placeholder. This is where you format your address block. If you’re using an external spreadsheet, Word attempts to assign the correct fields from the column labels. However, if the program can’t identify the labels you selected, you can choose Match Fields... so that the categories are assigned correctly.
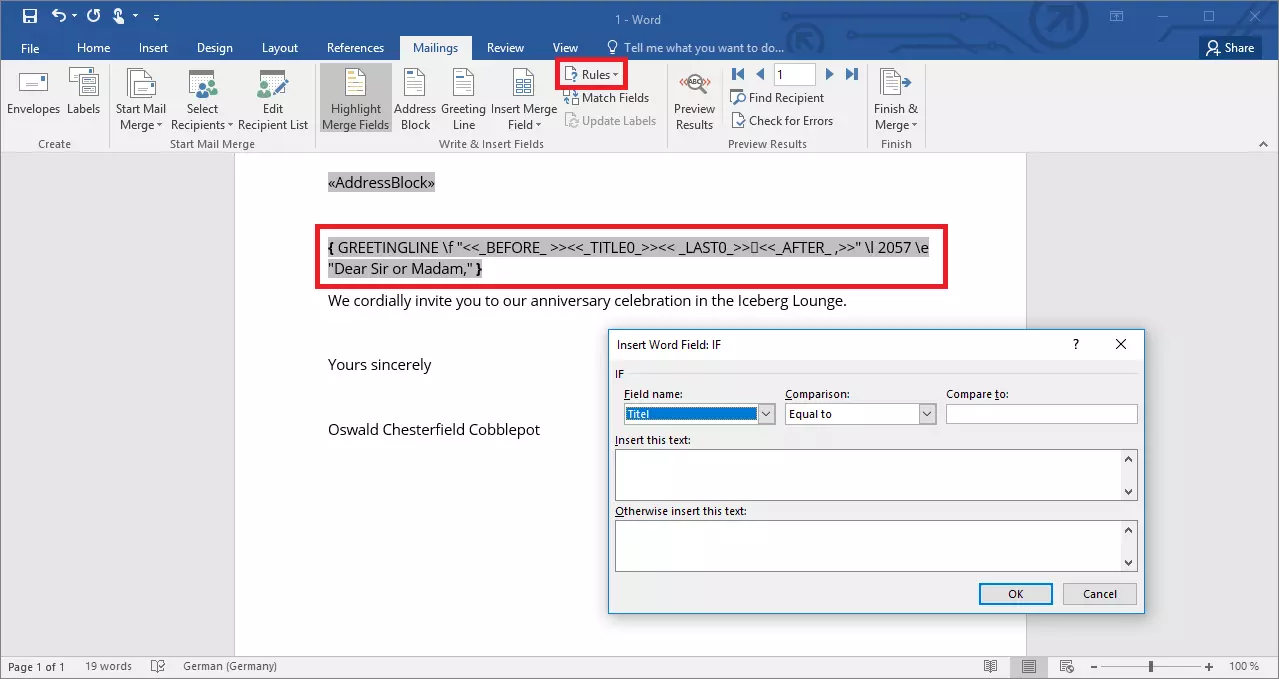
You can use a greeting line to insert a personalised salutation into your mail merge. So instead of addressing an unspecified recipient with “Dear Sir or Madam,” you can have Word pull the specific name from your data source. You can customise the format of the greeting line, for example by choosing to display the first name, last name, or both.
You can also have Word insert the greeting line prefix or format it yourself. Word offers the generic Dear Mr. or Dear Ms. followed by the recipient’s name. If you select (none), you can also type in the prefix as usual and then insert the mail merge field with the name.
Besides the address and greeting line, you can insert other merge fields directly into your document. For example, you can insert the recipient’s name or customer number into the body of a letter. You can use the Highlight Merge Fields feature to make mail merge fields stand out from the rest of the document. These areas will then be highlighted in colour.
Printing a mail merge document
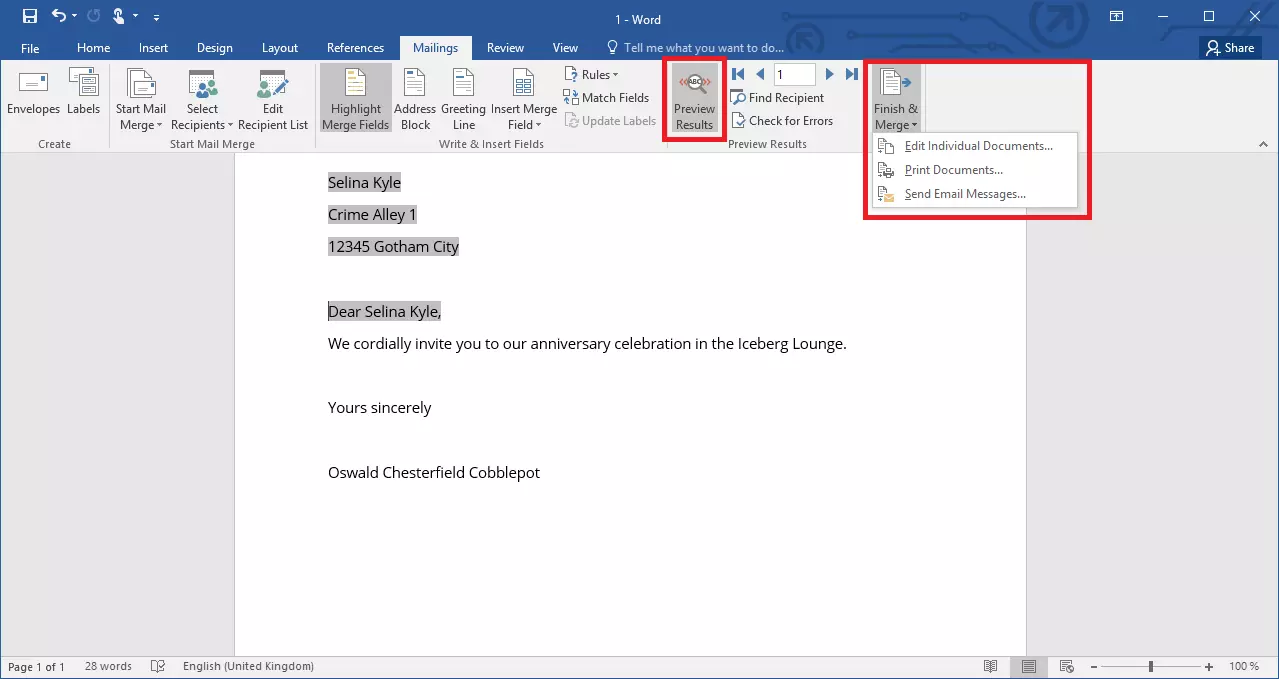
You can preview your mail merge documents in Word before printing them. When you do this, Word fills the placeholders with the actual data. This way you can look over each filled-in document and check it for errors. Then choose Finish & Merge to print the documents. Word offers various options for this:
- Edit Individual Documents…: Word creates a new document that displays each version of the letter in succession. You can still make certain changes at this stage.
- Print Documents…: Word prints each document in succession.
- Send Email Messages…: Word sends the document as an e-mail. Choose the field name from the data source containing your e-mail addresses and enter a subject.
- Up to 50 GB Exchange email account
- Outlook Web App and collaboration tools
- Expert support & setup service
The Mail Merge Wizard
You can create highly personalised bulk documents using the above method. But if you want to make things even easier, use the Mail Merge Wizard in Word. It will guide you through the mail merge process. To open this handy feature, go to the Mailings tab and choose the Start Mail Merge button and then Step-by-Step Mail Merge Wizard….
A task pane opens on the right side of the window that basically takes you through same steps we covered in this article. You define your data source, write the document and finish the merge process. An explanatory text is displayed in the task pane for each step. You can also use the wizard to ensure that you don’t forget any steps.
You can quickly set up a mail merge in Word if you continuously maintain your data source. Inserting the mail merge fields is easy, whether you use the wizard or not.


