How to install HAProxy on Ubuntu 22.04
HAProxy (High Availability Proxy) is a popular software that can be used as a reverse proxy and load balancer. It can be easily installed on Ubuntu 22.04 in just a few steps.
What is HAProxy?
HAProxy is a powerful open-source software that can be used as a load balancer or reverse proxy. It’s often used to distribute incident data traffic to several servers and thus improve the availability and performance of web applications. HAProxy is a proven solution, especially in highly scalable and fail-safe architectures.
Thanks to its high efficiency, HAProxy can process thousands of requests per second without placing a heavy load on system resources. The software supports various load balancing methods such as round robin, least connection and source IP hashing. It also offers functions such as SSL termination, health checks and sticky sessions in order to optimally control data traffic. Another strength is the ability to forward traffic based on specific rules or header information.
HAProxy is used in many large companies and cloud environments. Configuration is carried out via a simple but flexible configuration file that allows detailed customisation to your needs.
- Enterprise hardware
- Configurable hardware equipment
- ISO-certified data centres
How to install HAProxy on Ubuntu 22.04 step by step
Step 1: Update the system
Before you start the installation, you should make sure that your Linux distribution is up to date. This will ensure that all packages are current and that potential security vulnerabilities have been eliminated. To do this, open a terminal and execute the following commands:
sudo apt update && sudo apt upgrade -yThis command sequence first updates the package list to determine the latest versions of the installed software. All existing packages are then updated to the latest available versions. The -y parameter ensures that all updates are automatically confirmed.
Step 2: Install HAProxy
After the system has been updated, you can install HAProxy with the following command:
sudo apt install haproxy -yThis command downloads HAProxy from the official Ubuntu package sources and installs the application. The installation is usually quick as HAProxy is a lightweight program. Once the installation is complete, you can verify that HAProxy has been successfully installed by running the following command:
haproxy -vThe output should show the installed version of HAProxy.

Step 3: Activate and start the HAProxy service
After installation, you must ensure that the HAProxy service is running. First, start HAProxy as an admin with the following command:
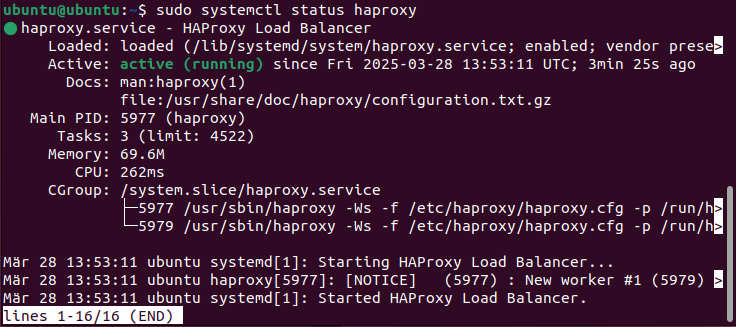
sudo systemctl start haproxyUse this command to check whether the service has been started successfully:
sudo systemctl status haproxyIf HAProxy is running, the output should look something like this:

To ensure that HAProxy also starts automatically after a restart, activate the service with:
sudo systemctl enable haproxyStep 4: Configure HAProxy
HAProxy is configured via the configuration file /etc/haproxy/haproxy.cfg. Before making any changes, it’s good practice to create a backup of the original file:
sudo cp /etc/haproxy/haproxy.cfg /etc/haproxy/haproxy.cfg.backupBy replicating the original file, you ensure that you can return to a working state at any time. In this way, changes can be made at low risk.
To edit the original file, open it with a text editor of your choice, such as nano or Vim. In our example, we’ll use nano:
sudo nano /etc/haproxy/haproxy.cfgA simple load balancing configuration could look like this:
frontend http_front
	bind *:80
	default_backend web_servers
backend web_servers
	balance roundrobin
	server web1 192.168.1.10:80 check
	server web2 192.168.1.11:80 check
In the example load balancer, the incoming HTTP traffic on port 80 is distributed to two backend servers (‘web1’ and ‘web2’). The load is distributed in a round-robin process so that requests are forwarded alternately to the servers.
Step 5: Restart and test HAProxy
After the configuration change, HAProxy must be restarted for the changes to take effect. This is done with the following terminal command:
sudo systemctl restart haproxyIf errors occur, you can check the HAProxy configuration file for syntax errors using the command below:
haproxy -c -f /etc/haproxy/haproxy.cfgA correct configuration is confirmed by the output Configuration file is valid. You can now test whether HAProxy works as desired by entering the public IP address or the domain name of your server in a browser.
Manage any workload with flexible GPU computing power, and only pay for the resources you use.

