How to create a custom Blogger domain
The blog provider https://blogger.com/ uses subdomains for blogs such as https://my-personal-blog.blogspot.com/. But if you’re a blogger, you can also get a custom domain and name it so that it matches the idea behind your blog and the content on it (like https://my-dream-blog.com/). All you need to do is link the domain to your blog.
Quick guide on how to link Blogger to a custom domain
- Pick an address and check its availability.
- Register the domain.
- Complete the order process.
- Log in to the customer account you were given by the domain provider.
- Define the destination and set up forwarding.
- Test the result.
- Set up an email address for your Blogger domain.
- Pick a name for your mailbox.
- Select the type of mailbox you want.
- Assign a password and set up email forwarding.
How to get a custom domain for your Blogger blog
With Blogger, you get a subdomain by default. But you can also create a custom Blogger domain for your blog. Personalised domain names can highlight the topic of your blog and lend it character, for example chrissys-travels.com or baltic-sea-photography.com. The country domain .co.uk is well known, but you could also consider the Blogger domain extension .blog. You can’t get any clearer about having a blog than that!
If you’re looking to make money blogging, you could also consider using a domain extension like .shop or .company. With more than 1,000 available domain extensions, it’s good to take a targeted approach. But it’s important to keep in mind how much a domain costs, because some domain extensions like .io can set you back between $60-100 per year.
Setting up your own domain is super easy with IONOS. In our step-by-step guide below, we start by choosing a package from IONOS and use the example of a blog created for people interested in hotels with good running trails and paths located nearby. The Blogger domain https://runninghotels.blog/ now needs to be linked to the blog, which has already been set up.
Step 1: Check domain availability
Go to https://www.ionos.co.uk and type in the domain you want in the field that reads ‘Find your domain now’.
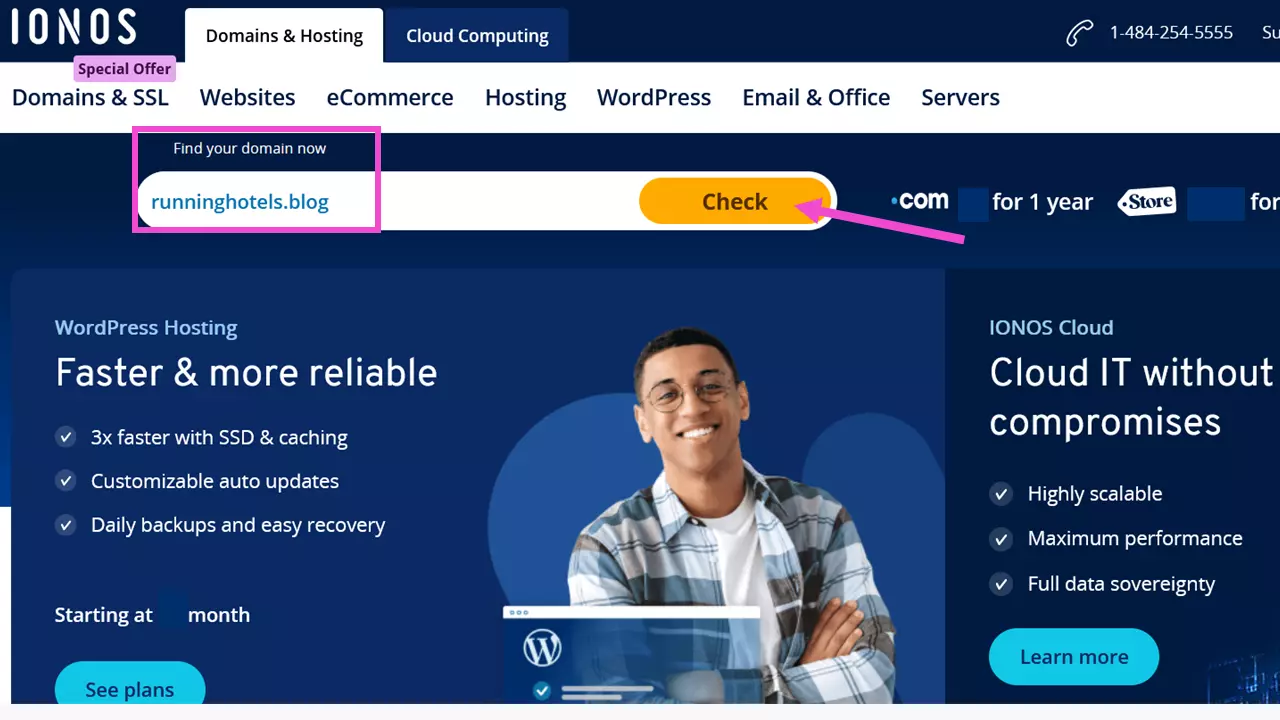
Now you can see whether the domain you want is still available. If it’s taken, you can try using these alternatives to a .uk domain. You can also try different word combinations of names, places or activities, or use hyphens.
Registering a domain with IONOS couldn’t be easier. The prices may surprise you too!
Step 2: Secure your domain
If the Blogger domain you want is available, you can start the process of purchasing it with IONOS.
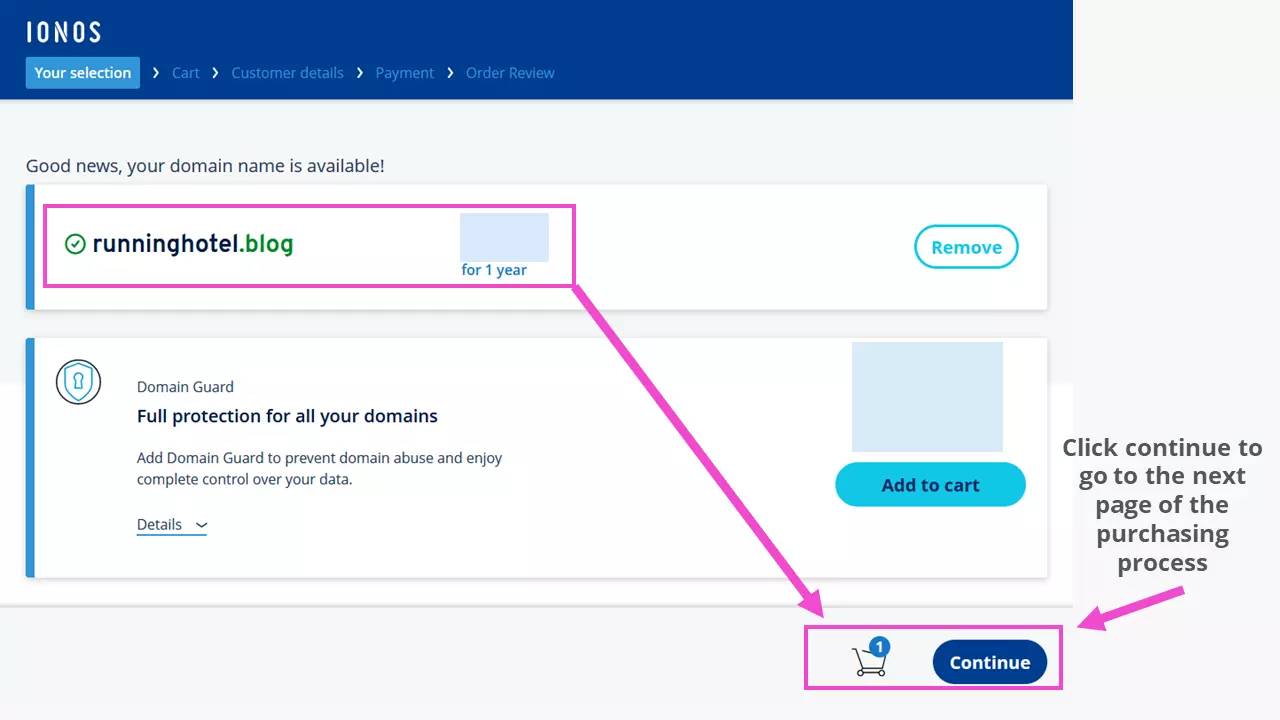
Choose Continue for an overview of additional offers to help boost your site. Since we only need the domain, we’ll click on Domain only.
Step 3: Complete and confirm order
To complete the order, we’ll create a new customer account with IONOS. If you have a PayPal account, you can use it to save you time and effort when setting up an IONOS account. After completing the payment process, you’ll soon be able to use the domain. You’ll receive emails from IONOS support, letting you know that your domain runninghotels.blog has been successfully registered along with confirmation of your purchase and contract documents. Additionally, you will also receive an email asking you to confirm your email address. Once this is confirmed, your domain will be ready for use. Just make sure to keep your IONOS account credentials safe.
It’s a good idea to assign an SSL certificate to your domain. This ensures that the lock symbol appears in the browser, which signals to visitors that you site is secure. After a few minutes, you can use a SSL Starter Wildcard at no additional cost.
You can find instructions on how to set up a user-managed SSL certificate in the IONOS Help Centre.
How to link your custom domain to your Blogger blog
Step 4: Log in to your IONOS account
Log in to your IONOS account with your account info (domain name, customer number or email address, and password) and select Manage domain.
Step 5: Assign a destination to your domain
To bring your domain https://runninghotels.blog/ to life, you need to assign a destination to it.
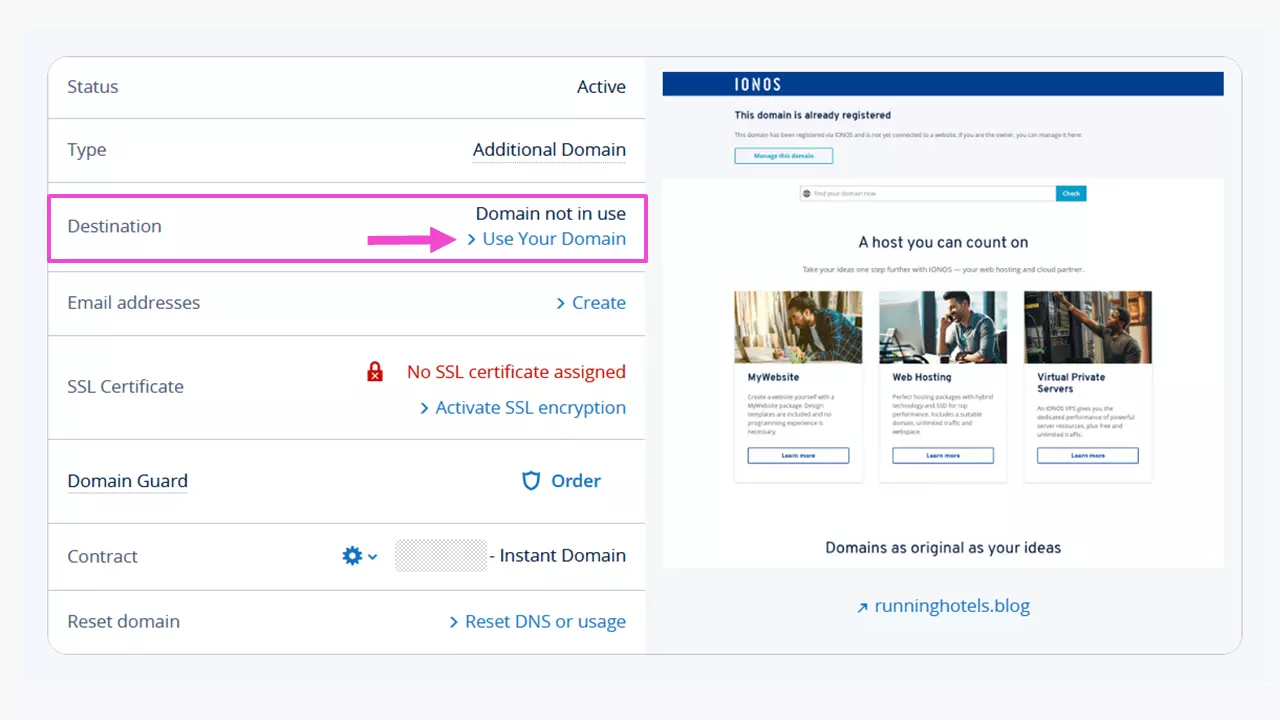
To connect your custom domain to your Blogger blog, you need to set up a forwarding link to your blog.
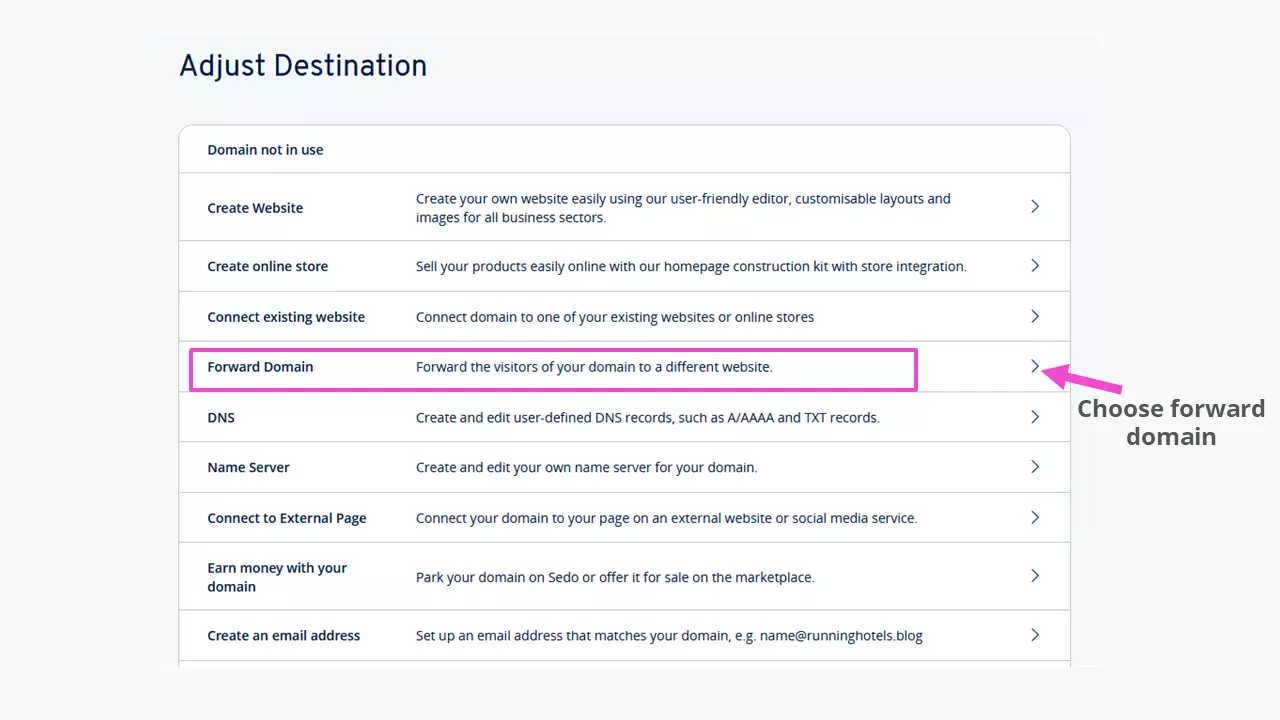
In the next step, you can choose one of two redirect options: HTTP or frame.
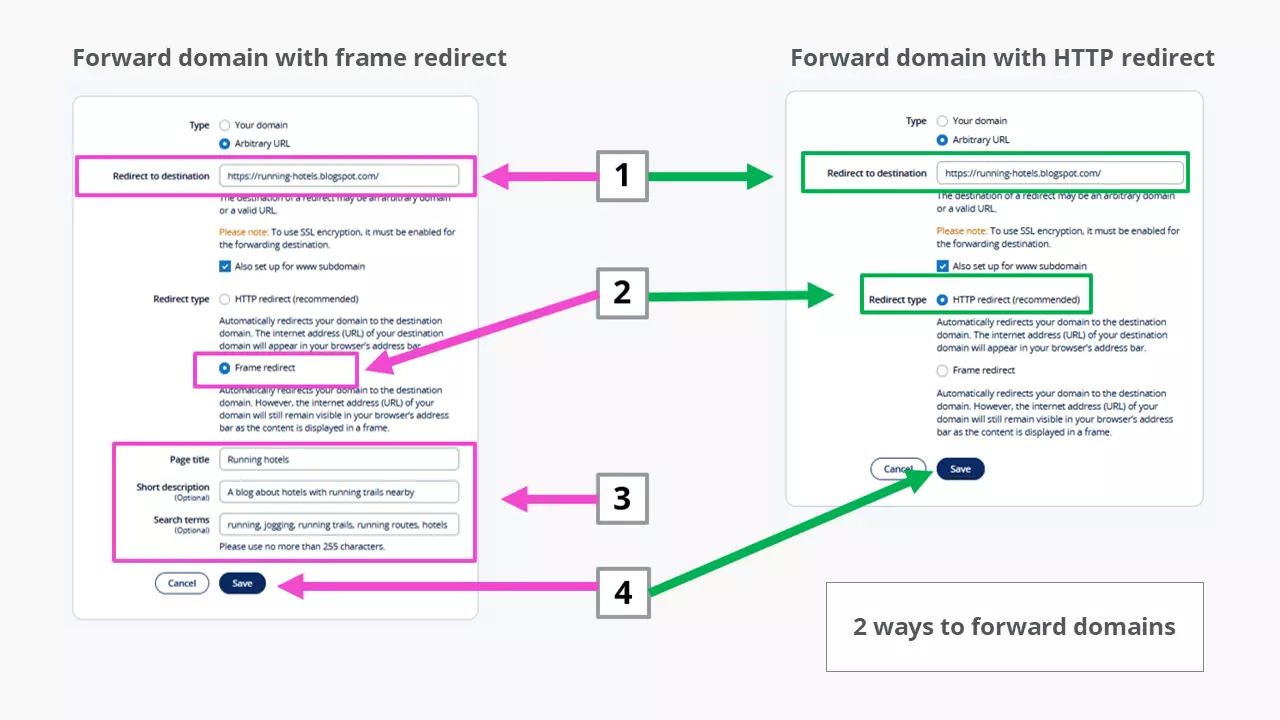
(1) Enter the current address of your blog. Check the box Also set up for www.subdomain. (2) Choose how you want to forward your domain. An HTTP redirect (which is recommended) works almost immediately but has the drawback that the subdomain of the blog provider will be shown in the browser search bar, for example https://running-hotels.blogspot.com/. This might not be an issue though since the user will have already found and made use of your custom Blogger domain. If you opt for the frame redirect, you’ll need to (3) create a page title. You also have the option to include a short description and related search terms. (4) Click Save to activate your forwarding choice.
With frame redirecting, the Blogger domain stays in the browser window. But since it is a frame, the SSL key usually has to be stored on the provider’s website to display the secure page. This isn’t all that easy with different providers, so it’s best to avoid this option. Plus, this type of redirect isn’t search-engine friendly.
Step 6: Review result
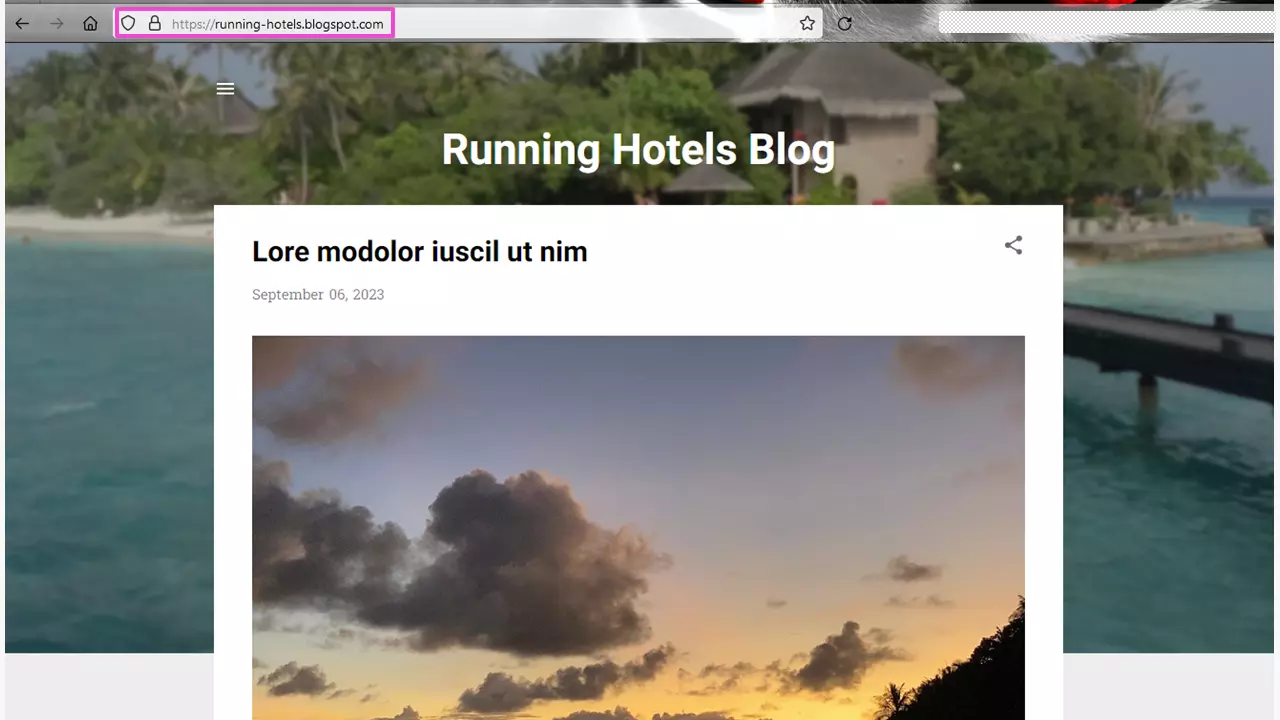
With HTTP forwarding, you’ll be redirected to the Blogger domainhttps://running-hotels.blogspot.com/ after entering https://runninghotels.blog/ in the browser search bar. Now, users can enjoy your content with SSL encryption.
If you process personal data on your blog, for example, through a contact form, you should notify site visitors of this. You’re required to do so under the EU General Data Protection Regulation (GDPR). You will automatically receive information about this in your IONOS account.
Step 7: Set up an email address for your custom Blogger domain
When you purchase a Blogger domain from IONOS, you automatically get a personal email address at no additional cost. This means you can also use this domain for professional emails. In our example, that would be xyz@runninghotels.blog. What goes before the @ sign is up to you. It could be your name, ‘mail’ or any other suitable term. If you already have an email address, you can forward mail sent to xyz@runninghotels.blog to it as well.
Step 8: Pick a mailbox name
After logging in to your IONOS account, the tile Create an email address will appear in your account interface. In the field before the @ sign, enter a name for your mailbox. Next, you’ll need to choose between four different types of email accounts:
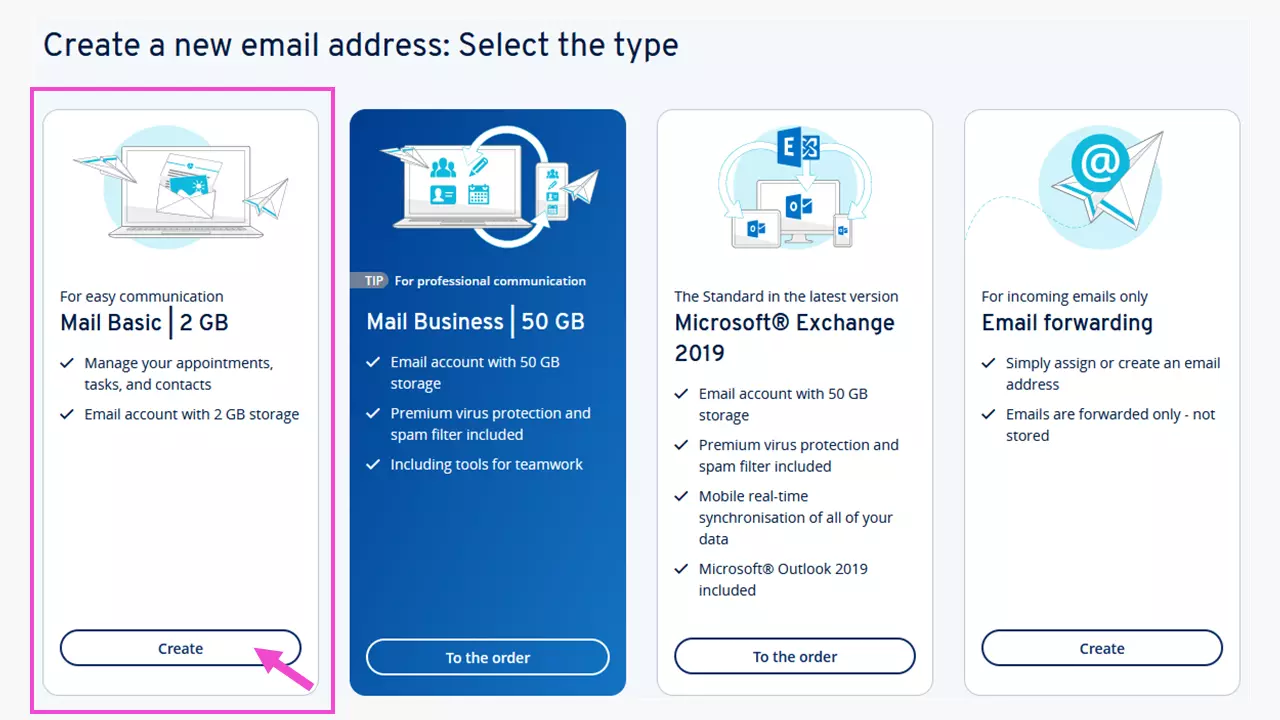
For a Blogger blog with a custom domain, Mail Basic | 2 GB should be sufficient. Carrying out regular mailbox maintenance (like deleting old files) can help you to manage the amount of space you have.
Step 9: Choose your type of mailbox
Now you’ll land on the page to set up your Mail Basic account. In our example, we decided to go with mail@runninghotels.blog. Now choose a strong password. In the Email forwarding field, you can enter the email address you want messages forwarded to.
Step 10: Set a password and email forwarding
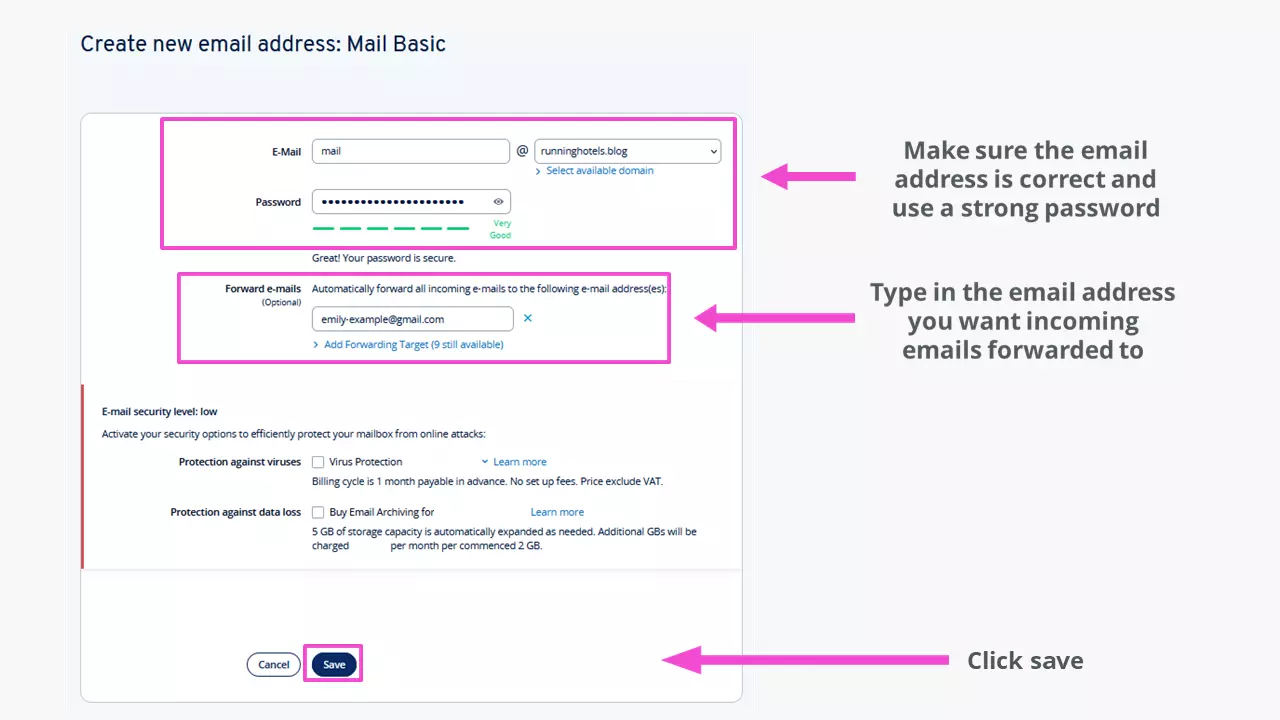
Your emails will now be forwarded to the email address you entered. You can also access the new mailbox in IONOS Webmail. Simply log in with your newly created email address and password.
Feeling lost? Check out our guide on how to set up email forwarding. You’ll also find a great example of how to do this in our Digital Guide article on Gmail with a custom domain.
Alternatively, you can also check emails in the email program you normally use. The IONOS Help Centre is packed with how-to guides on setting up email programs.