How to set up your Pinterest domain
Linking your Pinterest profile with your own domain is one way to add a finishing touch to your board. Once you’ve got your dream web address, you can set up forwarding with your site.
How to connect Pinterest with your domain
- Register your domain.
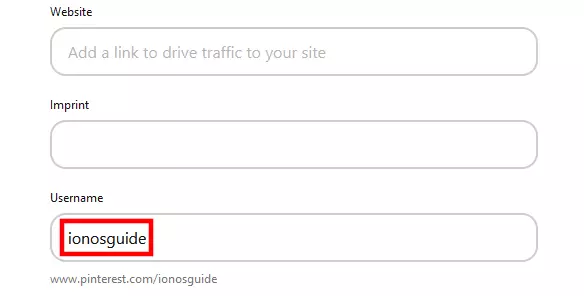
- Go into your Pinterest settings and click on ‘Edit profile’. Make a note of your username.
- Set up domain forwarding in your account with your domain provider.
- Free website builder with .co.uk
- Free website protection with one Wildcard SSL
- Free 2 GB email account
How to register your Pinterest domain
You can get your own domain from a domain registrar like IONOS. In theory, you can choose pretty much any domain name and top level domain you want. In practice, though, you’ll have to make sure that your desired web address is still available. New domain endings like .life and .travel are particularly good choices for marketing your Pinterest profile. Just keep in mind that having a domain name and ending that are well suited to your Pinterest board is an important factor in your success. Registration itself takes just a few minutes.
For example, here’s how you can register your domain with IONOS:
- Open the official IONOS website.
- Click on ‘Domains & SSL’ and then choose ‘Domain Names’.
- Find your dream domain using the domain checker.
- Put your Pinterest domain name in the basket and check out.
After you’ve completed your purchase, your address should be registered and available in just a few minutes. You’ll get a confirmation email and the login data for your account. Once logged into your account, you can access all the important settings for your new domain and link it with your Pinterest profile.
How to set up your Pinterest domain
To run your Pinterest board under your own domain, you’ll need to set up domain forwarding. You can do this in your account with your domain provider. In the following step-by-step guide, we’ll take you through how to set this up with IONOS. The process should be similar for other domain registrars.
Step 1: Open the setup assistant
IONOS provides support for setting up your Pinterest domain, so that you don’t have to deal with DNS settings yourself. That’s made possible by the setup assistant, which you can access on this page in the IONOS Help Centre. As soon as you’ve opened the page in your browser, you can open the tool by clicking Get Started or Connecting your domain with Pinterest.
Step 2: Log into your IONOS account
After clicking on one of those two buttons, you’ll be taken to the IONOS login page. Log into your account with the information you received after purchasing your domain.
Step 3: Select your domain
Once you’ve logged in, the setup assistant will show you a list of the domains you have registered with IONOS. Select your Pinterest domain.
If you’ve created subdomains for your website, they’ll also be shown in the list. You can of course also select a subdomain as your Pinterest domain.
Step 4: Connect your Pinterest profile with your domain
You’re now at the last menu you’ll need for your Pinterest domain in the setup assistant. To connect your profile with the domain, you’ll need your Pinterest username. Here’s how you can retrieve that:
- Log into your Pinterest profile.
- Click on the profile icon at the top right of the page. Select ‘Settings’ from the menu.
- Under ‘Edit profile’, scroll down to where it says ‘Username’. Make a note of your username.

Now navigate back to your IONOS account and insert your Pinterest username into the setup assistant where it says ‘Username’. Finally, click Connect to connect your Pinterest with your domain.

In our support article ‘Forwarding a domain to a different domain’ in the IONOS Help Centre, we provide an extensive summary of how you can manually set up forwarding for your IONOS domains.