Windows 10: How to auto login without a password
Set up an automatic login and save yourself the trouble of logging in with a password every time you open your Windows 10 device. We’ll outline how to set up the automatic login function in Windows 10 and we will also explain why the password prompt can be beneficial.
- Free website protection with SSL Wildcard included
- Free private registration for greater privacy
- Free 2 GB email account
Quick guide: Automatic login in Windows 10
- Open the Registry Editor using [Windows] + [R] and ‘regedit’.
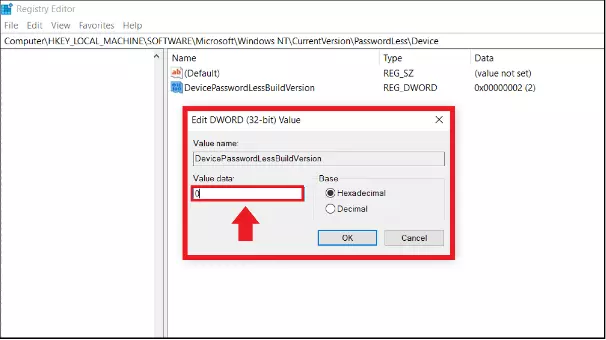
- Enter HKEY_LOCAL_MACHINE\SOFTWARE\Microsoft\WindowsNT\CurrentVersion\PasswordLess\Device.
- Double click on ‘DevicePasswordLessBuildVersion’ and set the value to ‘0’.
- Open User Accounts using [Windows] + [R] and ‘netplwiz’.
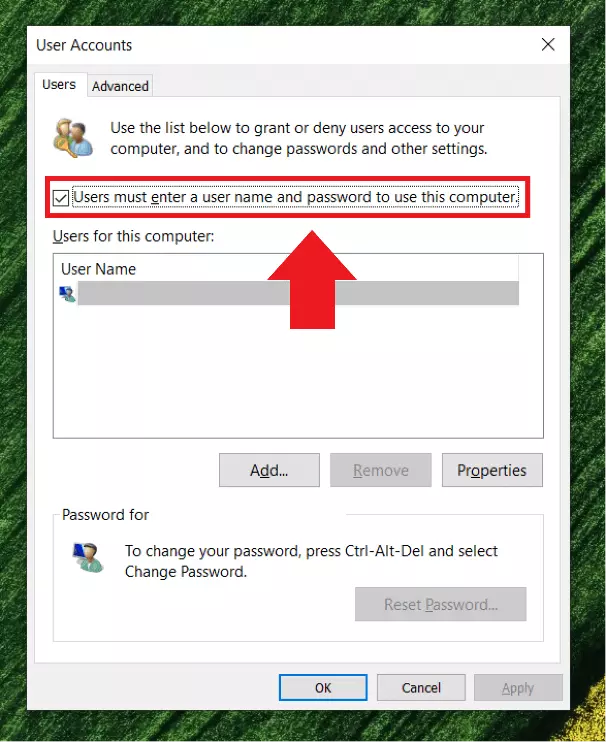
- Untick the box beside ‘Users must enter a user name and password to use this computer’.
Why Windows 10 requests a password
Anyone who installs Windows 10 will be asked to create a password to access the PC or laptop. This password must be entered when you start your device or wake it up from standby mode (if Windows Hello is deactivated). Obviously, a password prompt protects your device from unauthorised access. A password is an effective security measure which protects your data in the event you misplace your device. If your main aim is to make Windows 10 faster, it’s a good idea to check out startup programs or background processes that can be disabled.
Benefits of an automatic login in Windows 10
While the password prompt is beneficial in some respects, it leads to a slightly slower startup which can be annoying especially when the device is only waking up from standby mode. Forgetting or losing your password has the potential to create other problems. It’s easy to reset the password on the Microsoft website and your associated email address if you use your Microsoft account to log in to your device. However, if you are using a local account and haven’t created an administrator account or security questions, resetting or changing Windows 10 password is more complicated. At worst, you might have to reset the system and you’ll run the risk of losing your data. This reason is enough for some people to disable the password prompt on their devices altogether.
How to automatically login to Windows 10
Follow these steps to set up an automatic login in Windows 10. The steps are identical if you also want to set up an automatic login in Windows 11.
Set up automatic login in Windows 10
Firstly, enable the ‘Use Windows 10 without a password’ feature.
Step 1: Open the ‘Run’ dialogue box by entering the shortcut [Windows] + [R] and enter the CMD command ‘regedit’. This will open your system’s Registry Editor.
Please be aware that incorrect changes to the Registry Editor may change your operating system. Worst case scenario, it may permanently damage it. Follow these instructions carefully and ask a more experienced user for advice if necessary.
Set up automatic login in Windows 10
You can disable the password prompt once you have completed the following steps.
Step 1: Open the ‘Run’ dialogue box again with the shortcut [Windows] + [R] and enter ‘netplwiz’.
Step 2: The ‘User accounts’ menu will open. Untick the box beside ‘Users must enter a user name and password to use this computer’.
Step 3: Enter the current password to confirm changes and click ‘OK’.
Automatic login after stand-by/energy-saving mode
If you want to disable the password prompt after waking the device from standby mode, follow the steps below. This option is possible without changing anything in the Registry Editor.
Step 1: Open ‘Settings’ with the shortcut [Windows] + [i].
Step 2: Go to the ‘Accounts’ menu and select ‘Never’ in ‘Login options’. The password prompt will not appear anymore after the device has been woken from power saving mode.
How to disable Windows Hello
If you have Windows Hello set up, you can also deactivate your personal PIN login, fingerprint, or facial recognition.
Disable Windows Hello
Step 1: Firstly, you must disable Windows Hello. Open the Windows Settings with the combination [Windows] + [i], go to ‘Accounts’ and choose ‘Login Options’.
Step 2: Under ‘Windows Hello PIN’, remove the current PIN by changing the login option to ‘Password’ to change your preference to a local password.
Step 3: Follow the steps above to disable the password prompt in Windows 10.


