How to carry out a Nextcloud update
A Nextcloud update refers to upgrading the cloud software to a newer version. Before upgrading, it’s a good idea to create a backup and to check the compatibility of any third-party apps. Updates can be carried out either using the integrated updater or manually.
What is a Nextcloud update or upgrade?
A Nextcloud update or upgrade refreshes the open-source software to a higher version to improve the cloud platform’s functionality. An update typically involves minor version upgrades (such as, from 26.0.1 to 26.0.2) to address security vulnerabilities or bugs, and to optimise system stability. Whereas a Nextcloud upgrade refers to major version updates (such as from version 28 to version 29). An upgrade typically brings significant changes and new features.
Nextcloud recommends regularly updating your cloud server by installing all releases and promptly upgrading to new major versions. You can find detailed information about each version of the cloud software in the Nextcloud Changelog.
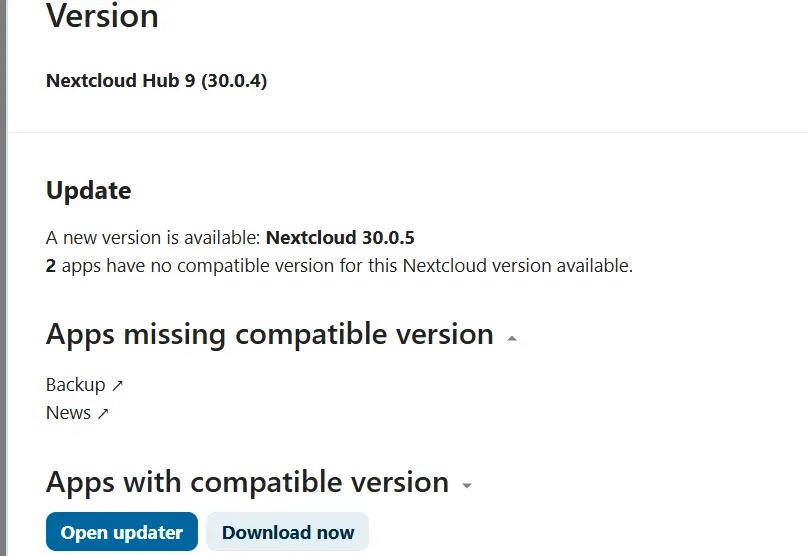
When a Nextcloud update is available, a notification will appear in the administration interface. However, updates in Nextcloud must be carried out step by step. Before upgrading, ensure the current major version is updated to its latest release. You can then upgrade to latest major version.
During updates, your Nextcloud server will be put into maintenance mode. While the update or upgrade is ongoing, users will not have access to the cloud. Major releases may take several hours to complete, though most upgrades generally take only a few minutes.
How should I prepare for a Nextcloud update or upgrade?
Before a Nextcloud update, create a full Nextcloud backup instance. This ensures that should any errors occur during the update, you can restore the instance.
It is also good practice to check whether externally sourced apps are compatible with the new version. As well as this, all third-party apps should be deactivated before the update or upgrade.
- Keep your data safe with industry-leading security
- Save time on updates and maintenance
- Easily add apps and online office tools
How to update or upgrade your Nextcloud
Nextcloud offers three methods for updating your cloud. Each method comes with specific advantages and disadvantages and is suited for different scenarios:
-
Updating via the user interface: The integrated web updater is the simplest way to update Nextcloud. This tool enables you to start the update directly from the web interface. The process is designed to be user-friendly, performing all necessary steps automatically, although it may occasionally result in errors. This update method is ideal for users seeking a straightforward solution.
-
Updating via the command line interface: The update process can also be carried out via the command line. This method follows the same procedure as the web updater, but typically results in fewer errors.
-
Updating manually: This method involves installing the software using a downloaded archive file. A manual update is usually only recommended if the integrated updater is unavailable.
The main difference between these methods lies in their level of automation. Using the updater automates most of the Nextcloud update process. Whereas the manual method requires each step to be performed manually, which is more time-consuming and prone to errors.
How to update Nextcloud with the web-based updater
-
Open the administration settings by clicking on the profile icon (Overview) and scroll down to the Version section.
-
Click the Open Updater button. The button will appear if a Nextcloud update is available.

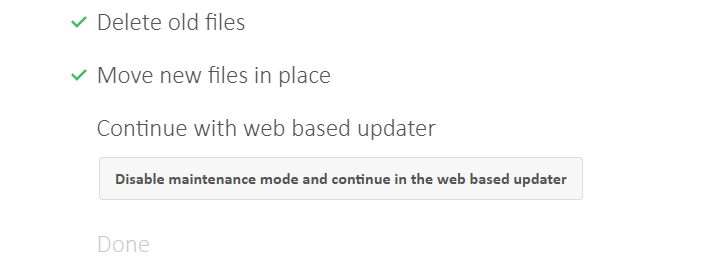
- After the updater completes all steps, specify whether you want to keep maintenance mode active and whether you wish to proceed via the web-based update page or the command line.

How to upgrade Nextcloud using the command line
-
Open the server settings by clicking on the profile icon and scroll down to the Version section.
-
Instead of clicking the updater button, go to the updater directory and execute the
updater.pharfile using the following command:
sudo -u www-data php /var/www/nextcloud/updater/updater.phar-
The updater will now display the currently installed version and the available update. Confirming with “y” to start the download. You will then be prompted to confirm if you wish to run the update immediately, which you respond again with “y” to.
-
The updater will then ask if the maintenance mode should remain active. Press “n” to deactivate maintenance mode, so users can access the cloud as soon as the update is complete.
How to manually update Nextcloud
The following step-by-step guide is based on an Ubuntu server with NGINX.
- Enable maintenance mode: Start by putting Nextcloud into maintenance mode to prevent any activity while the update is in progress:
cd /var/www/nextcloud
sudo -u www-data php occ maintenance:mode --on- Stop the web server:
service nginx stop- Rename the Nextcloud directory: Renaming the directory allows for easy deletion of the old Nextcloud directory later:
cd /var/www mv nextcloud nextcloud_alt- Download and extract the update: In this example, we’ve simulated an update to version 29.0.4. When using this command, ensure you enter the correct version number:
cd ~wget https://download.nextcloud.com/server/releases/nextcloud-29.0.4.tar.bz2tar -xjf nextcloud-29.0.4.tar.bz2 -C /var/wwwrm nextcloud-29.0.4.tar.bz2- Transfer the configuration file from the old installation:
cp /var/www/nextcloud_alt/config/config.php /var/www/nextcloud/config/config.php- Restart the server:
service nginx start- Assign directory permissions: Before carrying out the actual update, explicitly set the directory permissions:
chown -R www-data:www-data /var/www/nextcloud
chown -R www-data:www-data /var/nextcloud_data- Start the update:
cd /var/www/nextcloud sudo -u www-data php occ upgrade- Disable maintenance mode:
cd /var/www/nextcloud sudo -u www-data php occ maintenance:mode --off- Delete the old installation:
rm -r /var/www/nextcloud_altWith Managed Nextcloud, IONOS provides a convenient, hassle-free cloud solution with secure server infrastructure and no administration involved. IONOS handles the setup and maintenance of your server, while you retain full control over your data. What’s more, you also benefit from dedicated support tailored to your needs.

