How can I set up Nextcloud External Storage?
With Nextcloud’s External Storage support, you can easily integrate external storage sources into your own Nextcloud environment. This gives you extra space for your files, greater flexibility, and improved collaboration across teams. Adding external storage to Nextcloud takes just a few minutes, although it does require careful configuration.
What is Nextcloud External Storage?
Nextcloud External Storage allows you to connect external storage sources to your Nextcloud instance. By using the appropriate app, you can create a link between the cloud software and external systems, making data from multiple sources centrally accessible in Nextcloud.
These storage sources can not only be integrated but also customised to suit your specific needs. For example, you might use them to include personal backups or to synchronise business data. And because everything is managed through the familiar Nextcloud interface, it remains simple and intuitive to use.
Which external storage solutions does Nextcloud support?
Nextcloud External Storage supports a wide variety of popular storage solutions that can be integrated into your cloud environment, whether for personal or professional use. These include the following storage backends, among others:
- Amazon S3
- FTP/FTPS
- Local
- OpenStack Object Storage
- SFTP
- SMB/CIFS
- WebDAV
In addition to the officially supported storage solutions, the Nextcloud App Store also also offers apps for other services such as OneDrive and Dropbox. These Nextcloud apps are often developed by third-party teams and may be based on older versions of the software. Outdated apps can introduce security vulnerabilities or lead to compatibility problems. If you still want to try one of these apps, it’s best to test it in a separate environment and create a backup in advance.
- Keep your data safe with industry-leading security
- Save time on updates and maintenance
- Easily add apps and online office tools
When does it make sense to add external storage to Nextcloud?
Whether it makes sense to add external storage to your Nextcloud setup largely depends on how you intend to use it. There are several scenarios where integrating external storage can be particularly beneficial:
-
Need for more storage: If your Nextcloud instance has limited storage capacity, using external storage is a cost-effective way to increase space.
-
Centralised data management: External storage allows you to bring multiple data sources together within a single interface. This is especially useful for teams and organisations that rely on several different storage platforms. If you already use services like FTP servers or Google Drive, these can be integrated without the need to change your existing setup.
-
Flexible storage needs: External storage provides a simple way to scale your storage capacity. This makes it a sensible option for users and organisations handling increasing amounts of data volumes or with evolving needs. For instance, Nextcloud allows you to add external storage dynamically as your demands grow.
Despite this, there are a few potential drawbacks and limitations to bear in mind. External storage can sometimes impact performance, as Nextcloud scans the current directory for changes every time a page is loaded. In addition, configuring and managing external storage requires a certain level of technical expertise, and mistakes in configuration can affect both stability and security.
How to configure external storage in Nextcloud
The following step-by-step guide shows you how to add external storage to Nextcloud using the built-in External Storage Support app:
-
Log in to your Nextcloud instance, using an account with administrative privileges.
-
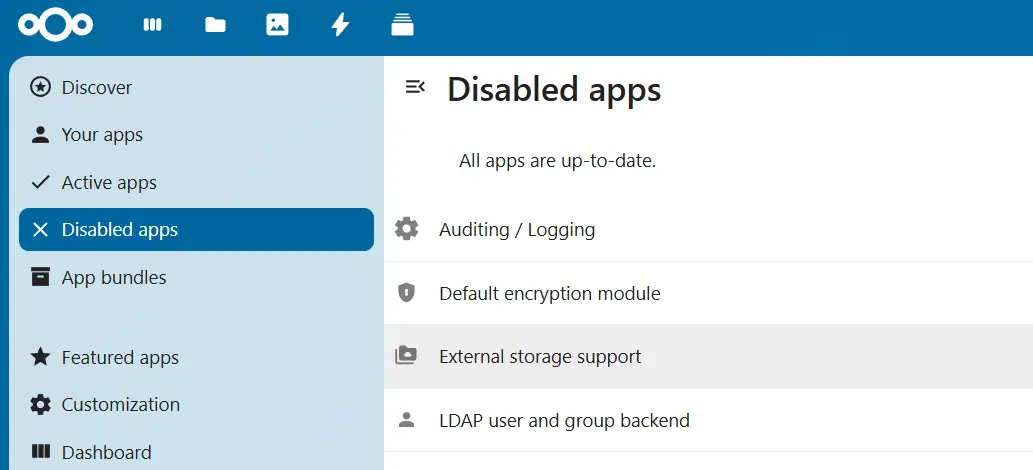
To set up external storage in Nextcloud, you’ll need the ‘External Storage Support’ app. You can activate it from the Nextcloud App Store by clicking the corresponding button.

-
Once the app has been activated, click the profile icon in the top-right corner and select ‘Administration settings’ from the dropdown menu.
-
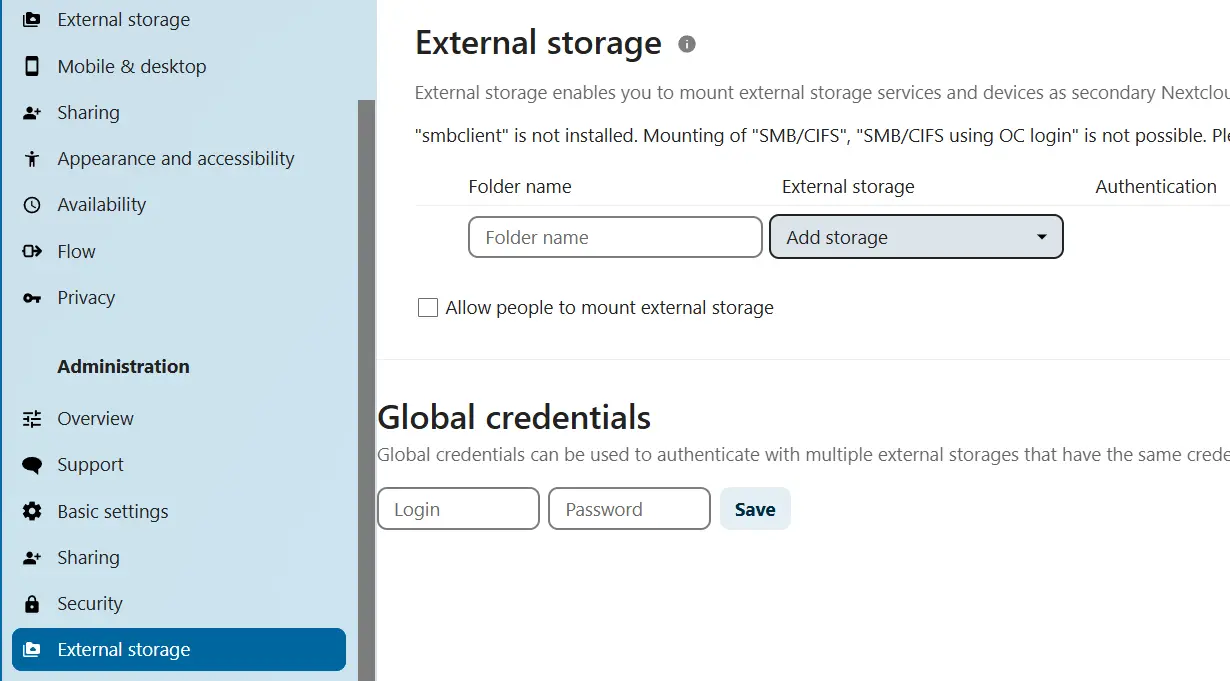
In the administration panel, click on ‘External storage’, then select ‘Add storage’. From there, choose the type of external storage you’d like to add.

-
Fill in the configuration fields with the necessary information, such as host address and password. The exact fields displayed will depend on the storage service you’ve selected. Required fields are highlighted in red.
-
Once you’ve entered all the required details, the external storage will be automatically added to your cloud. If the setup is successful, you’ll see a green dot next to the storage. A yellow or red dot indicates a problem with the connection. In that case, check the configuration again, as there may be an error.
Managed Nextcloud from IONOS offers a secure and user-friendly cloud solution that removes the burden of server maintenance and updates. As a Platinum Partner of Nextcloud, IONOS also provides tailored support for its Managed Nextcloud services.

