

How to use n8n workflows – 15 automation examples

n8n lets you build workflows that automate repetitive tasks and connect the tools you already use. By combining visual nodes with built-in integrations, you can create powerful automations with little or no coding. In this guide, we’ll show you 15 example n8n workflows you can start using right away.
There are several different ways to host n8n. If you want an easy way to get started, you can install n8n with Docker. For more demanding setups that need to handle higher workloads, you can install n8n on Kubernetes. You can also run n8n with CapRover or CasaOS for an easier setup process. If you already use a hosting panel, you can install n8n with Plesk. If you’re switching from Zapier, you can migrate your workflows to n8n step by step. This often helps reduce subscription costs and gives you more control over how your workflows run.
Publish social media posts automatically
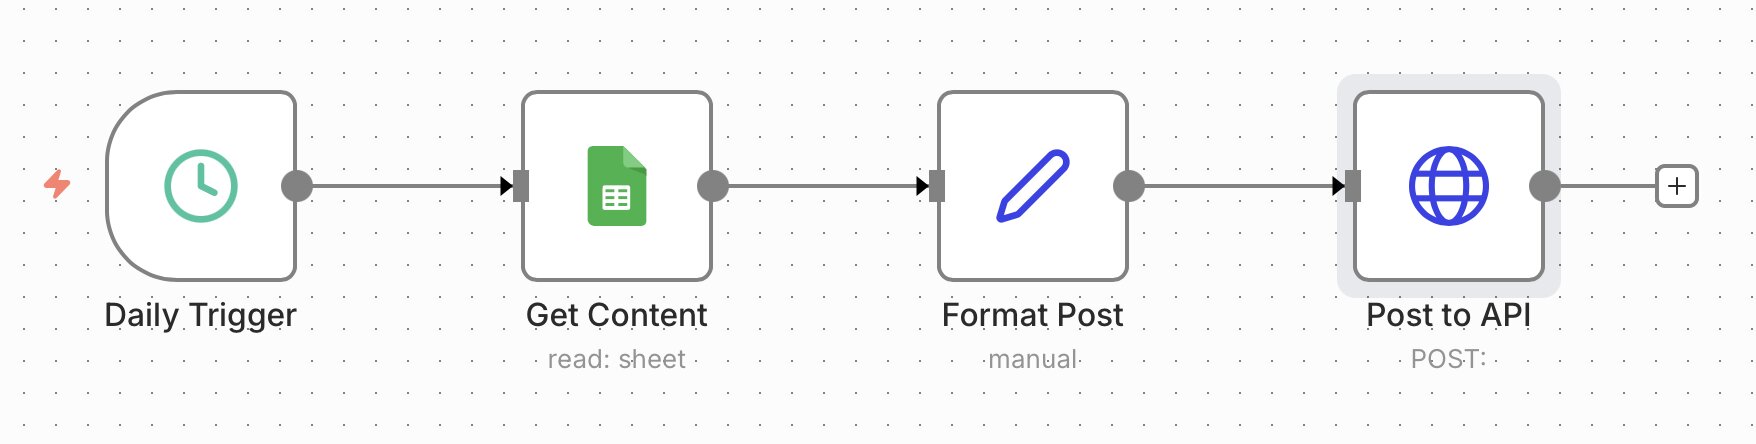
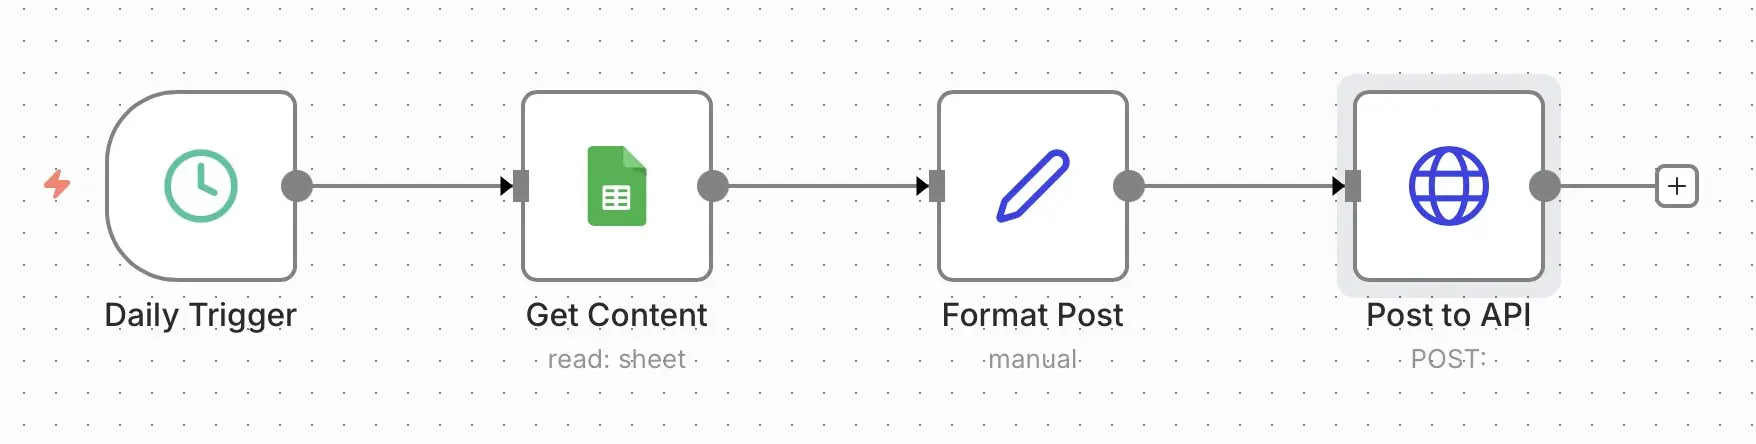
This n8n workflow lets you publish content across multiple social media platforms at the same time. It works well for marketing teams, creators and, more generally, for personal branding. You can manage your posts in a Google Sheet or a Notion database, and n8n will pull the content, then format and publish it on a set schedule. This saves you time and keeps your posts consistent. You can also generate hashtags automatically and include images in your posts.
How to build this workflow:
- Schedule node for timings: Use the Schedule node to run the workflow automatically at set times, like every morning or on specific days. This way, you don’t need to manually publish the post yourself.
- Google Sheets node for content: The Google Sheets node pulls the content you’ve prepared from your spreadsheet, including post text, publish dates or image links. This gives you one place to plan and update your posts.
- Edit Fields node for formatting: Use the Edit Fields node to get your content ready for each platform. You can rename fields, add text, or adjust hashtags and links to match the required format.
- HTTP Request node for publishing: The HTTP Request node sends ready-to-publish content to the platform’s API. Once everything is set up, posts are published automatically. You can also connect multiple APIs to post across different platforms from a single workflow.
Workflows like this are possible in other automation tools too. If you’re comparing options, look at how each tool handles setup, scaling and pricing. Tools like Zapier are built for quick, ready-to-use automations, while Make gives you a visual way to build more complex workflows.
Sort your email inbox automatically
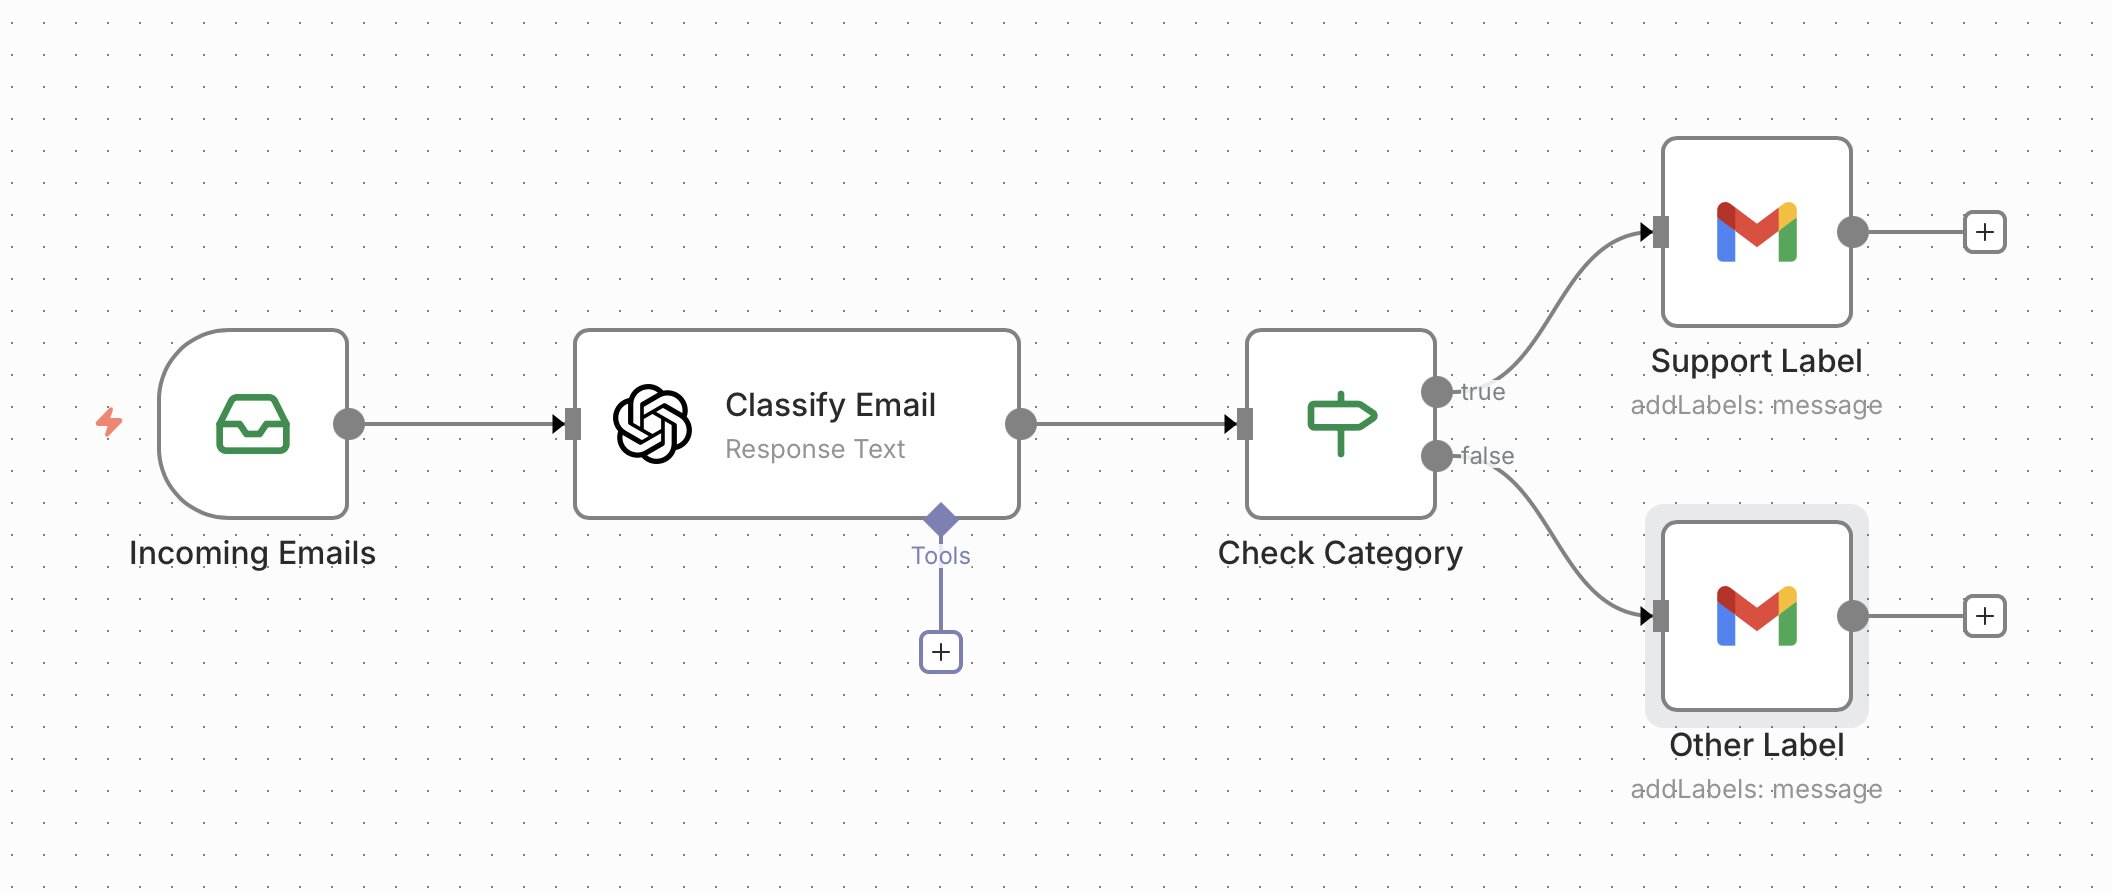
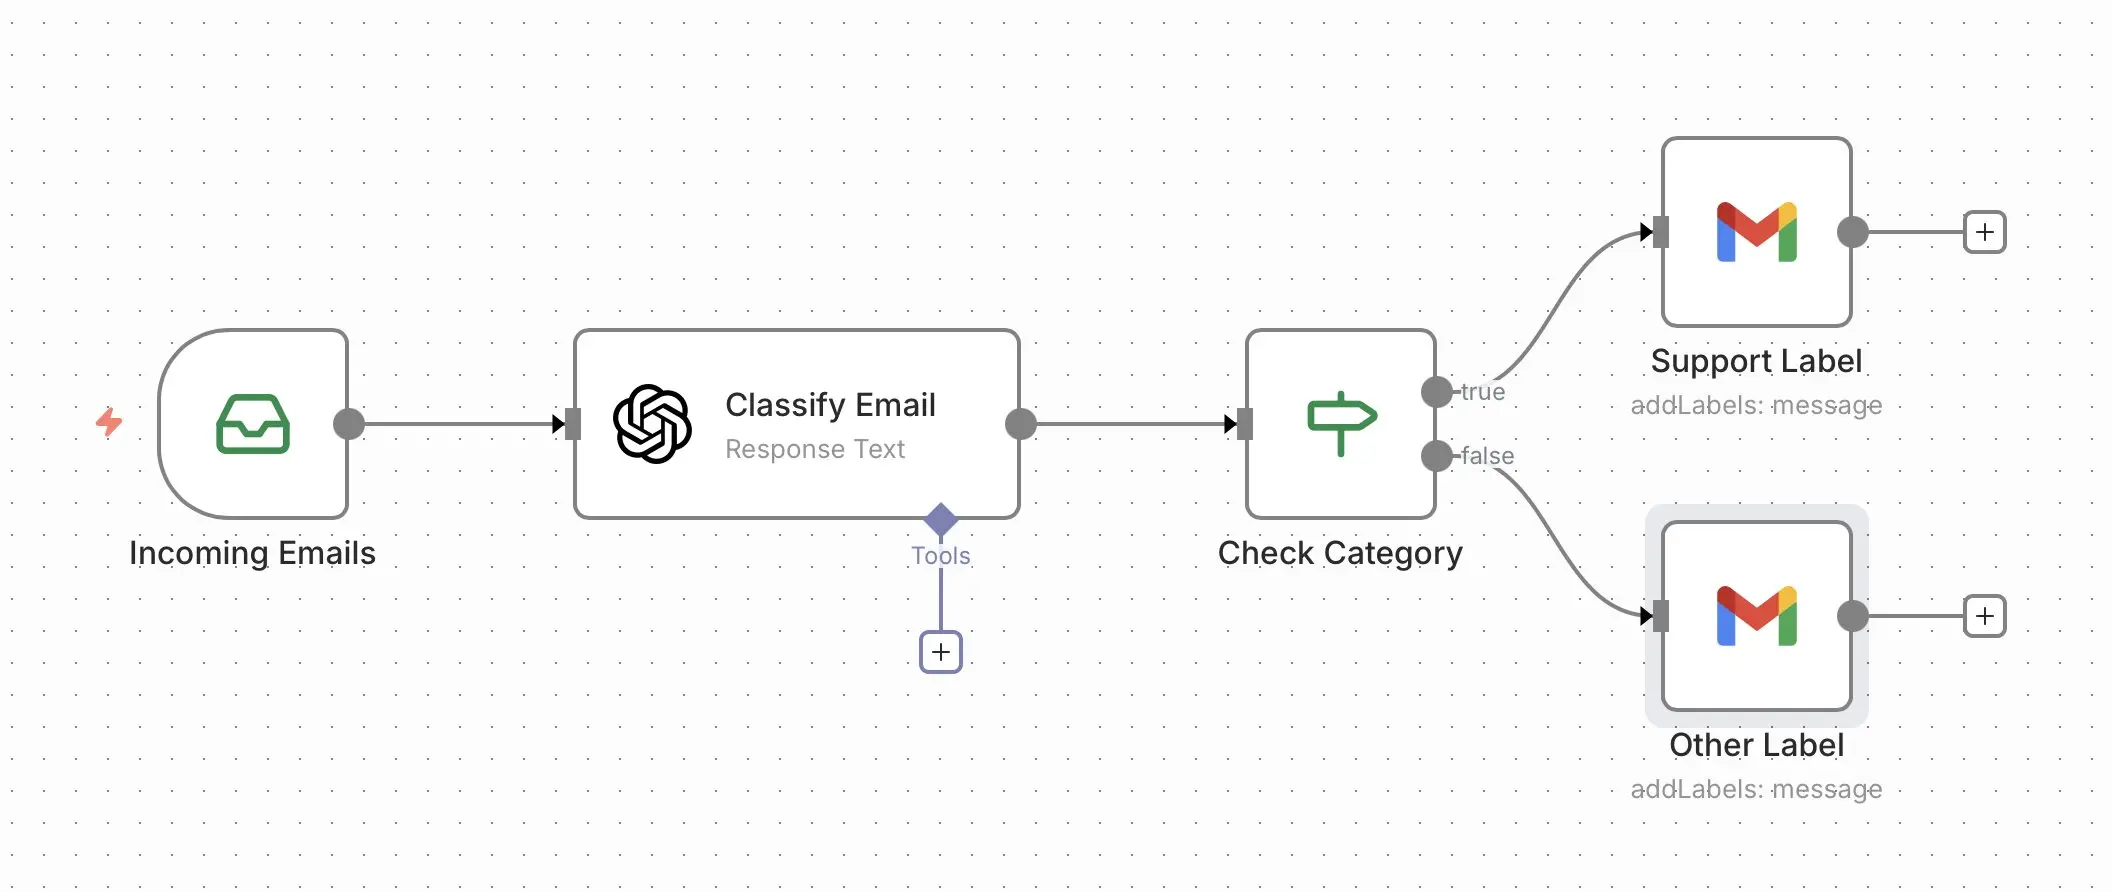
This n8n workflow reviews incoming emails and sorts them into categories. AI analyses each message and assigns a category to it, like ‘Support,’ ‘Spam,’ or ‘Important’. Based on that, the workflow automatically tags emails or forwards them. This cuts down manual work and keeps your inbox organised. You can also add automatic replies if needed. This workflow is great for freelancers or support teams handling high volumes of email.
How to build this workflow:
- IMAP Email node for new emails: The IMAP node monitors your inbox and detects new messages automatically. When an email arrives, the workflow starts and passes along details like subject, body, and sender.
- OpenAI node for classification: The OpenAI node analyses the email and assigns a category to it using a prompt. This lets the workflow decide what to do next based on the content.
- IF node for decision logic: The IF node checks the assigned category and routes the email accordingly. For example, you can prioritise important messages or forward support requests.
- Gmail node for labels and actions: The Gmail node labels emails or moves them into the right folders. This keeps your inbox organised and makes it easier to focus on what matters.
- Automates manual routines for tech teams
- Over 500 integrations and tools with open source
- Automation on your own server with no task limits and full cost control
Process website forms automatically
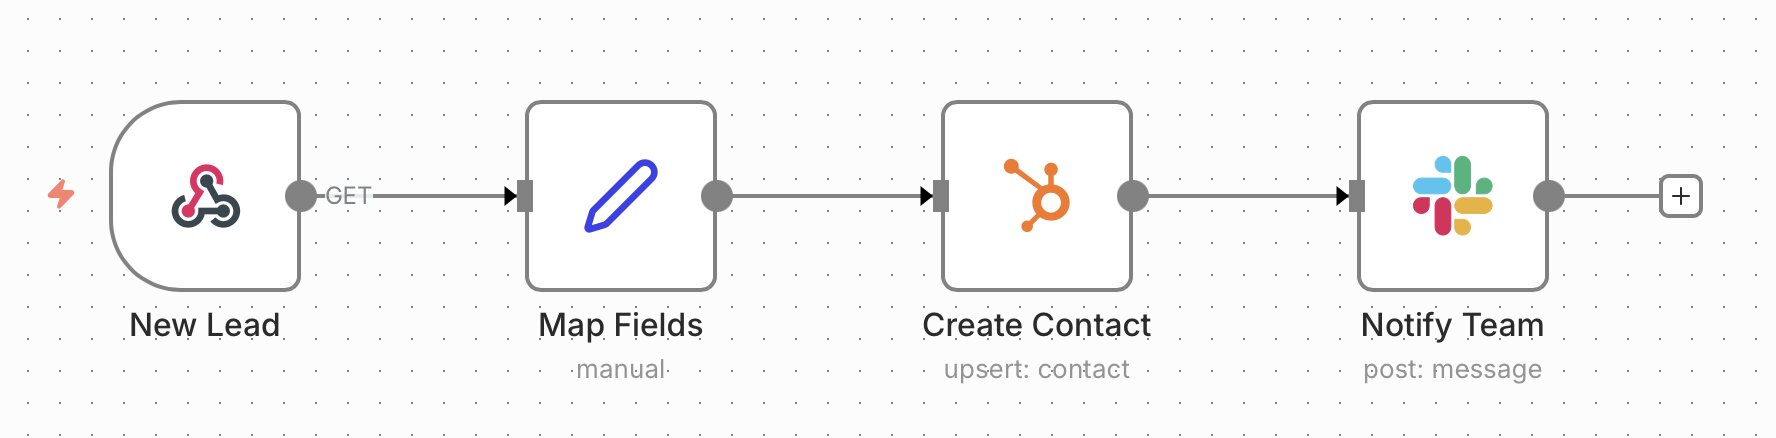
This workflow processes and forwards new form submissions automatically. The data is saved in the CRM and sent automatically to your team in Slack. Connecting n8n to Slack means requests are handled faster and don’t get lost in your inbox. You can also add automatic follow-up or confirmation emails if needed. This workflow is good for small to medium-sized businesses that deal with a steady flow of inquiries.
How to build this workflow:
- Webhook node as the starting point: The webhook node receives data from your website form. As soon as a form is submitted, it passes the data to the next node.
- Edit Fields node for data mapping: The Edit Fields node structures the incoming data and formats it for your CRM.
- CRM node for storing leads: The CRM node (like HubSpot) creates a new contact or lead based on the form data. You can also check if a contact already exists to avoid duplicates.
- Slack node for team notifications: The Slack node sends a message to the selected channel with the main details. This keeps your team informed in real time so they can respond right away.
Turn an RSS feed into a newsletter
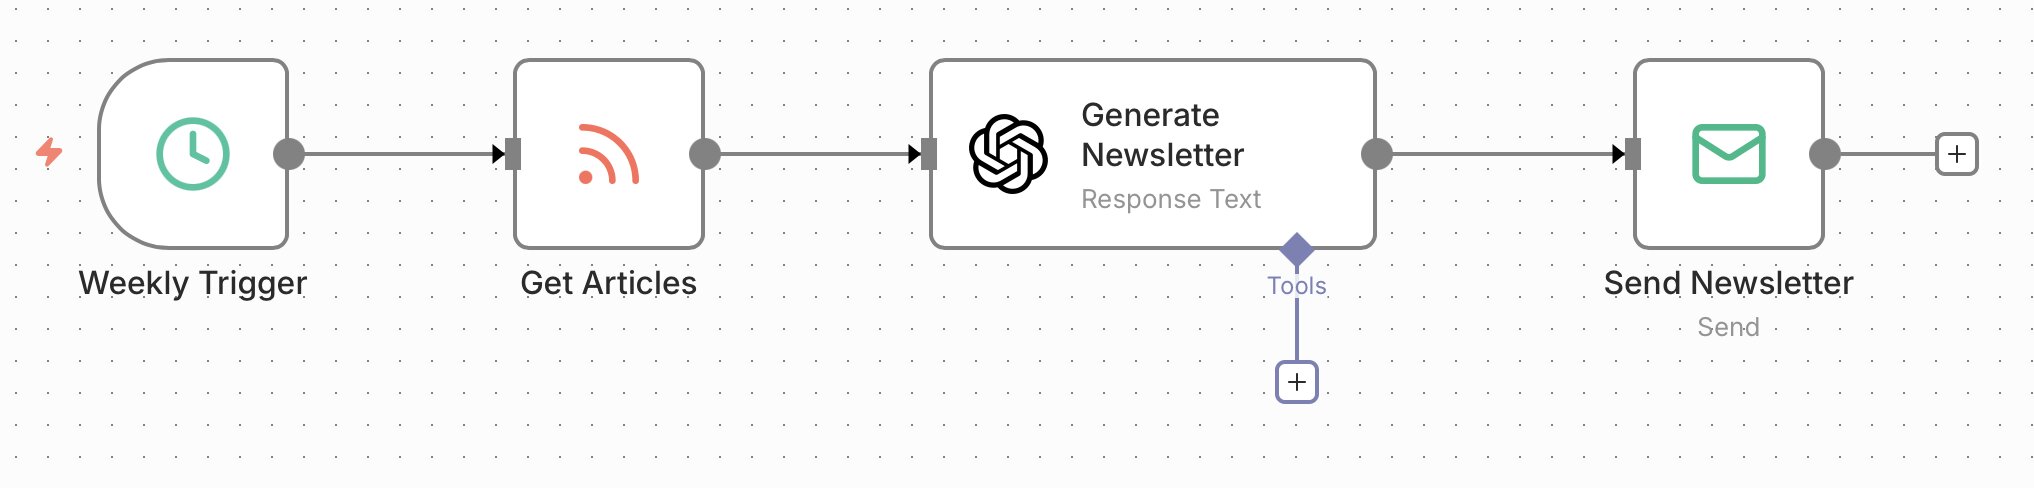
This workflow collects new content from an RSS feed and turns it into a newsletter. An LLM summarises the key points and builds a ready-to-send email. The newsletter is then sent to your recipients on a regular schedule. This saves you from creating newsletters manually while keeping your content visible. It works well for blogs, magazines, or any website that publishes content regularly. You can also filter by category or keywords to include only relevant updates.
How to build this workflow:
- Schedule node for timings: Use the Schedule node to run the workflow at set intervals, such as daily or weekly. This way, your newsletter goes out regularly.
- RSS node for content: The RSS node pulls the latest entries from your feed, including titles, descriptions and links. You can also limit the number of posts or filter them based on specific criteria.
- OpenAI node for the newsletter: The OpenAI node summarises the content and turns it into a ready-to-send newsletter. With the right prompt, you can control tone, length and style.
- Email node for sending: The Email node sends the newsletter to your recipient list.
Turn meeting notes into tasks automatically
This workflow analyses meeting notes or transcripts and turns them into clear tasks. The AI identifies to-dos, responsibilities and deadlines in the text, then sends them to a project management tool like Trello or Asana. This helps you keep track of what needs to be done and makes meeting follow-ups much more efficient. It works well for teams that have a lot of meetings and need to stay organised.
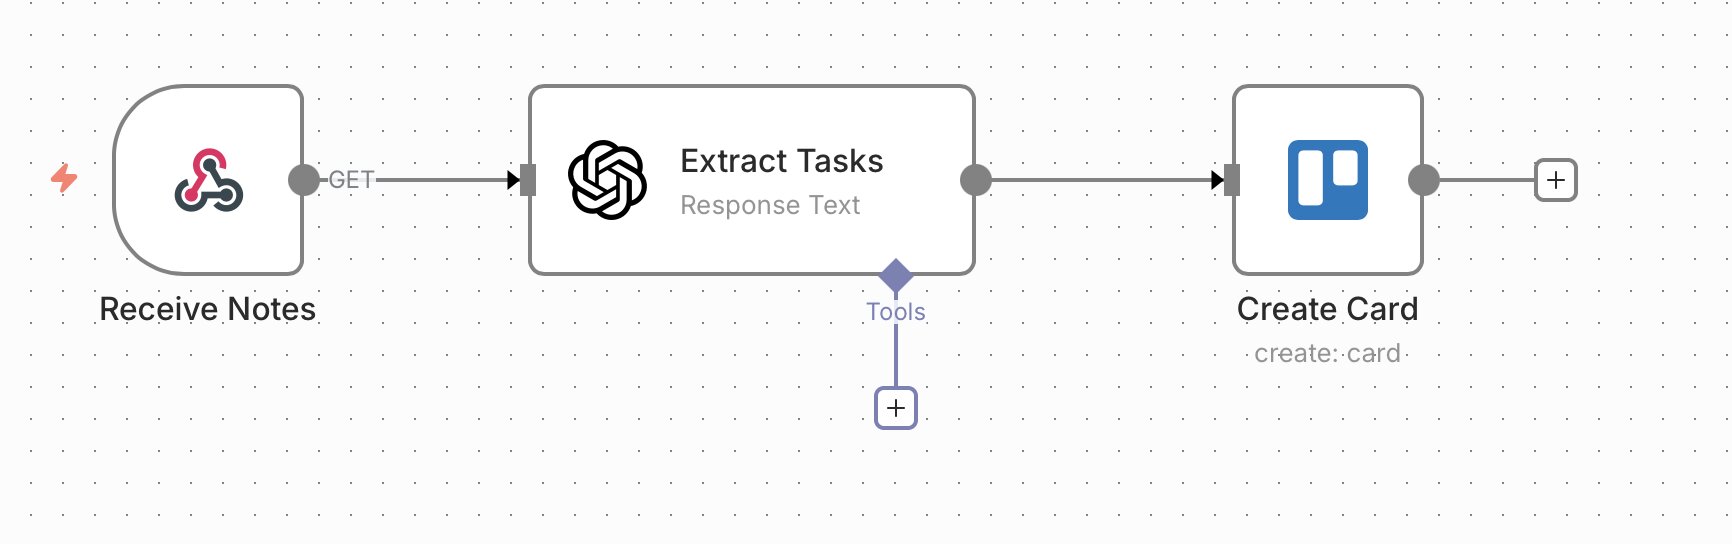
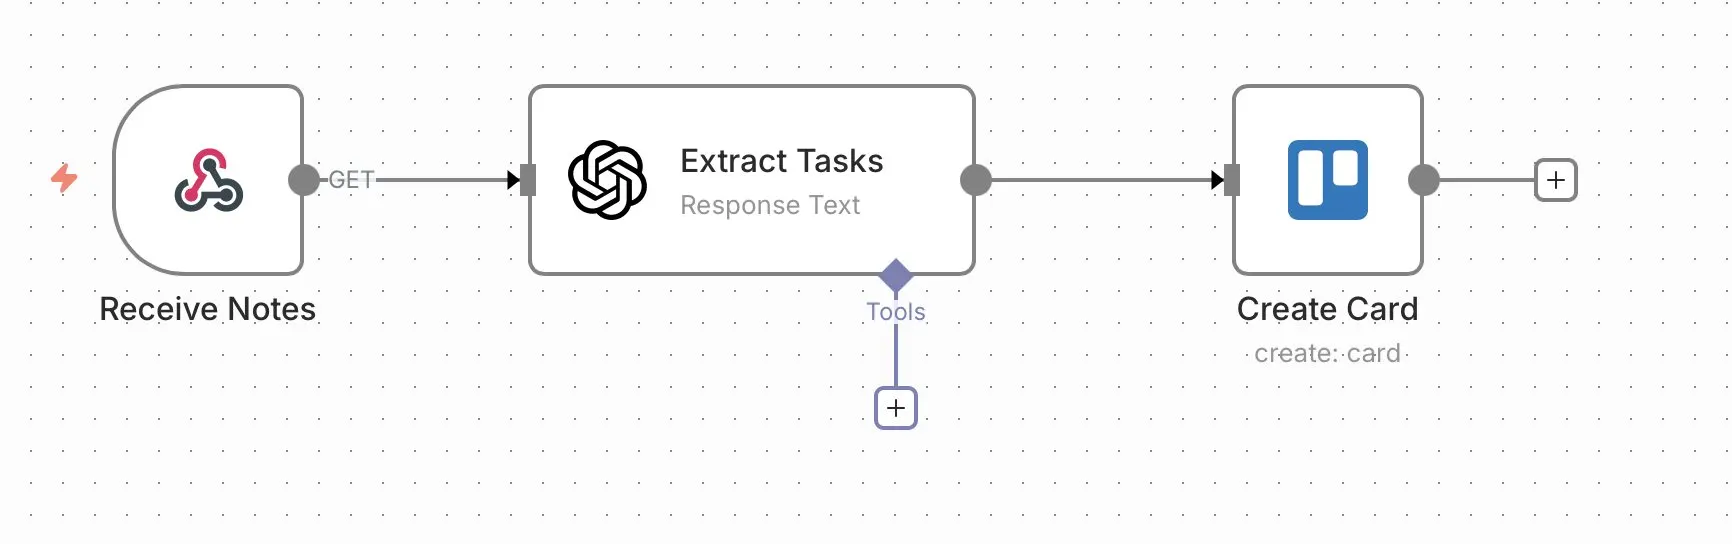
How to build this workflow:
- Webhook node for receiving meeting notes: The Webhook node receives meeting notes from a transcription tool or a form. As soon as new notes come in, it passes the data to the next step.
- OpenAI node for extracting tasks: The OpenAI node analyses the notes and extracts tasks, assignees and deadlines. With the right prompt, you can control how the tasks are formatted and structured.
- Trello node for creating tasks: The Trello node creates new cards in a board using the tasks from the previous step. You can set titles, descriptions, due dates and assignees for each card.
Monitor product prices automatically
This workflow checks the prices of selected products at regular intervals. It can pull price data from websites or APIs. If a price changes or reaches a set threshold, you get notified right away. This helps you keep track of price changes and act quickly when needed. It works well for bargain hunters or anyone in e-commerce. You can also store and analyse price history if needed. Depending on your setup, you can pull data from APIs or use web scraping, though scraping can be unreliable and isn’t always allowed.
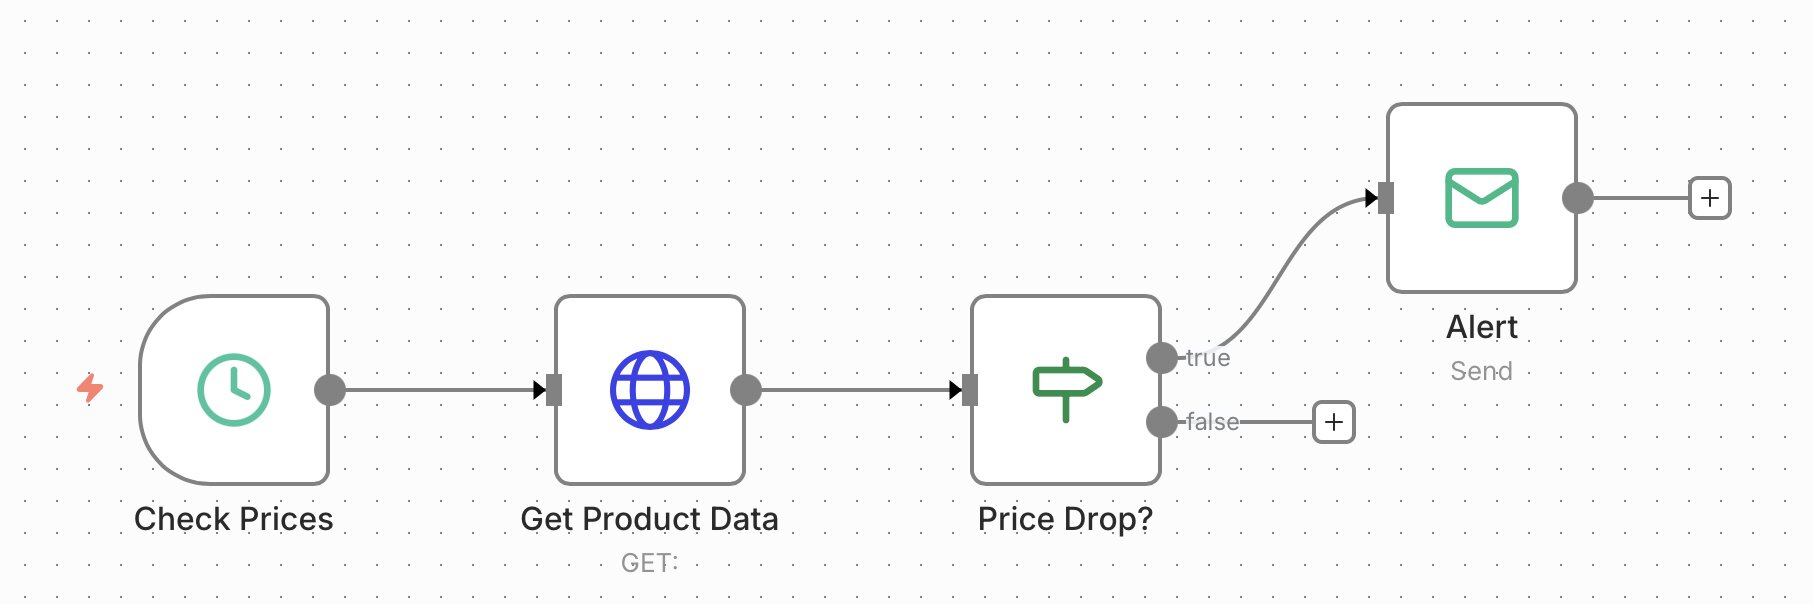
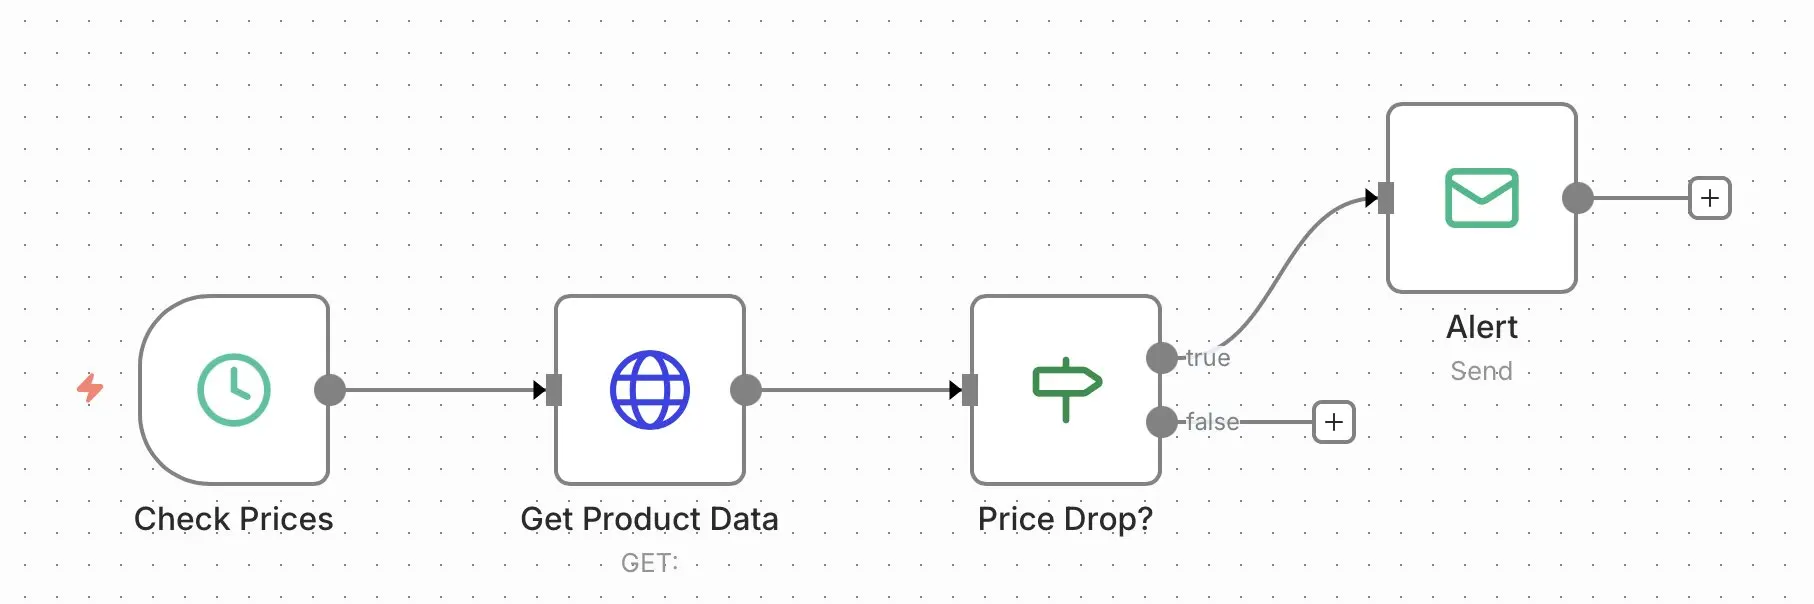
How to build this workflow:
- Schedule node for timings: Use the Schedule node to run the workflow at set intervals, such as every few hours or once a day. This keeps prices updated automatically.
- HTTP Request node for price data: The HTTP Request node fetches the current price from a product page or an API. Depending on the source, you can process JSON data or extract specific HTML elements.
- IF node for checking price changes: The IF node compares the current price with a previously saved value or a defined target price. If the price changes or reaches your target, it triggers the next step.
- Email node for notifications: The Email node sends you a message with the updated price and a link to the product. This lets you react quickly if needed.
Back up data automatically
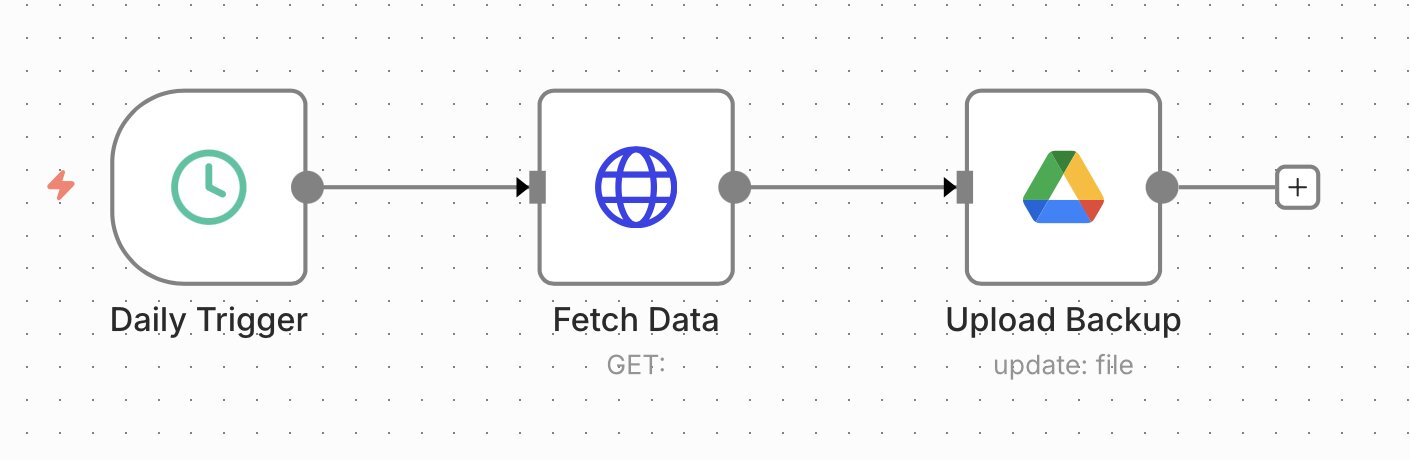
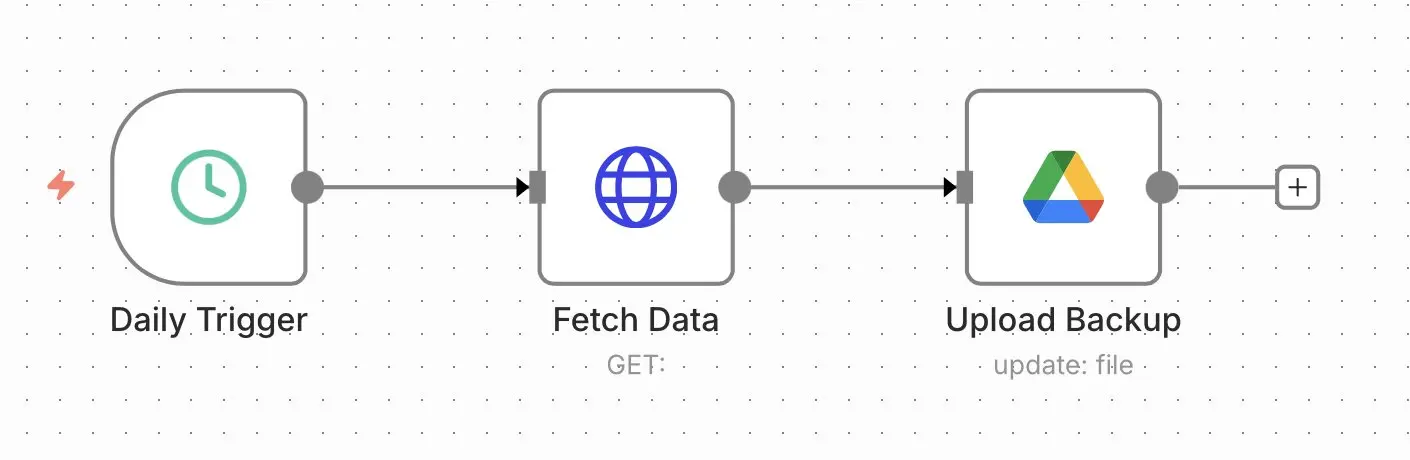
This workflow backs up data from different tools at regular intervals. For example, you can export data from Notion, a database or another tool and store it in Google Drive. This helps protect your data and reduces the risk of data loss. This matters most for data your business depends on. You can also save multiple versions to restore earlier data if needed. The workflow can also be adapted to different data sources.
How to build this workflow:
- Schedule node for timings: Use the Schedule node to run the workflow at set intervals and keep your backups up to date.
- API or HTTP Request node for data: Use this node to pull data from a tool or database, like Notion. The data is formatted so it can then be stored.
- Google Drive node for storage: The Google Drive node uploads the data as a JSON or CSV file. You can add timestamps to the file names to keep different versions of the data.
Analyse social media comments automatically
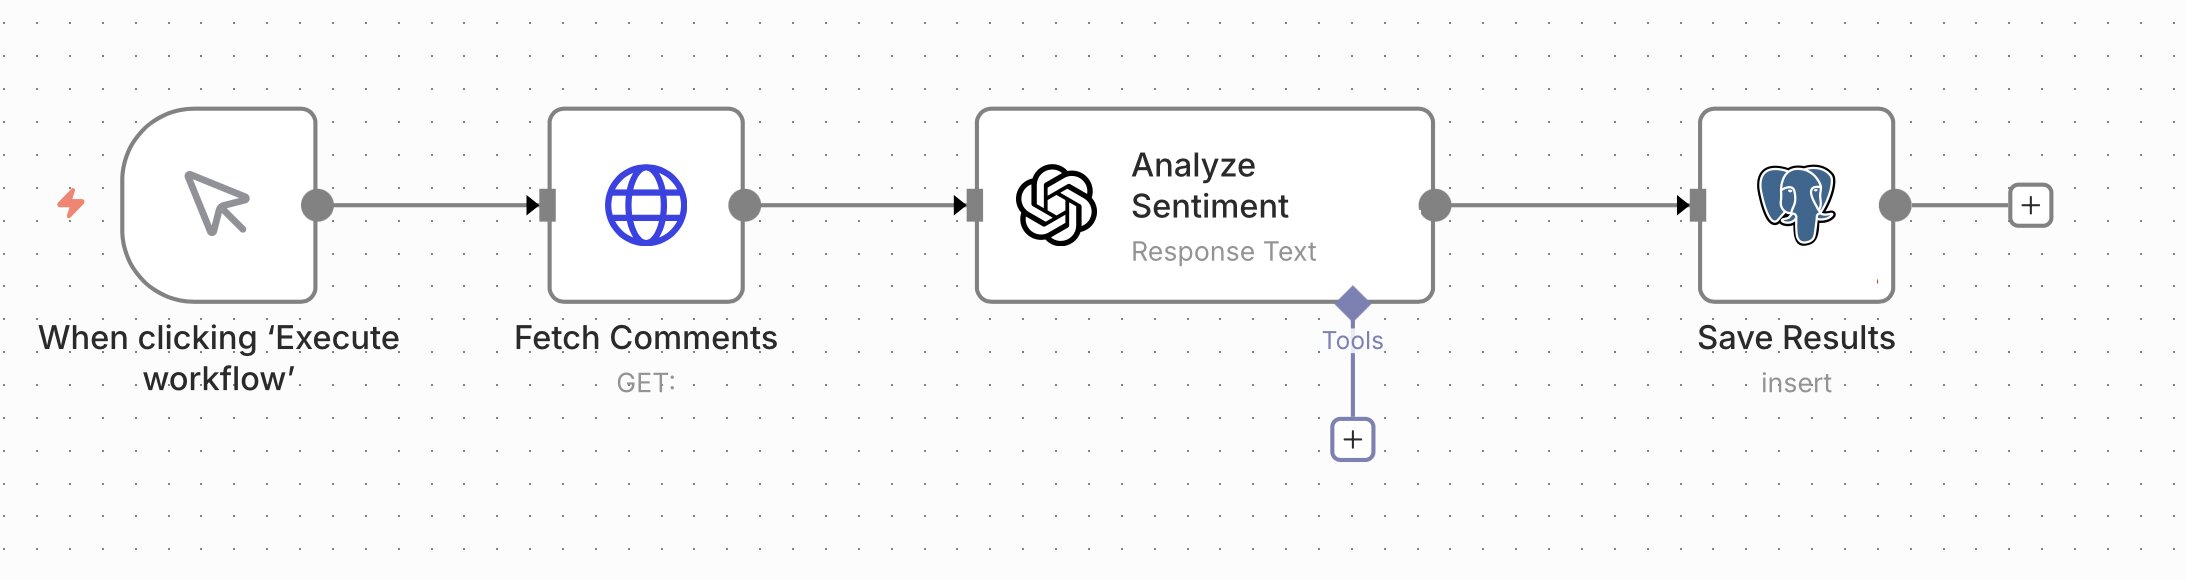
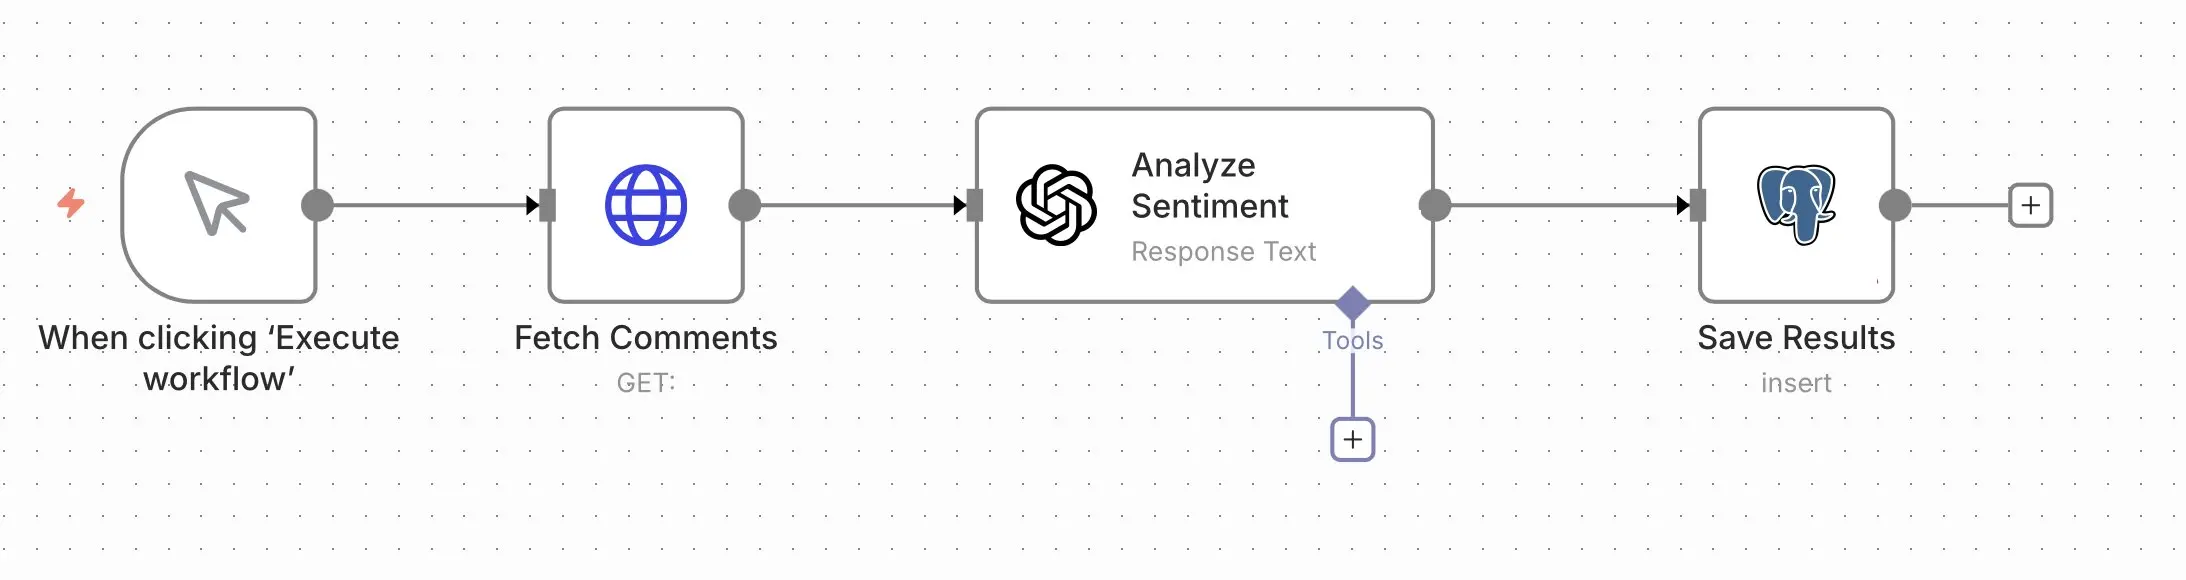
This workflow collects comments on your social media and analyses them. It works well for marketing teams and community management. AI analyses the comments and identifies sentiment, opinions and common topics. The results are saved so you can spot trends and understand how your audience reacts to your posts. This helps you improve the quality of your content and respond to comments faster.
How to build this workflow:
- HTTP Request node for comments: The HTTP Request node fetches comments through the platform’s API, e.g. from Instagram, X or YouTube.
- OpenAI node for analysis: The OpenAI node analyses the comments and categorises them by sentiment (positive, negative or neutral) or by topic. With the right prompt, you can control how the comments are grouped and labelled.
- Database node for storage: The database node stores the results in a database, like PostgreSQL or MySQL. This lets you track trends over time and use the data for reports or dashboards.
Create invoices and email them automatically
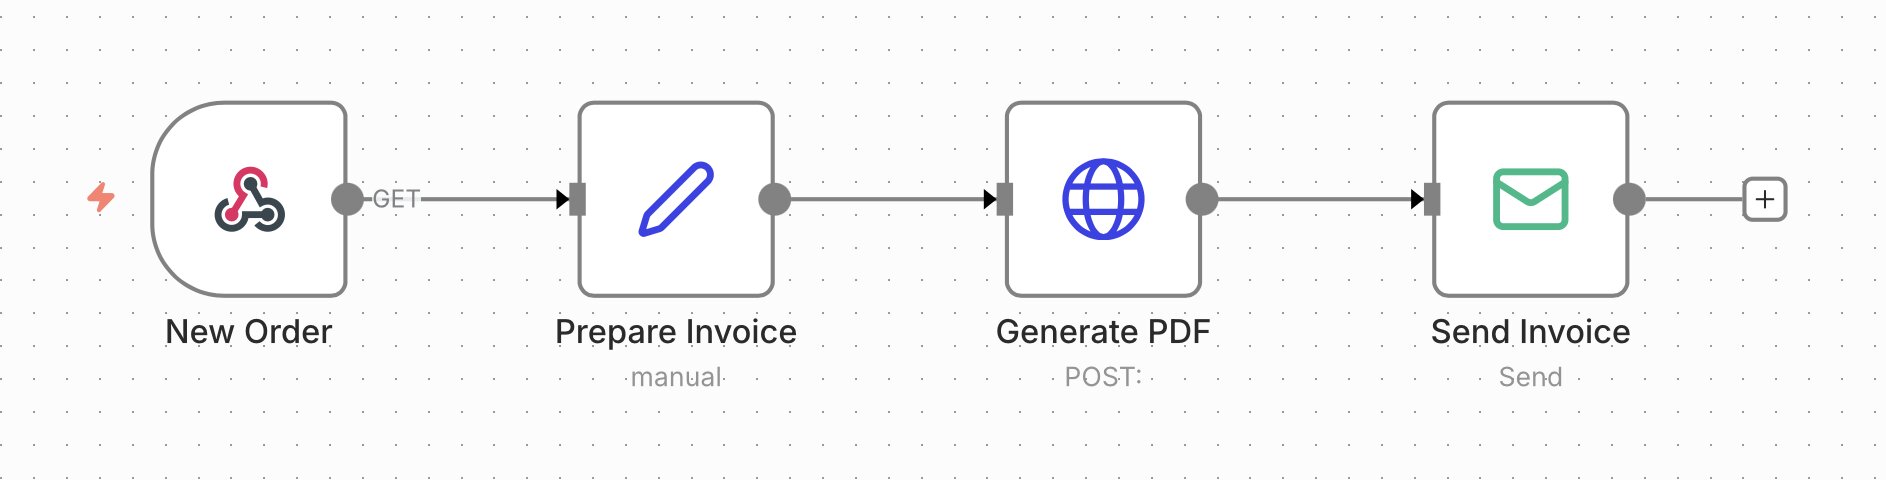
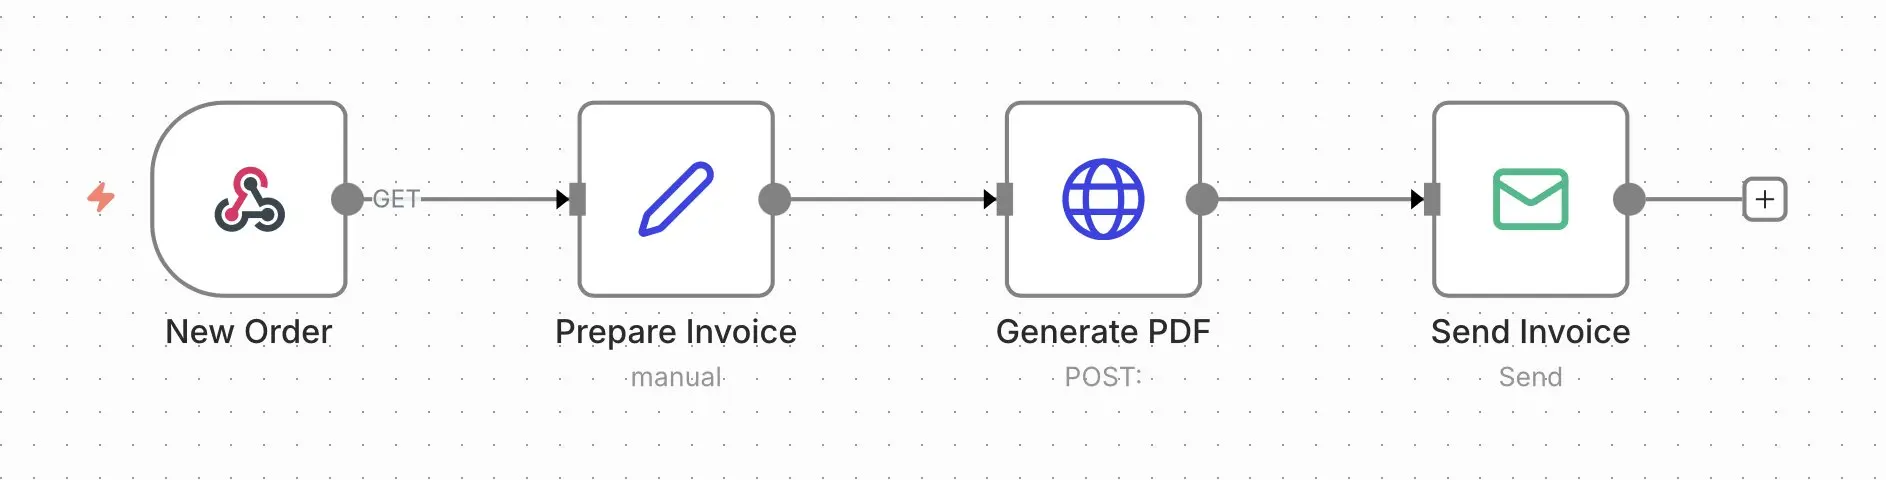
This workflow creates an invoice after a purchase or order and emails it to the customer. It takes the order data, formats it into an invoice and creates a PDF. This means less manual work and fewer errors when creating invoices. You can also connect accounting systems or archive invoices automatically. This workflow works well for freelancers, online stores and service-based businesses.
How to build this workflow:
- Webhook node for order data: The Webhook node receives order data from a store, form or payment system.
- Edit Fields node for invoice data: The Edit Fields node formats the incoming data for the invoice.
- HTTP Request node for PDF creation: The HTTP Request node sends the invoice data to a PDF generator. The PDF generator then turns it into an invoice document. You can use a template to keep the layout consistent and professional.
- Email node for sending the invoice: The Email node sends the invoice PDF to the customer. You can set the subject line, edit the message and attach files.
Monitor server availability and send alerts
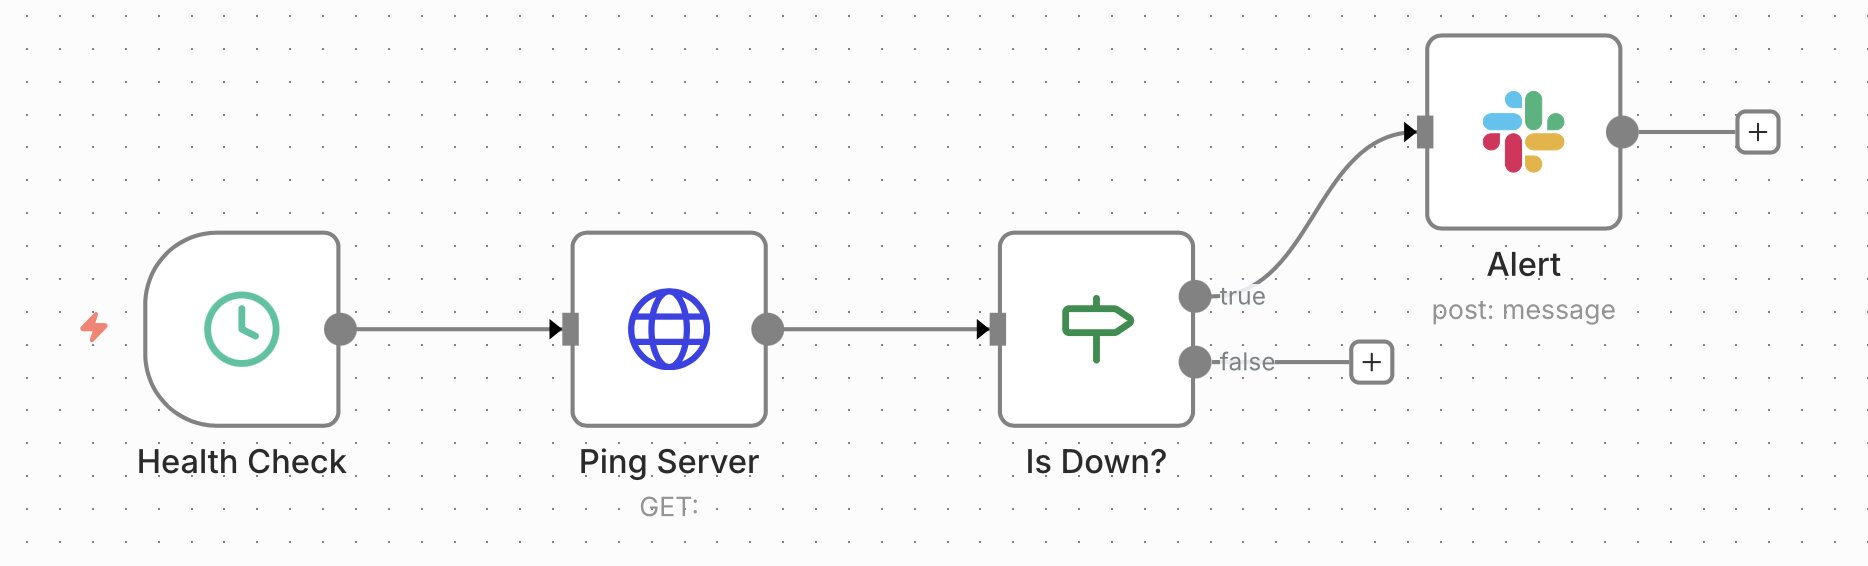
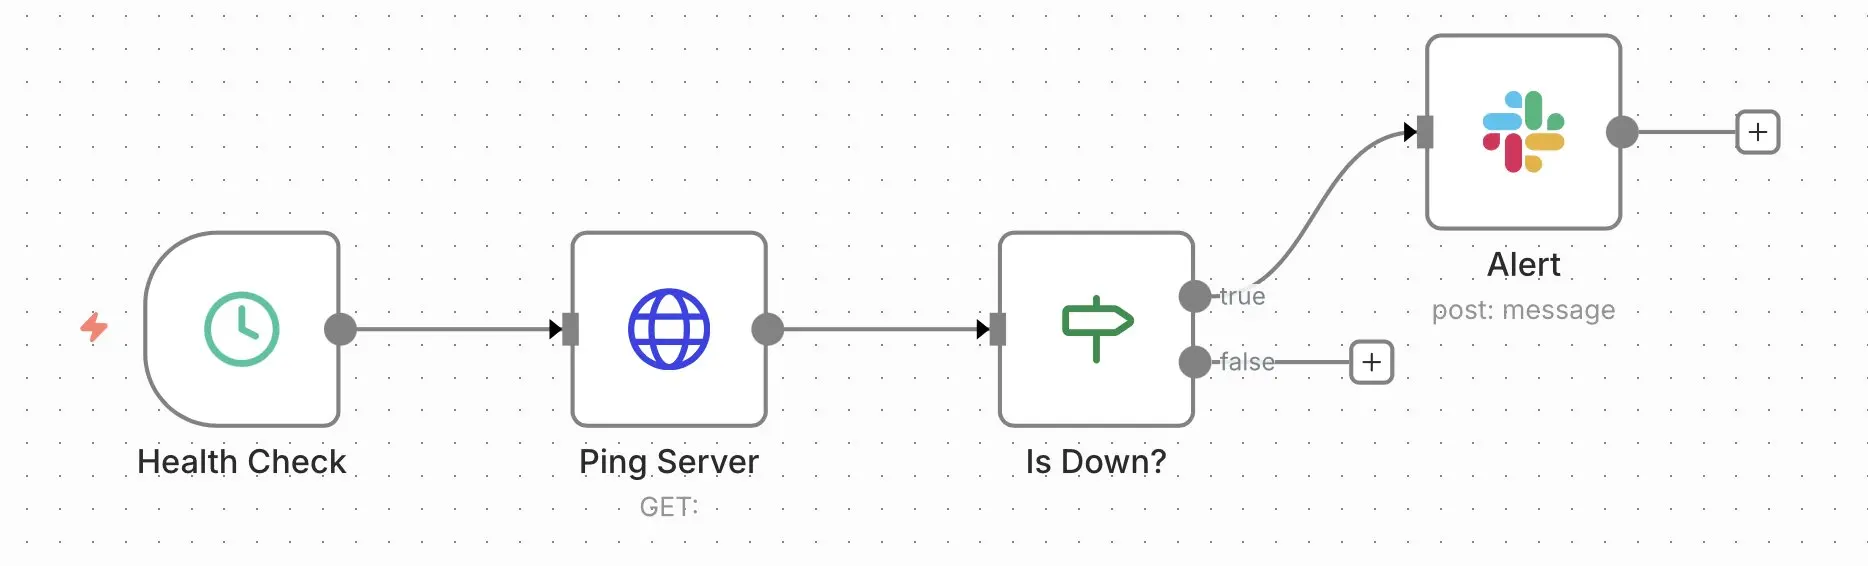
This workflow checks your servers at regular intervals, so it works well for IT teams or anyone running websites. It looks at key signals like availability and status codes. If something goes wrong, you are notified right away. This allows you to react quickly and reduces downtime. Alerts can be sent through Slack, email or other tools.
How to build this workflow:
- Schedule node for timings: Use the Schedule node to run checks at set intervals so your servers are monitored around the clock.
- HTTP Request node for status checks: The HTTP Request node sends a request to your server to check if your server is reachable and how it responds. You can use the HTTP status code to check if the server is working and how fast it responds.
- IF node for errors: The IF node checks if the server response matches what you expect, e.g. a status code of 200. If something’s wrong, it triggers an alert.
- Slack node for alerts: The Slack node sends a message to your channel when something goes wrong, so your team can act right away.
Track job applications automatically
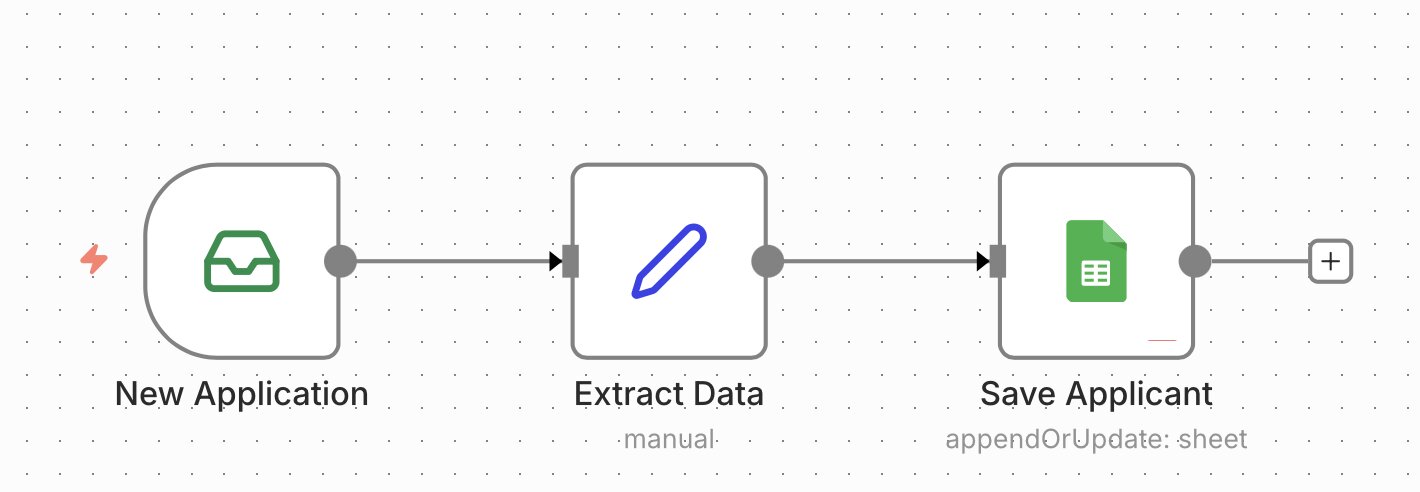
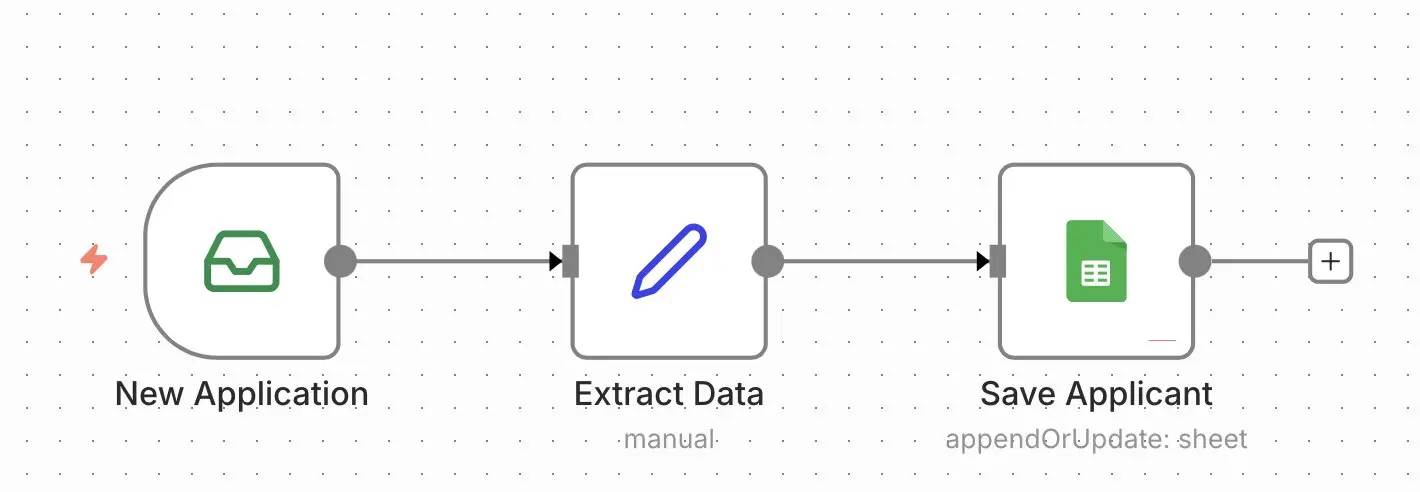
This workflow pulls job applications from your inbox and stores them in a single place. It extracts details like name, position and contact info and saves them in a table. This gives you a clear overview of all applications. You can update statuses manually or automate them later. This workflow makes the hiring process easier to manage, making it a good option for HR teams or for managing your own job search.
How to build this workflow:
- Email node for applications: The Email node monitors your inbox and automatically detects new applications.
- Edit Fields node for data: The Edit Fields node organises the data and maps it to the right fields.
- Google Sheets node for storage: The Google Sheets node saves each application in a spreadsheet. You can then view, filter and update the data as needed.
Collect and analyse customer feedback automatically
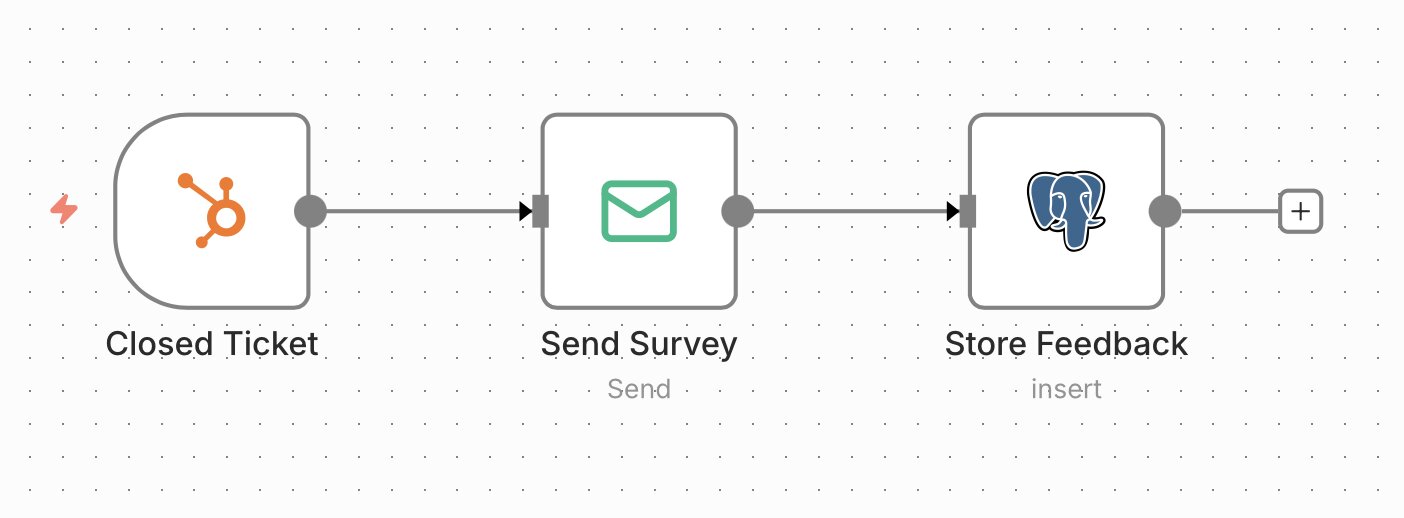
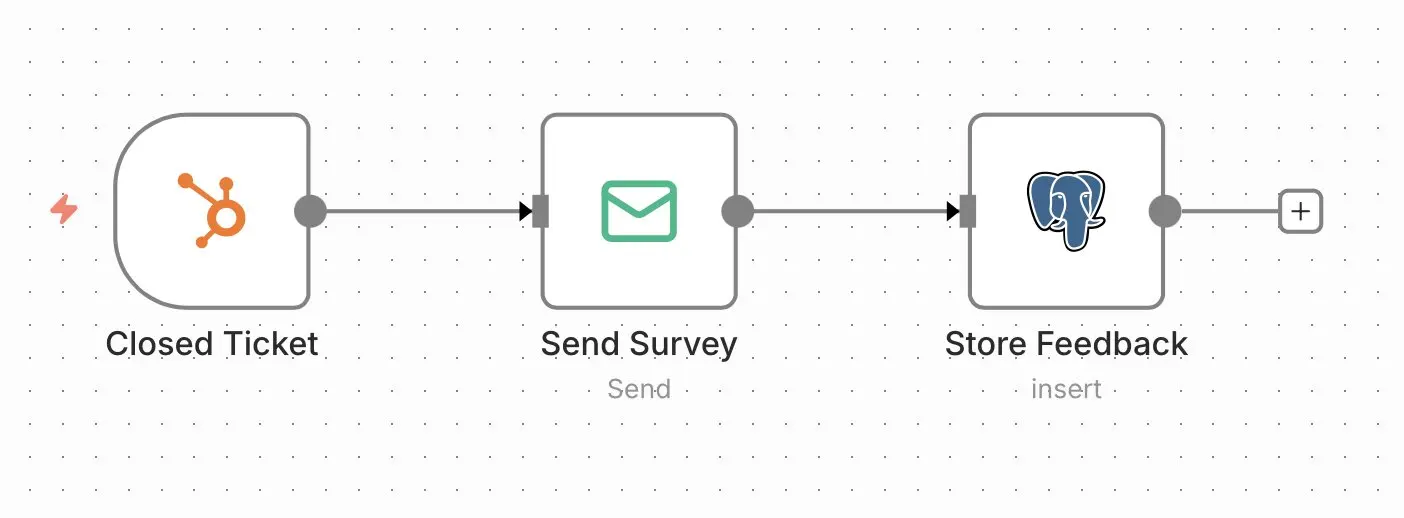
This workflow collects feedback after support requests have been completed. It works well for support teams as well as service-based businesses. The CRM triggers a feedback request, which is then emailed to customers. When responses come in, they are stored and analysed so you can see how satisfied your customers are. This gives you a better sense of what’s working and helps you improve your service over time.
How to build this workflow:
- CRM node as a trigger: The CRM node triggers the workflow when a ticket is closed or a request is completed.
- Email node for feedback request: The Email node sends a feedback request. You can include questions, rating links or short surveys.
- Database node for storing responses: The database node stores the responses in a database. You can then review the data over time and use it for reports or dashboards.


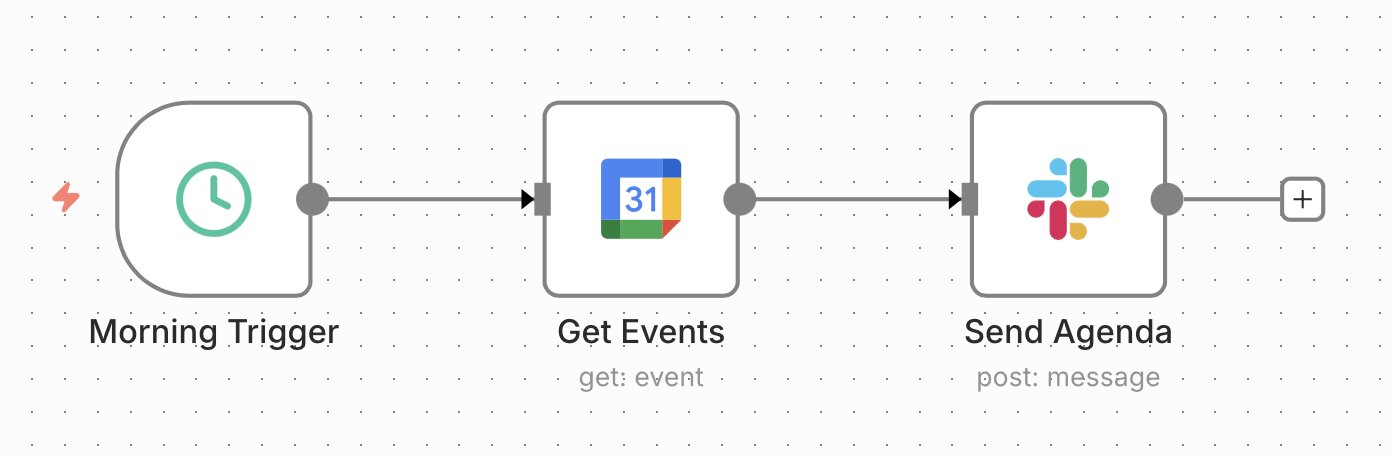
Send a daily agenda based on your calendar via Slack
This workflow gathers all events for the day and creates a daily agenda. It sends the agenda every morning either to a Slack channel or to individuals, so you can quickly see what’s coming up. This makes it easier to plan your day and keep track of upcoming meetings, especially for teams with busy schedules.
How to build this workflow:
- Schedule node for timings: Use the Schedule node to run the workflow at the same time each day, say every morning at 8 a.m. This way, the agenda is sent out at a set time.
-
- Google Calendar node for events: The Google Calendar node pulls all events for the day, including title, time and description, and formats them into a clear list.
- Slack node for sending: The Slack node sends the agenda to a channel or an individual so everyone can quickly see what’s coming up.
Sync data between tools automatically
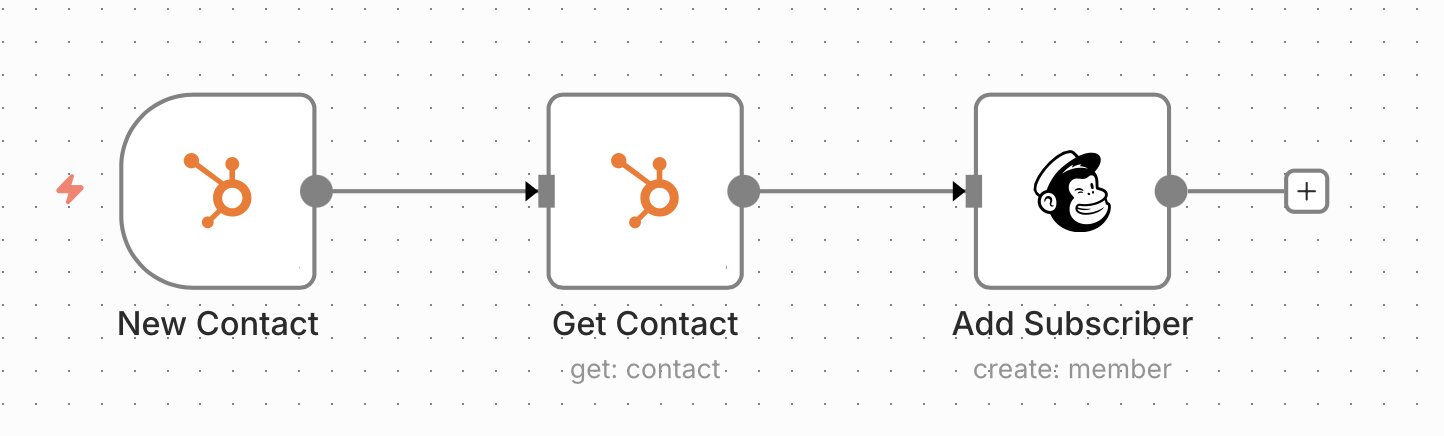
This workflow keeps data in sync across different tools. When something changes in one tool, for example in your CRM, the update is sent to the other one right away. This keeps your data consistent and up to date, while reducing manual work and errors. It’s one of the most common ways to use n8n and works especially well if you use a lot of different tools.
How to build this workflow:
- Trigger node for changes: The Trigger node runs the workflow as soon as data changes in an app, like when a new contact is created or updated. This makes sure updates are handled right away.
- Source app node: This node pulls data from the source app. You can choose which fields to include or skip.
- Target app node: This node sends the data to the target app and creates or updates records there, so both systems stay in sync.
Build an AI-powered support chatbot
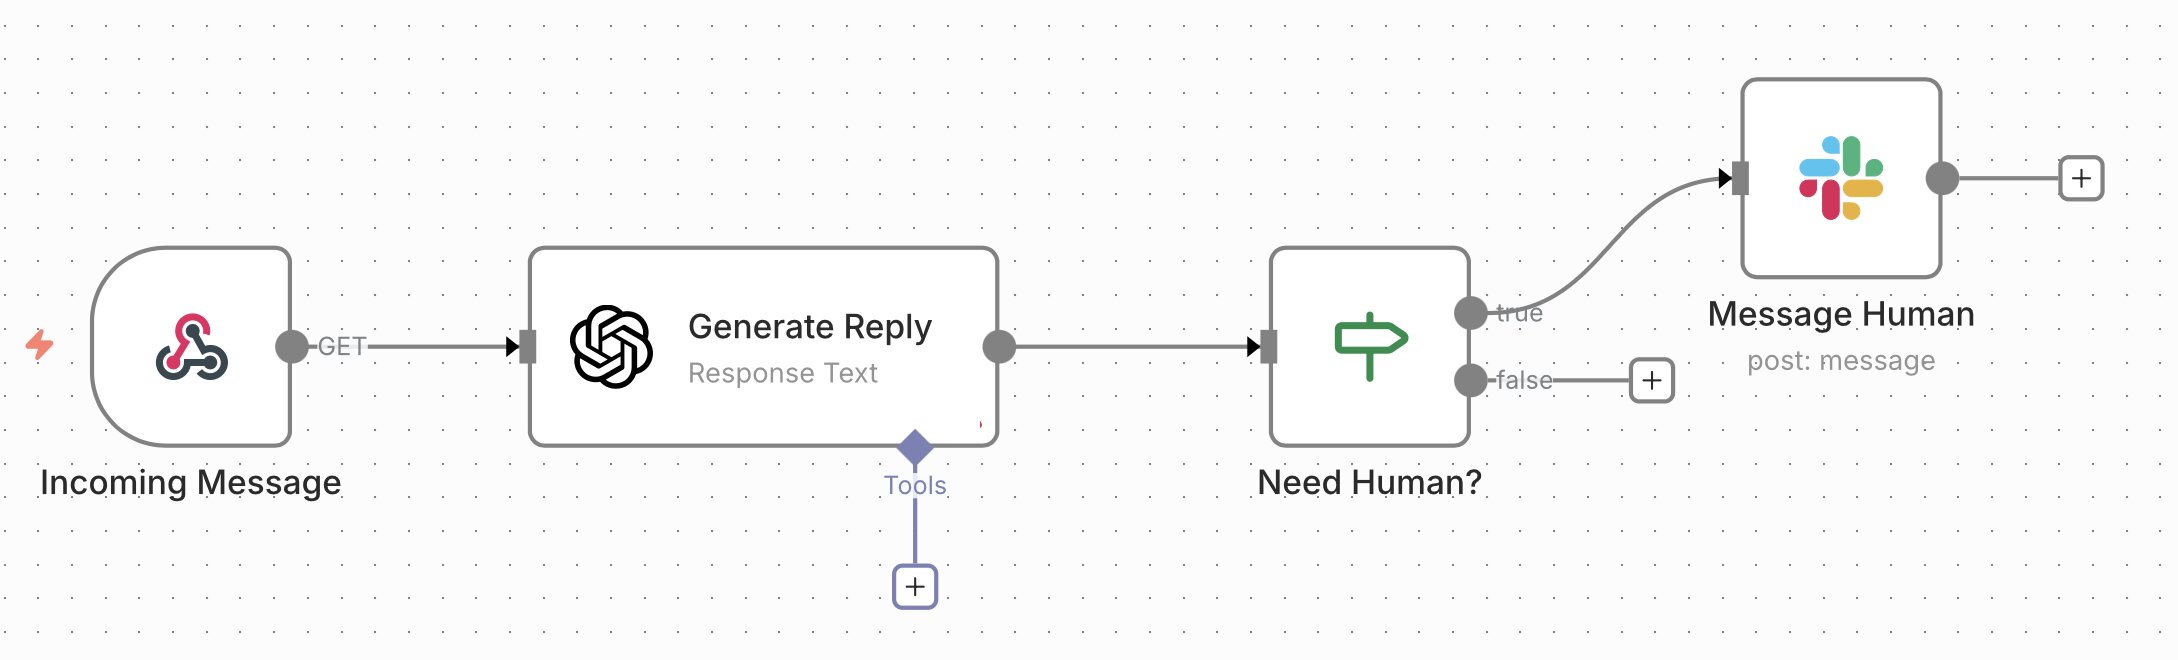
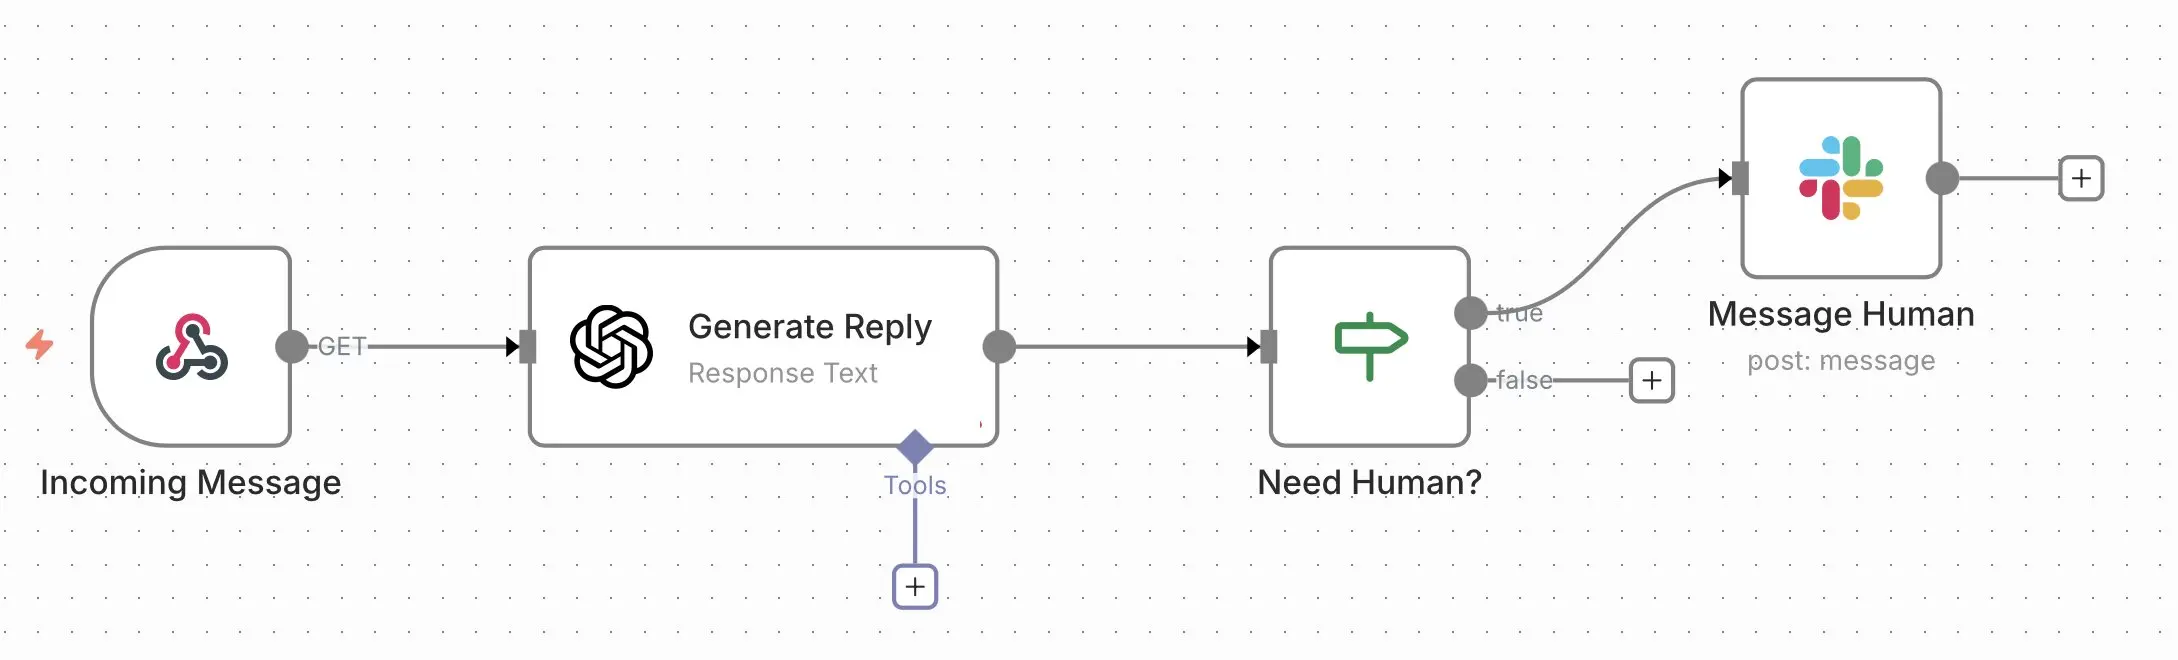
This workflow uses AI to handle incoming support requests automatically. It reads each request and sends a reply without any human input. If a request is more complex or the AI isn’t sure how to answer, it’s forwarded to your support team. This takes the pressure off support staff and helps you respond faster. With the right prompts, you can control the quality and style of the replies. This particular workflow works well for companies that deal with a lot of recurring requests.
How to build this workflow:
- Webhook node for requests: The Webhook node receives incoming requests from live chat, forms or messaging apps. As soon as something comes in, it kicks off the workflow.
- OpenAI node for responses: The OpenAI node reads the request and generates a reply. You can tweak how it responds (e.g. its tone or level of detail) by adjusting the prompt.
- IF node for routing: The IF node checks if the AI’s response is good enough to send. If not, it passes the request on to the next step.
- Slack or Email node for handoff: If the AI can’t fully answer the request, it’s sent to your support team so someone can take over.
Reviewer

Christian Heldmaier
Christian Heldmaier is an experienced online marketing and SEO specialist from Karlsruhe. He has been working as an SEO Manager at IONOS since July 2020.