The Excel FIND function
If you use Excel often, you’re already aware of its numerous useful functions. Many of these formulas perform calculations or analyse data. However, if you want to make life easier when working with large data sets, you should know about the FIND function. What is the syntactical structure? How do you use the function? And what’s the difference between FIND and FINDB? You can find this out and more in the following article.
What is the Excel FIND formula used for?
It’s easy to lose track of things when working in large spreadsheets with hundreds of rows. Like all other Office products, Excel has a built-in search function. But that isn’t always what you actually need. The search function automatically searches the entire document, meaning you can’t narrow down the range. More importantly, you can’t use the returned values in other functions. You can’t forward the search result because the search function operates only on the interface.
But if you want to search within specific cells and integrate the search directly into your worksheet, you can use the FIND function. Simply enter the word or phrase and the function to find the location of the first occurrence of your search term in the text string (meaning the text in the cell).
The FIND function in Excel is a building block with a range of further applications. Combine FIND with other functions to unlock its full potential. For example, you can use it to see whether a certain term appears in your worksheet or to extract specific parts of a text string.
You can also use VLOOKUP as an alternative search function in Excel.
Excel FIND function – the syntax explained
The syntax of FIND isn’t very complex. In the standard version, you only have to specify two arguments: What do you want to find? And where do you want to find it?
=FIND(Find_Text)You can also customise your search to start at a specific character:
=FIND(start_num)You can use the parametres to specify various information:
- Find_text: This is the text string you want to find. You have to enclose the text in quotes. You can also specify the cell containing the text. This parametre is always case-sensitive.
- Within_text: This parametre specifies the text within which you want to search. You typically specify a cell containing the text. You could also type the text directly into the formula. In that case, you also have to enclose it in quotes.
- Start_num: You use a numerical value to specify the character where the search is to start. This parametre is optional. If you don’t enter this value, the search will start at position 1.
The FIND function is case-sensitive and does not support wildcards. To get around this restriction, you can use the SEARCH function.
Excel returns a number as the result. This value tells you where the search string begins, meaning the first occurrence from left to right. If the term occurs again in the cell, the FIND function will disregard it by itself. To find further positions, you have to use nesting. The returned value counts every single character, including spaces. The number indicates the position of the first character of the returned string. This means that the first letter or number of the search is counted in the result.
Besides FIND, Excel also offers the FINDB function. Both functions achieve the same results and have identical syntax. They only differ in the character sets they support. FIND only works with single-byte character sets (SBCS). This includes the Latin alphabet. If you use Asian characters from Chinese, Japanese and Korean (CJK), use FINDB because it supports double-byte character sets (DBCS) for these languages. Each character is encoded in two bytes, so counting is adjusted accordingly.
To work faster in Excel, you should learn the most important Excel shortcuts.
The Excel FIND function in practice
For many users, the purpose of this function is not always immediately apparent. Finding the position of a search term within a text doesn’t seem all that useful at first. But the true power of this function is revealed when used in combination with other functions.
FIND & FIND: Nested groups
Suppose we want to find the second, third or nth occurrence of the search term rather than the first.
=FIND(Searchtext;Text;FIND(Searchtext;Text)+1)This formula shows how you can use the optional third parametre. In the start_num position of this formula, we once again insert the formula that returns the position of the first occurrence. This value plus one indicates the position at which you want the search to begin. If you then want to find a third position, nest the function again, and so on.
FIND & ISNUMBER: True or false statements
The FIND function in Excel allows you to form a true or false statement from the specified position: Does the text contain the search term or not?
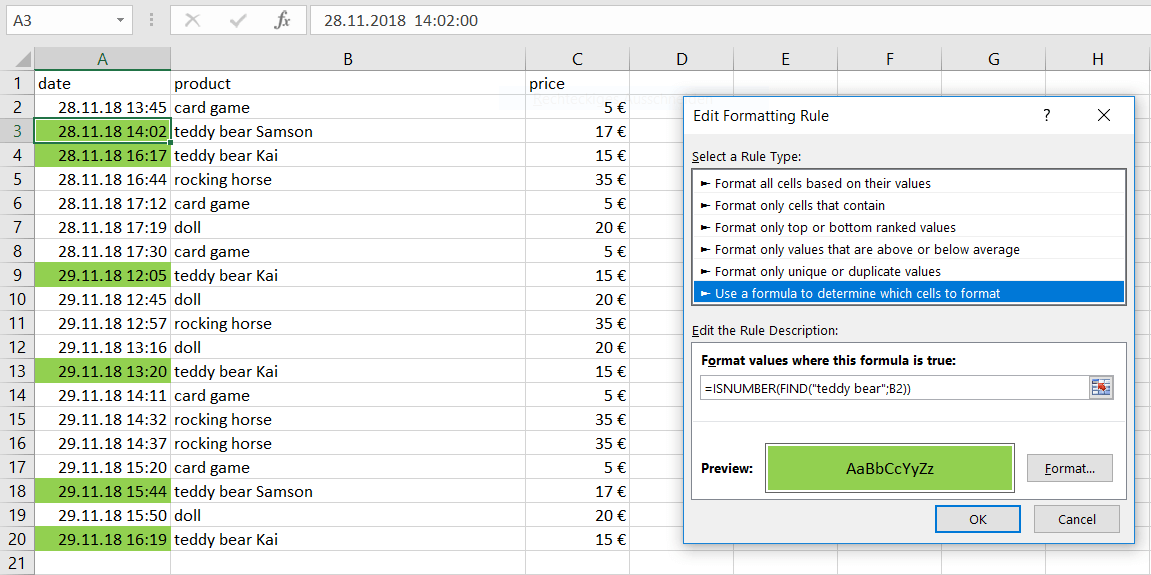
=ISNUMBER(FIND("Teddybear";B2))The ISNUMBER function returns the value TRUE if the result of FIND is a number, otherwise it will return FALSE. Since the FIND function in Excel specifies the position of the term as a whole number, the ISNUMBER function can respond to it. If the text does not contain the search term, FIND returns an error message, which of course is not a number, and ISNUMBER responds accordingly with FALSE.
You may also be interested in seeing where search terms appear. You can do this if you’ve entered data in multiple cells, such as a list of products sold. You can add this formula (like any other formula) to the conditional formatting rules. This allows you to select any sales entry related to teddy bears, for example.
FIND & MID: Extracting characters
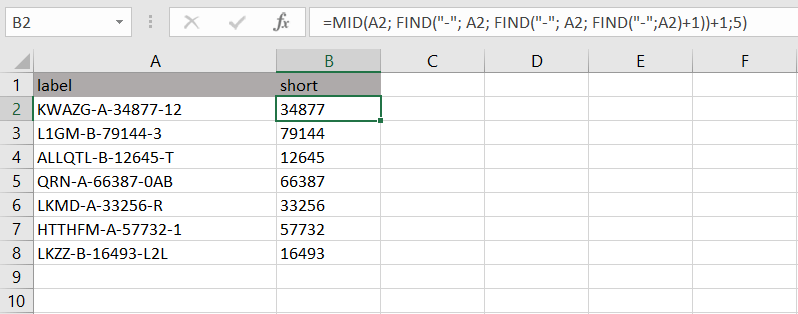
Product codes can be very long and confusing, so you may want to extract a certain number of characters from a string. Excel provides three functions for this purpose: LEFT, RIGHT and MID. These are very useful on their own, but the formulas are even more powerful when combined with FIND. Suppose your product codes always follow a specific pattern consisting of letters, numbers, and hyphens: ABCDE-A-12345-T. You want to extract the numerical part in the middle.
However, because the string does not have a fixed length, you can’t use the basic extract functions. These functions require a specific number of characters, which you can’t easily provide in this case. But thanks to the hyphens, you can use the FIND function. It gives you the position information you need.
Since there are multiple hyphens in the string, you have to nest the FIND function. In this example, we’re assuming that the number part always contains five characters.
FIND & IF: If, then, otherwise
Product codes can be very long and confusing, so you may want to extract a certain number of characters from a string. Excel provides three functions for this purpose: LEFT, RIGHT and MID. These are very useful on their own, but the formulas are even more powerful when combined with FIND. Suppose your product codes always follow a specific pattern consisting of letters, numbers, and hyphens: ABCDE-A-12345-T. You want to extract the numerical part in the middle.
However, because the string does not have a fixed length, you can’t use the basic extract functions. These functions require a specific number of characters, which you can’t easily provide in this case. But thanks to the hyphens, you can use the FIND function. It gives you the position information you need.
Since there are multiple hyphens in the string, you have to nest the FIND function. In this example, we’re assuming that the number part always contains five characters.
=PART(A2;FIND("-"; A2;FIND("-"; A2;FIND("-";A2)+1))+1;5)However, if the length is not defined, further nesting of FIND functions can be helpful. Since the string you want to find ends in a hyphen, you can search for it to determine the length.
=PART(A2;FIND("-";A2;FIND("-";A2;FIND("-";A2)+1))+1; FIND("-";A2;FIND("-";A2;FIND("-";A2)+1)+1)-FIND("-";A2;FIND("-";A2;FIND("-";A2)-1))-3)Admittedly, this formula is very confusing, but it actually manages to achieve the goal. No matter how many characters you place between the two hyphens, Excel will always extract the correct characters using the FIND function.
FIND & IF: If, then, otherwise
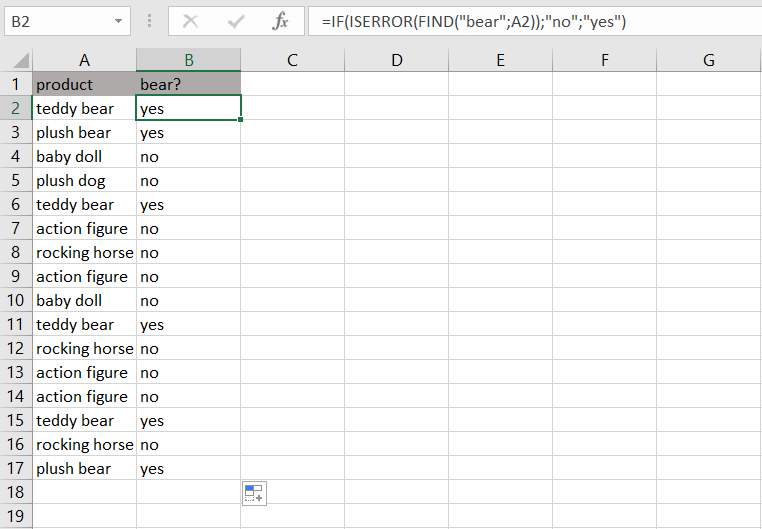
You can also easily combine FIND with IF. For example, you may want a certain action to happen if a specific string occurs in the cell. You can do this by combining IF and FIND: If the string appears, this will happen, otherwise that will happen. A problem may arise if FIND returns an error if the string does not appear. Therefore, you also have to use the ISERROR function.
=IF(ISNUMBER(MATCH(B2,A:A,0)),1,0)If the FIND function doesn’t find the search term (“bear” in this example), it returns an error message. For ISERROR, this means the condition is met and IF returns the first option: No, the search term does not appear. However, if the FIND function finds the string, it returns a number, which does not meet the condition for ISERROR. The alternative is returned: Yes, the search term appears.
FIND is a helpful function, especially when combined with other functions. It has a wide range of combination options and different applications. This small but useful function can help you solve many problems you encounter when creating formulas in Excel.
HiDrive Cloud Storage with IONOS!
Based in Germany, HiDrive secures your data in the cloud so you can easily access it from any device!


